Move Close
Welcome to zx14ninjaform.com!

You are not logged in.
New Topic Reply
Next Page

Page: 1 2 3 4

Previous Page

Thread: Vortex Rearsets

Created on: 05/19/11 09:36 PM

Replies: 78

Rook


Rook's Gravatar

Joined: 03/28/09

Posts: 20605

Vortex Rearsets
05/19/11 9:36 PM

These things are not as light as I was expecting. Now that they are assembled, not as heavy as the felt in the packaging either.

Yes I like, but increasing weight on any parts that are replaced is against my philosophy. How much you want to bet the stock parts that come off the bike are lighter than these racing upgrades?

w/o rear brake switch


With rear brake switch, exactly 1 ounce more.

see. OEM is a tad lighter.


* Last updated by: Rook on 1/1/2014 @ 4:04 PM *


'08 MIDNIGHT SAPPHIRE BLUE Now Deceased

Link | Top | Bottom

Rook


Rook's Gravatar

Joined: 03/28/09

Posts: 20605

RE: Vortex Rearsets
05/20/11 1:14 PM

Everything fits amazingly well to the bike and the parts to one another. The brake pedal snaps on so perfectly around the right foot peg it is shocking!!

I have a gripe though. Couldn't Vortex have sprung for two nuts and one screw?

The stock screw works for the shift knuckle clamp but I would like to save that with my stock gear shift lever.

IU happened to have a few 6mm nuts laying around and it works for a locknut on the shift knuckle end of the link rod. The shift lever end of the link rod is reverse thread. There is no way I am going to find reverse thread screws in any size. WTF couldn't they just throw one in the package? The setup will work with one locknut but I wish I had two.

Second gripe: The long rod does not thread into the shift lever very far before it gets stuck--that is the only thing that seems to fit poorly. The long rod is supposed to be for the farther back positions. I HAVE mine as far back and up as possible. Fortunately the short rod is long enough. The long trod must be for GP shifting setup where the shift knuckle points down instead of up.


'08 MIDNIGHT SAPPHIRE BLUE Now Deceased

Link | Top | Bottom

Rook


Rook's Gravatar

Joined: 03/28/09

Posts: 20605

RE: Vortex Rearsets
05/20/11 1:15 PM

.and yes, so far, the stocks are slightly lighter than the Vortex. will scale show pics later


'08 MIDNIGHT SAPPHIRE BLUE Now Deceased

Link | Top | Bottom

Edgecrusher


Edgecrusher's Gravatar

Joined: 02/22/11

Posts: 1272

RE: Vortex Rearsets
05/20/11 1:18 PM

.and yes, so far, the stocks are slightly lighter than the Vortex. will scale show pics later

I was beginning to think you were slipping...


RIP 08 Special ED ZX-14
2004 Electra-Glide Classic Peace Officer Black, Rineheart true-duals, HID with Hella headlight bucket, Goodridge SS brake lines, saving for DJ PowerVision FI controller and K&N large cap. kit.
2004 Suzuki Katana 750 (wife's but doesn't ride anymore) (fo sale), Hindle exhaust, K&N air, Dark metallic blue w/ blue led accent lighting.
1983 Suzuki GS750ES under construction(perpetually)

Link | Top | Bottom

Edgecrusher


Edgecrusher's Gravatar

Joined: 02/22/11

Posts: 1272

RE: Vortex Rearsets
05/20/11 1:19 PM

BTW did you get a new scale ??!!hehe


RIP 08 Special ED ZX-14
2004 Electra-Glide Classic Peace Officer Black, Rineheart true-duals, HID with Hella headlight bucket, Goodridge SS brake lines, saving for DJ PowerVision FI controller and K&N large cap. kit.
2004 Suzuki Katana 750 (wife's but doesn't ride anymore) (fo sale), Hindle exhaust, K&N air, Dark metallic blue w/ blue led accent lighting.
1983 Suzuki GS750ES under construction(perpetually)

Link | Top | Bottom

trainedkilla


trainedkilla's Gravatar

Location:

Fort Mitchell, AL

Joined: 05/15/11

Posts: 127

RE: Vortex Rearsets
05/20/11 6:14 PM

Those look real nice! Mine should be here tomorrow.


2010 Special Edition Black/Titanium. Muzzy M10 Full System, PCV, F.A.I.C Map, NGK 9EK plugs, Vortex Shorty Levers, Vortex Rearsets, Vortex Rear Sprocket (43T), SpeedoHealer, EK ZZZ Chain, K and N Air and Oil Filter, Fender Eliminator, Smoked Rear Turn Signals, Galfer SS Brake lines (front and rear), Carbon Fiber Ram Air Covers, Custom Airbrushed Front Cowl, Driven Grips, Secondary Flies removed , blocked PAIRs and LC frame plugs.

Link | Top | Bottom

scottjkyl


scottjkyl's Gravatar

Location: east jordan,mi

Joined: 06/26/09

Posts: 1851

RE: Vortex Rearsets
05/20/11 8:57 PM

rook they didnt come with my set either just call them they will ship those 2 lock nuts right out to you free of charge yes even the left hand threaded 1 too lol


08 zx14se Brocks CT Duals, Brocks street map, Driven 16/43 sprockets,EK ZZZ Chain,MRA Windscreen, Roaring Toyz Diamond Cut Grips Pingel Elec shifter, Hyper-Pro RSC Damper, BlackChrome Wheels, Sargent Seat,Factory Pro Velocity Stacks,PCIII USB,Bonneville Pro, TPX Radar/Laser Detector, TPX Laser Jammer, Goodridge Shadow series braided lines front and rear, Rifleman 1/5 turn throttle, Fusion LED Stage IV Kit, DDM HID's 10,000k

Link | Top | Bottom

Rook


Rook's Gravatar

Joined: 03/28/09

Posts: 20605

RE: Vortex Rearsets
05/20/11 9:19 PM

BTW did you get a new scale ??!!hehe

Actually, yes I did, edge. The old scale is accurate to 100th / ounce but only goes up to 2lbs. I needed something to do heavier duty weighing so I got the Salter which is only accurate to a tenth /ounce but weighs up to 15 lbs.

both very accurate -- I tested with brass weights and they are dead on.


Those look real nice! Mine should be here tomorrow.

The installation is simple but adjusting the link rod on the gear shifter is a PITA. The only way I got it to the right length was to take the shift lever off and screw it in all the way. Then screw the other end into the shift knucle on the shaft into the gear box. Then put the lever back on. I used the longer link rod that comes with the kit.

If you raise and set back as far as possible, you will want to use the longer rod. The short will not allow you to get the lever adjusted to a low enough height---you'll see.

IMO, raising and setting back to max is not too dif from stock. I road the bike with one rearset on and one stock peg. Couldn't really tell the dif until I paid close attention. Could feel that one knee was a tiny bit higher. Not nearly as much of a change as I expected.

The ends of the rods are not the same on both ends. One end has reverse threads and they are very tight threads. Quite difficult to work with. I imagine Vortex makes it so tight because they know no one will ever find a reverse thread nut to lock the threads....so they make the threads real tight. I had to cover the rod with a rag and grab with a pliers to twist it. I was out in the ge-rage all bloody afternoon until night.

The shift knuckle also fits very tight on the splines of the shaft. I would not recommend pushing that on all the way until you know you have it at the best angle. Might want to adjust it so that you can get the link rod to the proper length so the shift lever is where you need it. I stuch the blade of a screwdriver in the crack and twisted a bit while pressing it on the splines. Don't think rapping with a hammer be a good idea AT ALL-- pushed in shifter shaft is a common damage caused by a tip over. Hate to have that happen just by installing rearsets. Twist and press. I used some never-seize on the splines so it will hopefully come off easy when needed.


I wouldn't tighten anything until you know it is all set. Unfortunately, you are likely to have to take the stuff apart more or less to get everything to adjusted perfectly.

Use blue locktight on everything (not the link rod or you will have a dickens of a time taking it apart) after you know you have it set up right. I believe Vortex recommends locktight because they do not want the screws to be torqued in the soft aluminum-----just a hunch because they show T-handle hex tools in the instructions. No wrenches.


One last thing---careful when you rip open the plastic. There are some very thin metal gaskets that go on the pegs and they can get wrinkled very easy. Thicker than foil but not by much.


* Last updated by: Rook on 5/20/2011 @ 9:24 PM *


'08 MIDNIGHT SAPPHIRE BLUE Now Deceased

Link | Top | Bottom

Rook


Rook's Gravatar

Joined: 03/28/09

Posts: 20605

RE: Vortex Rearsets
05/20/11 9:26 PM

The shifting is just as smooth and sure as the stock pedal which is a surprise. I thought the link rod would make it feel less positive. Not at all. The shifter is much stiffer the knob at the end feels more solid than the rubber grip on the stocker. The area around the toe and lever feels much more open. Will be much better for riding boots.

I stuck with standard shifting but I will prolly switch to reverse pattern GP shifting soon....when I can bring myself to go through all this adjusting crap again.

Tomorrow night maybe I will get the brake side done. I hope it is easier.


* Last updated by: Rook on 5/20/2011 @ 9:33 PM *


'08 MIDNIGHT SAPPHIRE BLUE Now Deceased

Link | Top | Bottom

Grn14


Grn14's Gravatar

Location: Montana

Joined: 02/25/09

Posts: 15511

RE: Vortex Rearsets
05/20/11 10:01 PM

They're very nice looking Rook..sorry they didn't end up being as cool as you hoped.Oh well...such is life buying MOTORCYCLE parts.I know the feeling.They are cool though.Very techno looking.At least they don't perform....LESS...than your original setup....(do they? )


I'm only curious here.What actually are they supposed to do?The main selling feature?The idea of a non-foldable peg,hmmm...that to me doesn't sound too encouraging if you're into leaning.

Also,as I was looking at yours there...I see the bolts going into the ?rear set block",the one with the adjustment holes.Okay...the have the attachment bolts(on the adjustable part)going vertically,not horizontally.So the forward rearward adjustment appears very limited.And that scenario also seems to be a limiting factor on height adjustment as well.Am I missing something here?If you attempt to raise the adjuster past,you can only go so far and then the only thing holding it on would be the one bolt...yes?Maybe there should be another bolt like right in the center at that raised(or cutout) area of the plate.IDK...just sayin.


What is the height,lowering span of those?


* Last updated by: blue07 on 5/20/2011 @ 10:14 PM *

Link | Top | Bottom

Rook


Rook's Gravatar

Joined: 03/28/09

Posts: 20605

RE: Vortex Rearsets
05/21/11 4:14 AM

At least they don't perform....LESS...than your original setup....(do they? )
They are a lot more grippy. The feel to the gear shift is a bit better, IMO and I'm sure much better with motorcycle boots. The only thing worse is the nonfolding pegs. I have never touched a peg. Something I have to think about now. Some day, I may slice the pegs at an horizontally at an angle so that the outside edge is higher. Might pick up 1/2 inch of clearance.

So the forward rearward adjustment appears very limited.And that scenario also seems to be a limiting factor on height adjustment as well.
There seems to be quite a bit less range of adjustment on ZX-14 rearsets than other bikes for some reason. I have mine adjusted all the way up and all the way back in the photo and that is how I put the one on the bike yesterday. NOT a big diff in rider position. Perhaps the lower and frward positions feel more pronounced. ???? That is not the position I am after, however.


Maybe the 1/2-3/4 inch dif matters tpo some riders. There was such a bunch of talk about the dif between rider position between the busa and the 14. I really hardly can tell between the two bikes. Maybe I am just easier to please>


'08 MIDNIGHT SAPPHIRE BLUE Now Deceased

Link | Top | Bottom

Romans


Romans's Gravatar

Location: Toronto,ON

Joined: 02/13/09

Posts: 5926

RE: Vortex Rearsets
05/21/11 5:06 AM

Quite difficult to work with. I imagine Vortex makes it so tight because they know no one will ever find a reverse thread nut to lock the threads....so they make the threads real tight. I had to cover the rod with a rag and grab with a pliers to twist it. I was out in the ge-rage all bloody afternoon until night.

Rook somethings wrong, this does not sound right to me???????????????

There is a forward and reverse thread as it is set up to work like a turn buckle. I left my jam nuts lose and rode around for a few days adjusting at stop lights with a turn of my finger with Gloves On. Very very easy to do.

Both starting threads are designed to start in the banjos at the Exact same time for easy adjustment. No pliers needed (Yikes)

I could not find her sweet spot for a while. Still trying High Low positions. If you got it thats great but Check for burs on threads inside and out. Something is not right but sounds easy to fix with tap and di.

Link | Top | Bottom

Rook


Rook's Gravatar

Joined: 03/28/09

Posts: 20605

RE: Vortex Rearsets
05/21/11 11:01 PM

sounds easy to fix with tap and di.

Ya prolly do that if I need to but as long as the OEM parts are okay I won't bother about it. If I fiddle with it enough, perhaps it will loosen up. As for now, I will just consider the anti-loosening quality a bonus. I saw no slivers of metal. I do not know why it was so hard except that tge ther=read was not quite right. The hard the=reads look a bit fatter than the other side. Prolly could have chased the threads on the rod and it would have been perfect but I have no access to that threading equipment any more. the shift rod works. That's all that matters. I don't think I will be changing the position of the pegs so it is set.


BTW, I really like those blackies. The silvers are very bright. Wish they were a bit darker like the color of the stock heel guards. I may paint parts of them darker some day. I can't leave anything alone. End up modding my mods. for crying out loud.


'08 MIDNIGHT SAPPHIRE BLUE Now Deceased

Link | Top | Bottom

bgordon

Forum Administrator

bgordon's Gravatar

Location:

Grand Junction, CO

Joined: 07/19/09

Posts: 1520

RE: Vortex Rearsets
05/22/11 4:58 PM

I stuck with standard shifting but I will prolly switch to reverse pattern GP shifting soon


I'll be interested to know if you can get the GP shifting to work. I tried, but the side stand is in the way... -bg


* Last updated by: bgordon on 5/22/2011 @ 4:58 PM *

Link | Top | Bottom

Rook


Rook's Gravatar

Joined: 03/28/09

Posts: 20605

RE: Vortex Rearsets
05/22/11 11:32 PM

^^HMmm? Don't see that it will work for me either. Thanks for the tip--before I took everything all apart again.

the pic Romans poste right above shows the problem of GP shifting


* Last updated by: Rook on 5/23/2011 @ 12:26 AM *


'08 MIDNIGHT SAPPHIRE BLUE Now Deceased

Link | Top | Bottom

bgordon

Forum Administrator

bgordon's Gravatar

Location:

Grand Junction, CO

Joined: 07/19/09

Posts: 1520

RE: Vortex Rearsets
05/23/11 9:13 AM

Thanks for the tip--before I took everything all apart again.


Glad I could help. Yes, it was kind of a waste of time... -bg

Link | Top | Bottom

Rook


Rook's Gravatar

Joined: 03/28/09

Posts: 20605

RE: Vortex Rearsets
05/23/11 7:21 PM

rook they didnt come with my set either just call them they will ship those 2 lock nuts right out to you free of charge yes even the left hand threaded 1 too lol

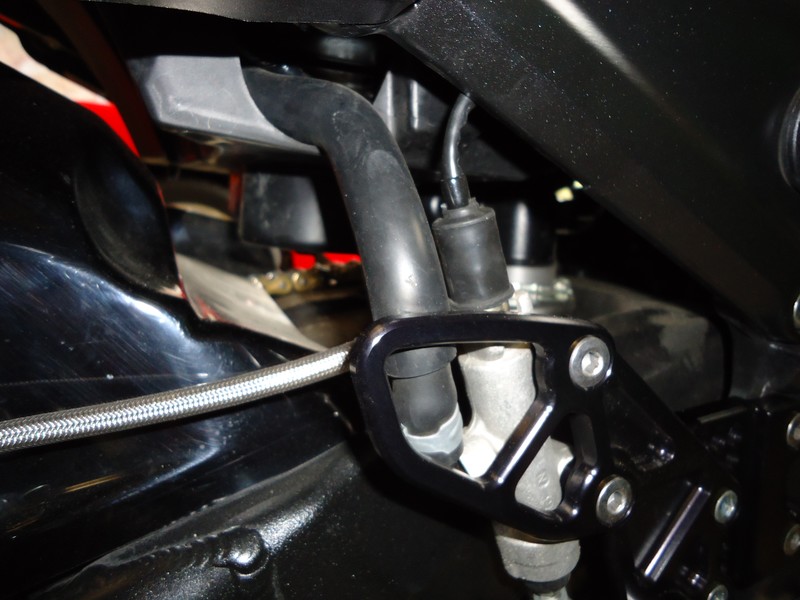
Thanks, Scotty. I am also going to grumble about the fact that they did not include new screws to attach the master cylinder to the heal guard. The OEMs work just fine but sheeze, fellas, it says in the directions to use the new screws which are included (but they aren't).

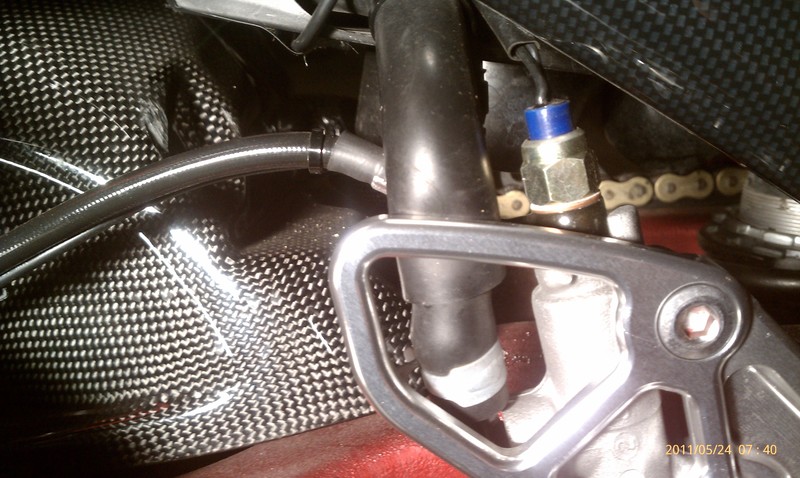
Have completed install except for rear brake light switch. I am still baffled about what that thing screws into or if I even have the right part.

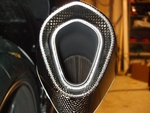
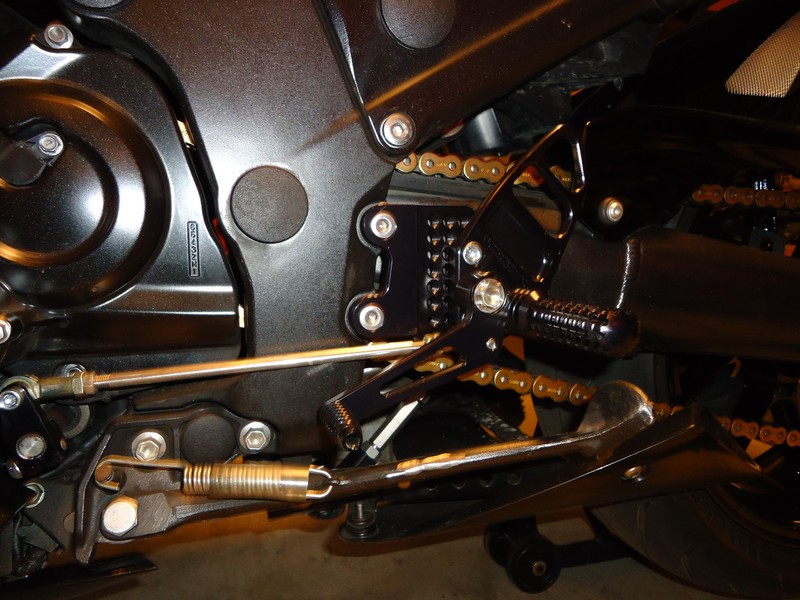
On the upside, I am totally impressed with the improved clearance of the Vortex pegs. They do not feel all that dif to me but there will be a big dif in cornering clearance. I did some measuring and it appears that when the Vortex pegs are raised to the top hole, the lowest point is over 3/4" higher than the the lowest point on the OEM pegs (that is even if you removed the OEM feeler peg and ground the bung flush.)

OEM, on rear stand, Sixteen and 3/16" from ground

Vortex, highest position, on rear stand, 17" from ground. 13/16" higher than OEM

The Votex' have over 3/4" more clearance. Take a grinder and bevel the bottom tip of the Vortex and that will add another 3/8"-1/2" clearance for good measure.

More astounding is the length. Careful measuring tells me the head of the rearset screws are the same distance from the frame with OEM rearsets or Vortex (Vortex is actually ~ 1/32" farther from frame and I took that into consideration when calculating the difference in length).

OEM length from rearset screwhead, five and 5/16 inch. The steel ruler is just there as a "plumb line." I had to eyball the perpendicular from the tip of the footpeg to the tape measure. The perspective distortion in the pic makes it appear as though the ruler is not perpendicular but that is an illusion. I measured this several times with the same result.

Vortex length from rearset screws, Four and 3/16 inch!
http://s461.photobucket.com/user/Rookzx/media/2008%20ZX-14/Body%20and%20Exterior%20Parts/controls/Vortex%20rearsets/lthVtxrst.jpg.html

The last two rows of the Vortex grip teeth seem to be made to break away or bend on contact with the ground. There is a channel of reduced diameter. This could also easily be sawn off to reduce length. Under those circumstances, my pipe would surely scrape before the peg did.

I don't think these bad boys are going to ever touch down unless the tires let go first.


* Last updated by: Rook on 1/1/2014 @ 4:27 PM *


'08 MIDNIGHT SAPPHIRE BLUE Now Deceased

Link | Top | Bottom

Rook


Rook's Gravatar

Joined: 03/28/09

Posts: 20605

RE: Vortex Rearsets
05/23/11 9:56 PM

When I first started the rearsets project it seemed so simple that I didn't think it would be of much help to anyone if I took pics to show installation. Now I am having second thoughts. There are a number of issues that have come up. I think I remember reading a thread on the old forum about this and the weird threads on the long rod and non-inclusion of hardware was mentioned. Also, the clearance improvement was measured and explained much the same as I did today. That was a thread that answered many questions for me a few years back but it was lost and I forgot about it. Glad we can revisit the same ideas again and solve the problems. Hopefully that will help others who are considering the cost and benefits of owning Vortex rearsets on their 14.

Next problem to solve: Rear brake reservoir tube gets squashed between heel guard and rear brake line. I think I could remove the coupling on the top of the master cylinder and turn it so the protrusion was situated between the two protrusions on the mastercylinder. I can't think of any other way to do it.

I have the master cylinder detached now. I'm afraid the tube will permanently deform if I leave it squashed as it is shown in the pics above.

Last problem:
I haven't got the slightest idea how the pressure switch is installed so the rear brake light will work. Was I shipped the wrong part? It must be something entirely different than the OEM setup. If anyone knows where this thing goes, please let the rest of us know.


* Last updated by: Rook on 1/1/2014 @ 4:30 PM *


'08 MIDNIGHT SAPPHIRE BLUE Now Deceased

Link | Top | Bottom

Edgecrusher


Edgecrusher's Gravatar

Joined: 02/22/11

Posts: 1272

RE: Vortex Rearsets
05/24/11 5:06 AM

It should go where the banjo is on the rear master, Rook. And yes it looks like it is different from stock. Stock must use a mechanical switch that is actuated by a spring. Vortex uses a hydraulic pressure switch mounted in the banjo bolt which is what you've got there.

Can't you just run that reservior tube on the inside of the brake line?

Man their instructions must suck!


* Last updated by: Edgecrusher on 5/24/2011 @ 5:11 AM *


RIP 08 Special ED ZX-14
2004 Electra-Glide Classic Peace Officer Black, Rineheart true-duals, HID with Hella headlight bucket, Goodridge SS brake lines, saving for DJ PowerVision FI controller and K&N large cap. kit.
2004 Suzuki Katana 750 (wife's but doesn't ride anymore) (fo sale), Hindle exhaust, K&N air, Dark metallic blue w/ blue led accent lighting.
1983 Suzuki GS750ES under construction(perpetually)

Link | Top | Bottom

Jeff01ss


Jeff01ss's Gravatar

Location: Missouri

Joined: 04/29/09

Posts: 724

RE: Vortex Rearsets
05/24/11 5:37 AM

I just installed a set on my wife's cbr and I didn't think instructions were at all necessary.


The problem with the world today is that there is no one to eat the stupid people!

You taught me hate, I'll teach you fear!

Link | Top | Bottom

scottjkyl


scottjkyl's Gravatar

Location: east jordan,mi

Joined: 06/26/09

Posts: 1851

RE: Vortex Rearsets
05/24/11 5:43 AM

rook when /if you install rear ss brake line that will fix your problem


08 zx14se Brocks CT Duals, Brocks street map, Driven 16/43 sprockets,EK ZZZ Chain,MRA Windscreen, Roaring Toyz Diamond Cut Grips Pingel Elec shifter, Hyper-Pro RSC Damper, BlackChrome Wheels, Sargent Seat,Factory Pro Velocity Stacks,PCIII USB,Bonneville Pro, TPX Radar/Laser Detector, TPX Laser Jammer, Goodridge Shadow series braided lines front and rear, Rifleman 1/5 turn throttle, Fusion LED Stage IV Kit, DDM HID's 10,000k

Link | Top | Bottom

Romans


Romans's Gravatar

Location: Toronto,ON

Joined: 02/13/09

Posts: 5926

RE: Vortex Rearsets
05/24/11 7:17 AM

rook when /if you install rear ss brake line that will fix your problem

2ND


Last problem:
I haven't got the slightest idea how the pressure switch is installed so the rear brake light will work. Was I shipped the wrong part? It must be something entirely different than the OEM setup. If anyone knows where this thing goes, please let the rest of us know.


Rook it is a pressure switch not a spring activated micro. The Brake fluids pressure will make up the contacts.


1. Remove Rear set.
2. Remove old system (Spring hooks wires)
3. Follow wires up with fingers to you feel the plug then remove. Do not plug in New.
4. Remove old bolt and old Brass washers from banjo
5. Replace with the New bolted pressure switch and washers.
6. When tight you are now free to plug in the new wires
7. Reinstall rearset
8. Bleed line.

I hope this Helps. Cheers


* Last updated by: Romans on 5/24/2011 @ 8:05 AM *

Link | Top | Bottom

scottjkyl


scottjkyl's Gravatar

Location: east jordan,mi

Joined: 06/26/09

Posts: 1851

RE: Vortex Rearsets
05/24/11 8:59 AM

rook this is how ur pressure switch should look when installed. if you remove your seat youll find the switch plug going down on the right side you can pull it up and unplug the oem and plug the new one in then tuck it back down


* Last updated by: scottjkyl on 5/24/2011 @ 9:04 AM *


08 zx14se Brocks CT Duals, Brocks street map, Driven 16/43 sprockets,EK ZZZ Chain,MRA Windscreen, Roaring Toyz Diamond Cut Grips Pingel Elec shifter, Hyper-Pro RSC Damper, BlackChrome Wheels, Sargent Seat,Factory Pro Velocity Stacks,PCIII USB,Bonneville Pro, TPX Radar/Laser Detector, TPX Laser Jammer, Goodridge Shadow series braided lines front and rear, Rifleman 1/5 turn throttle, Fusion LED Stage IV Kit, DDM HID's 10,000k

Link | Top | Bottom

darryle


darryle's Gravatar

Location: ontario

Joined: 02/15/09

Posts: 1185

RE: Vortex Rearsets
05/24/11 3:25 PM

Mine will be here this week,I have a few options,Think ,instal and swear.Read instal and talk to myself,Drink instal and reference Romans


2012 14R,full hindle Evolution ,vortex rear sets,BST's with ceramic bearings,HID's,hyper pro damper and custom map 205.3 hp/120.2 torque

Link | Top | Bottom

Romans


Romans's Gravatar

Location: Toronto,ON

Joined: 02/13/09

Posts: 5926

RE: Vortex Rearsets
05/24/11 5:39 PM

few options,Think ,instal and swear.Read instal and talk to myself,Drink instal and reference Romans

Rofl, if it takes more than 20 Minutes is because the booze won you over Lol.

Takes longer to get brake pedal to proper location. I spent countless hours riding and adjusting to get the perfect setting for my foot. I now have the least amount of foot and ankle movement to work the Gears and Brakes. This is where these little beauties shine. Love em,,,, Now.

When adjusting = Gear side you can just reach down and turn with fingers for the up and down but that brake side is a bitch. Each adjustment requires you get off the bike. Now that they are set I am very happy with them. Stock has nothing on these bad boys,,, Great mod, but you do have to spend the time on set up. Not plug and play if you want the most out of them.

Link | Top | Bottom


Welcome to zx14ninjaform.com!
 
New Topic Reply
Next Page

Page: 1 2 3 4

Previous Page

New Post

Please login to post a response.