Move Close
Welcome to zx14ninjaform.com!

You are not logged in.
New Topic Reply
Next Page

Page: 1 2 3

Previous Page

Thread: Newbies' Guide to Fairing Removal

Created on: 05/17/11 12:00 AM

Replies: 59

Rook


Rook's Gravatar

Joined: 03/28/09

Posts: 20589

RE: Newbies' Guide to Fairing Removal
11/25/12 7:16 PM

Just curious here...HOW did you fix those broken tabs?I'd like to know just in case;)

Yes, do tell--? I would venture a guess it was epoxy with extra plastic piece to bridge the brake?

Glad you got them fixed. I know just how that feels when you have to have it perfect even though you know it doesn't amount to a hill of beans. heheh, even as the 14 gets older, I have to have everything in proper place.


'08 MIDNIGHT SAPPHIRE BLUE Now Deceased

Link | Top | Bottom

ZX14MAN64


ZX14MAN64's Gravatar

Joined: 08/17/12

Posts: 1237

RE: Newbies' Guide to Fairing Removal
11/26/12 12:54 PM

The two I have fixed so far are the smallest; the little tiny hooks and the tabs that they go over located is inside the front fairing part. (I learned these fragile hooks are why you slide the mid fairing *back*, ) I noticed you can access them with the dashboard panel out and the mid fairing installed. They are so small I couldn’t do much but super glue gel them back together with the parts connected and installed. Seems to hold fine as there is no stress on them being glued after they are already together.

Working on the best way to fix the others now.

Link | Top | Bottom

ZX14MAN64


ZX14MAN64's Gravatar

Joined: 08/17/12

Posts: 1237

RE: Newbies' Guide to Fairing Removal
11/27/12 5:23 PM

Used the reinforced by another piece of plastic behind the broken part method for one of the tank cover grommett tabs that broke. That along with using a soldering iron to melt and *weld* the plastic on the front of the crack. Also used more plastic as a welding rod to help strengthen the crack.


For the others side I am gonna have to make the tab from scratch as that one broke off entirely and tab and grommet are gone. At the hardware store, I found a grommet the correct size now I have to find a suitable piece of plastic to make the new tab out, shape it, get it in the precise place, of and get it firmly on the fairing. I will post the results of how well it all holds when put back together.

The two ones I need to fix are the tabs up at the very front on each side of the tank just behind the steering column. Those should be pretty easy. I had to laugh when the guy who made the above video of the blue 2102 fairing removal suggested to snip them off anyway and get em outta the way. LOL To each his own.

Stressed plastic that is already brittle is hard to repair, but I am gonna get this sucker back with ALL the tabs repaired. Or else...........


* Last updated by: ZX14MAN64 on 11/27/2012 @ 5:27 PM *

Link | Top | Bottom

Grn14


Grn14's Gravatar

Location: Montana

Joined: 02/25/09

Posts: 15511

RE: Newbies' Guide to Fairing Removal
11/27/12 6:07 PM

I won't be 'snipping' anything off my bike.It was nice of him to make a video...yup...even if he didn't actually REMOVE or install anything!LOL!!!!

I set out earlier this year to make a vid of the parts removal....my cam wasn't in the right position for it...found out AFTER.Maybe I'll do another one with my new bike...as I work on it.

Link | Top | Bottom

ZX14MAN64


ZX14MAN64's Gravatar

Joined: 08/17/12

Posts: 1237

RE: Newbies' Guide to Fairing Removal
11/28/12 6:07 PM

LOL agree.

As thin as they are and as tight as they fit, and with them being larger on the end..............those are some little $%#$#$# tabs Kawasaki put on on the inside of the dashboards on each side of the steering column. Those stock tabs are very stressed when taking them off and putting them back on.

When I make those little f****ers they are gonna have to be just straight tabs to merely slide in and out of the slots, or else they'll break off again for certain.

But I hope I don't have to take this thing apart again anytime soon to test my new tab's and their durability.


* Last updated by: ZX14MAN64 on 11/28/2012 @ 8:14 PM *

Link | Top | Bottom

ZX14MAN64


ZX14MAN64's Gravatar

Joined: 08/17/12

Posts: 1237

RE: Newbies' Guide to Fairing Removal
11/30/12 7:20 PM

One of my repairs broke off, again. Stressed plastic is so hard to repair when its that thin and brittle.

To hell with it. I am either gonna have to live with a 1/16 of an inch more gap right there, (noonoe knows there even is a gap there, unless I point it out and you look close) Or I am gonna have to just suck it up and buy both new side fairings for $195 each.

And whose to say the tabs won't bust off in getting that sucker put on !!!!! I even greased the knobs before trying to insert them in the grommet..... Still busted.


* Last updated by: ZX14MAN64 on 11/30/2012 @ 7:21 PM *

Link | Top | Bottom

Rook


Rook's Gravatar

Joined: 03/28/09

Posts: 20589

RE: Newbies' Guide to Fairing Removal
12/01/12 11:03 PM

You could look at this as an opportunity to go crazy with some wild paint scheme. LOL I'm sure the bike is too new for that but I imagine you will be ready if the urge strikes.


'08 MIDNIGHT SAPPHIRE BLUE Now Deceased

Link | Top | Bottom

ZX14MAN64


ZX14MAN64's Gravatar

Joined: 08/17/12

Posts: 1237

RE: Newbies' Guide to Fairing Removal
12/04/12 12:34 PM

Got the tabs repaired/replaced and I am good to go. I almost bought new fairing pieces, but with how brittle those suckers are, whose to say the new tabs wouldn't crack off on me, too?

I think some of you may have broken these tabs and not even realized it, as they are covered once your tank cover is snappped in place, and they don't really offer much as far as holding the tank cover down tighter.

Anyway, I am good to go and if I do have to disassemble the fairing again, I know I now have tabs that will not bust off on me. Thanks for all the help, guys.

Link | Top | Bottom

ZX14MAN64


ZX14MAN64's Gravatar

Joined: 08/17/12

Posts: 1237

RE: Newbies' Guide to Fairing Removal
12/08/12 8:07 AM

Rook wrote:

*I know just how that feels when you have to have it perfect even though you know it doesn't amount to a hill of beans. heheh, even as the 14 gets older, I have to have everything in proper place.*

Yes, the repaired parts are not going to fly. Its eating at me knowing I've got a $14000 bike with repaired parts on it.

Even though these current parts are *repaired*, that just won't cut it on a bike like this that I have taken such pride in. I've never had a new car in my life, and I want this machine to be and stay pristine, as its the first high dollar new item I've ever bought for myself.

I can see now I have to buy new fairing parts at some point before too long. I am sure alot of you feel the same way about your bikes.

Link | Top | Bottom

Grn14


Grn14's Gravatar

Location: Montana

Joined: 02/25/09

Posts: 15511

RE: Newbies' Guide to Fairing Removal
12/08/12 9:11 AM

Wish you had a pic of these snapped tabs...I can't seem to figure out exactly which ones you're talking about...and the grommet deal?How'd you snap a projection off sticking it in the grommet?(if that's what you did?)You mention a tab up by the dash...holding the ram cover piece in there?....I don't remember seeing one?

Link | Top | Bottom

jasonc32amg


Location: Florida

Joined: 10/12/12

Posts: 69

RE: Newbies' Guide to Fairing Removal
12/09/12 7:19 PM

A suggestion to those taking the fairings off for the first time, have some spare well nuts handy. The PO or dealer over tightened several and they needed to be replaced. This tutorial is a godsend. Thank you!!! It made my coolant switch to watterwetter a snap and now I feel comfortable moving on to the reed valve plates and fly removal.


12 ZX14R
12 Super Tenere

Link | Top | Bottom

ZX14MAN64


ZX14MAN64's Gravatar

Joined: 08/17/12

Posts: 1237

RE: Newbies' Guide to Fairing Removal
12/10/12 8:57 PM

I wish someone would have made a video and performed the actual disassembly, part by part, and which way to pull what, and where your brittle tabs are lying in wait for you......LOL. .......

Maybe me or GRN will make one before long. God knows we need a good step by step disassembly of the fairing, and even a reassembling, as well.

Link | Top | Bottom

ZX14MAN64


ZX14MAN64's Gravatar

Joined: 08/17/12

Posts: 1237

RE: Newbies' Guide to Fairing Removal
12/13/12 8:38 PM

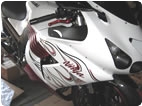
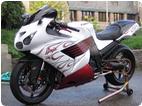
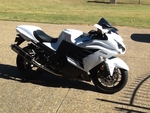
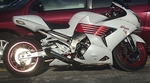
Got all the new parts on with NO breakage. Whoooo, what a relief. New side fairing and new dash boards. Now I gotta wait for the NINJA emblems to come in as they are sold as a seperate part. And those emblems are expensive as HELL, too.

I know this fairing so well and every tab, bolt pushipin, direction to pull, push...........I can now do it in my sleep.

Here is a hint a learned the hard way, but one I hope will prevent someone else from busting off their precious and expensive fairing tabs.........Its a safe way to get the grommets on the tank cover to pop into those brittle tabs I broke before.

1. Don't bolt down the Foremans. Merely pop the front end in place and leave the foreman grommets not popped in and leave all three bolts (two big sliver ones and the small black one) out, for now.

2. Then when you start to put that tank cover on and are bout to attempt to pop them tank cover knobs in those brittle mid fairing grommet tabs, carefully and gently pull the Foreman grill out just enough to get your hands up underneath them, and use your fingertips to support the brittle tab on the back, as you maneuver the tank pad tab into the brittle mid fairing tab grommet, while also making sure the upward pointing tab on the forman is getting aligned in the slot just above it in the bottom of the tank pad. If you have big thick hands, this probably wont work, but it did for me as my hands are long. But be extra careful and gentle, as its like a brittle puzzle in that area.

I have found this to be pretty much the ONLY way to ensure you haven't busted them tabs off. As I said before, I regrettfully say alot more of us have broken them than realize, cause once they break off, you don't even know it. (but then again, if you don't know it, who cares? LOL)

Anyway, hope this helps. .


* Last updated by: ZX14MAN64 on 12/13/2012 @ 8:44 PM *

Link | Top | Bottom

Grn14


Grn14's Gravatar

Location: Montana

Joined: 02/25/09

Posts: 15511

RE: Newbies' Guide to Fairing Removal
12/13/12 10:40 PM

Ya...it'll help.There's a couple of 'owner procedures' that will work.Once ya know what's where...then it becomes much easier to know how to reassemble and all.I always put spit on those projection deals...slides right into the grommet,and dries....Then holds.Works for me anyway;)

Link | Top | Bottom

JUDAH


JUDAH's Gravatar

Location: North Carolina

Joined: 06/21/12

Posts: 27

RE: Newbies' Guide to Fairing Removal
02/22/13 8:35 AM

Thanks Rook great post! I have never removed all of the fairings but I am getting ready to paint my 06 and this thread is very helpful. Keep em coming!


06 STRETCHED AND LOWERED ZX-14

Link | Top | Bottom

Grn14


Grn14's Gravatar

Location: Montana

Joined: 02/25/09

Posts: 15511

RE: Newbies' Guide to Fairing Removal
02/22/13 9:48 AM

"I have found this to be pretty much the ONLY way to ensure you haven't busted them tabs off. As I said before, I regrettfully say alot more of us have broken them than realize, cause once they break off, you don't even know it. (but then again, if you don't know it, who cares? LOL)"....
....yup....regrettably...I broke BOTH mine on my new 2013.Repaired the left side....right side...didn't hold(the repair).But so far....no fitment issues.Everything went where it was supposed to...without the tab/projection.When I again remove the tank cover...I'll look in there and try to find that tab...it's there...somewhere.Perform some surgery...and see if I can re fix it like the other side.;)They really should have made these two tabs a bit beefier IMO.


* Last updated by: Grn14 on 2/22/2013 @ 9:49 AM *

Link | Top | Bottom

busabob


busabob's Gravatar

Location: Gilbert

Joined: 06/01/13

Posts: 16

RE: Newbies' Guide to Fairing Removal
06/20/13 7:39 AM

Duuuuude, this is awesome thanks!!


If it's fast I want it. If it's intoxicating, I drink it

Link | Top | Bottom

tooncinator


tooncinator's Gravatar

Location:

Colorado Springs, CO

Joined: 06/07/11

Posts: 273

RE: Newbies' Guide to Fairing Removal
08/31/13 9:45 PM

Thanks Rook, this thread is a life saver!

Link | Top | Bottom

Bardahl


Bardahl's Gravatar

Location:

North Mississippi

Joined: 07/16/13

Posts: 67

RE: Newbies' Guide to Fairing Removal
01/09/14 2:26 PM

Got a battery tender for Christmas, so my first time taking things off....just wanted to thank you for the information, as it was invaluable

Link | Top | Bottom

Grn14


Grn14's Gravatar

Location: Montana

Joined: 02/25/09

Posts: 15511

RE: Newbies' Guide to Fairing Removal
01/09/14 2:40 PM

As far as those tabs go...I called Kawasaki and told em about the 'flimsy' construction of those(nicely of course)...they were glad I called and offered to pay for a new side fairing...I declined...bought two new side fairings...installed...put my hand behind that tab while pressing in the projections..worked fine.This was back several months ago now.Removing that turn signal cover can be dicey as well...be careful with the forcing of those parts against the thin fairing line in front of the foremost edge...that can snap.Gotta kinda wedge that plastic clear cover in there and gently apply pressure to the body of it,while holding that plastic slice for support.(from behind).

Link | Top | Bottom

06blackpearl


06blackpearl's Gravatar

Location: South Jersey

Joined: 07/27/12

Posts: 605

RE: Newbies' Guide to Fairing Removal
01/09/14 5:26 PM

Thanks for thread everyone!!! Will def need this in a few months!


www.sportbikepc.com
Sport Bike Powder Coating,LLC
Authorized Dealer for:
Alien Motion Batteries,ASV Levers,Brocks Performance,Carrozzeria Wheels,CBLAST Flash,Core Moto Brake Lines,Driven Racing,Galfer,Hyperpro Stabilizers,Metal Scorpio Wheels,RK Excel Chains,Sato Racing,Stahlbus-USA,SuperSprox,Voodoo Indsutries, PAZZO levers.

Link | Top | Bottom

leonyam


leonyam's Gravatar

Location:

Tweed Heads, NSW, Australia

Joined: 12/17/13

Posts: 14

RE: Newbies' Guide to Fairing Removal
01/22/14 11:49 PM

THANK YOU ! THANK YOU ! THANK YOU ! YOU'RE DA MAN !!!!!
I took the fairings off 2 x weeks ago and dropped them off to be painted then went on holidays. When I returned, I picked up the newly painted plastics and started to reassemble. Taking them off wasn't so bad, just felt my way and placed all the grommets, well nuts, lights etc. in 2 x ice cream containers. Well, ............. now, where the FCUK does everything go !!! I spent hours swearing cussing, I printed out a few pages from the owners manual CD which was as useful as tits on a bull ! I was getting nowhere fast then spotted this thread. Thanks to this very detailed and pictorial blow by blow description by ROOK I was able to reassemble it all with not too much fuss and have just been for my first small ride on a ZX14 ! WO HOOOOOO !!!!! Having done it once, I think it will be a lot easier in the future if I need to pull it down again.
Only thing left over was a small allen bolt, don't know where it goes and lost 1 x well nut ( it just popped off somewhere into outer space when I was getting it out with a small screwdriver ! )
Very grateful ZX14 owner, thanks again, .............. Noel

Link | Top | Bottom

shaun32


shaun32's Gravatar

Joined: 02/13/15

Posts: 3

RE: Newbies' Guide to Fairing Removal
02/13/15 8:55 PM

I have my second zx14 now and after the mess I made putting the fairings back on on my first one this will bea great help to me as I am preparing to put a new fastener kit on as most of the grommets and some of the screws are missing on this one. Really degrades the beautiful machine it is. Could you recommend a good yet still affordable kit that would include all the screws and grommets one would need?

Link | Top | Bottom

Rook


Rook's Gravatar

Joined: 03/28/09

Posts: 20589

RE: Newbies' Guide to Fairing Removal
02/14/15 7:30 AM

only one i know of is Pro Bolt. I think they include the wellnuts. I got well nuts with my windscreen kit. Pro

bolt isn't cheap though. I have seen aftermarket steel fairing screws on Ebay that are a lot less expensive.

I've used steel Dzues fasteners from Kurvey Girl and later upgraded to ProBolt aluminum Dzues fasteners. It's mainly for looks. It adds weight because of the steel catch inside the fairing. Also, the fairings don't fit as tight between the top and side fairings. It's a little tricky getting the front fastener in under the nose.

Dzus fasteners


* Last updated by: Rook on 2/14/2015 @ 7:35 AM *


'08 MIDNIGHT SAPPHIRE BLUE Now Deceased

Link | Top | Bottom

Grn14


Grn14's Gravatar

Location: Montana

Joined: 02/25/09

Posts: 15511

RE: Newbies' Guide to Fairing Removal
02/14/15 8:26 AM

"grill out just enough to get your hands up underneath them, and use your fingertips to support the brittle tab on the back, as you maneuver the tank pad tab into the brittle mid fairing tab grommet"...this is critical.You will break that tab on the midfairing if you don't support it on the backside while pushing the projection in.They designed stronger ribs on that tab in the 2012's and up...BUT,they still will break.


Fantastic how-to Rook...I hadn't read this before.Excellent job:)

Link | Top | Bottom


Welcome to zx14ninjaform.com!
 
New Topic Reply
Next Page

Page: 1 2 3

Previous Page

New Post

Please login to post a response.