


Tire Removal and Mount
If you only replace tires one or two times in a season, changing your own tires may not something that is going to be financially practical. Tire mounting tools can be purchased for a small investment but the time it takes and the fact that you will have old tires to dispose of (which will probably cost you $10/tire) will make the dealership shop’s prices start to look more attractive. I’ve found the retail price of tires from a dealership to be within ten dollars of the price online plus sales tax which the dealership collects at the time of sale.
I decided to start changing my own tires because I own expensive aftermarket rims and I have had bad experiences in the past getting my rims back all scratched along the edge. If you take the time to learn the process, you should be able to avoid careless damage like that. Tire changing is rough work, however. Chances are, something will drop or slip and a rim will get a scratch eventually.
The following link is to a pdf tutorial by Adam Glass. Mr. Glass’ tutorial has a plethora of images and detailed descriptions that I am sure will explain most if not all you will need to know if you decide to start removing, mounting and balancing your own tires. Glass goes into detail on a number of things that I will not cover in my tutorial. It is all good information, however I will take issue with one suggestion made by Mr. Glass. The use of plastic water bottles as rim protectors is not to be trusted when using tire irons. I used this technique one time and had success. The other time, the tire was so tight that the tire iron levered down hard enough to crack the plastic. This left a small scrape on my rim. It may be safer to use plastic bottles of a different thickness (I used milk bottles folded in half) if you are going to improvise rim protectors. To be completely safe, I strongly recommend using ONLY the specifically designed rim protectors such as those sold by Motion Pro and other suppliers.
CLICK LINK>>Motorcycle Tire Changing
links to other threads about tire changing.
Tools:
air line and quick connect fittings
Sharpie
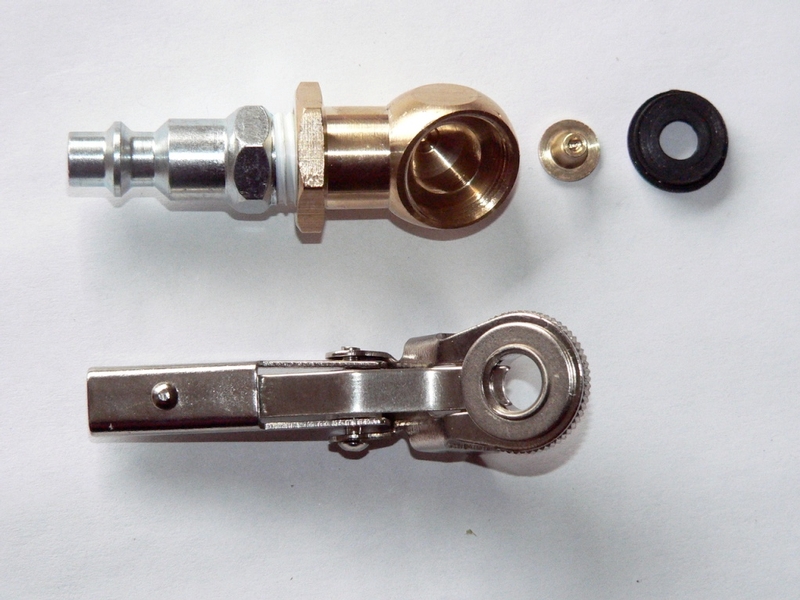
valve core tool
tire changing stand
1/2 inch plywood, three and a half inches square
bead breaker
soap and water solution or tire mounting lube
4 rim protectors
string
3 fifteen inch tire irons
steel wire (optional)
safety goggles or a face shield
new valve stem
wheel balancing stand
blowgun
new tire
ball foot clip air chuck
thumb lever control air hose attachment
Tools Overview
Valve Core Tool. These are easy to find and inexpensive. I would not try to use some other tool to remove or install a valve core. The valve core remover is just a simple bit that fits nicely to the two flats of a valve core. These tools have flats but you should never need to use a wrench on them except perhaps to remove a rusted valve core. Valve cores are not to be installed more than hand tight. Might as well pick one of these tools up. The one in the pic is distributed by Motion Pro. Like most tire changing tools we will discuss, the majority of valve core tools sold by different companies are identical in shape.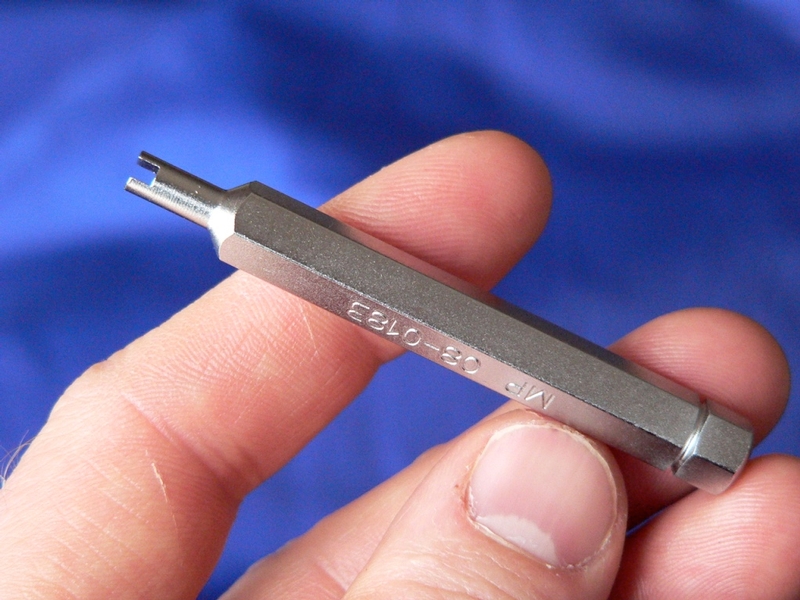
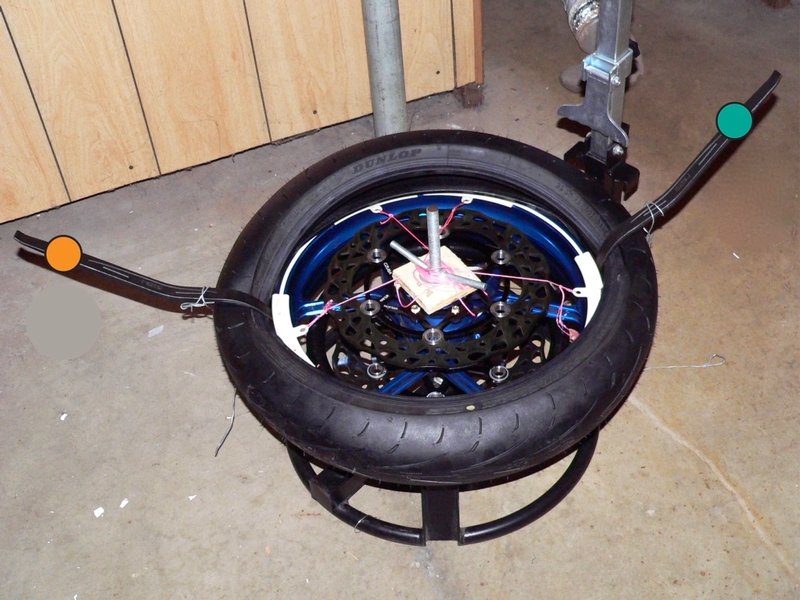
Tire Changer Stand/Bead Breaker. They are called by a variety of names such as “Black Widow” or “Shadow” but as far as I can tell by the online pictures in the ads, they are all identical. Basically the tire changer does nothing but hold the wheel steady when you break the beads and lever with tire irons. The bead breaker is a long lever that is used to press a hinged blade down against the tire. The blade presses the bead away from the rim as one of the first steps of tire removal.
Both a bead breaker and a tire changing stand can be made at home with some easy to find items but for $90, you can buy one of these and be almost ready to go out of the box. It works well and will not damage rims. Be careful to avoid over-tightening the wing nut on the threaded rod that runs through the center of the wheel. You do not want to inadvertently press your wheel bearings deeper into the wheel hub. Use one hand and just snug the wing nut up finger tight after it makes contact. This will secure the rim.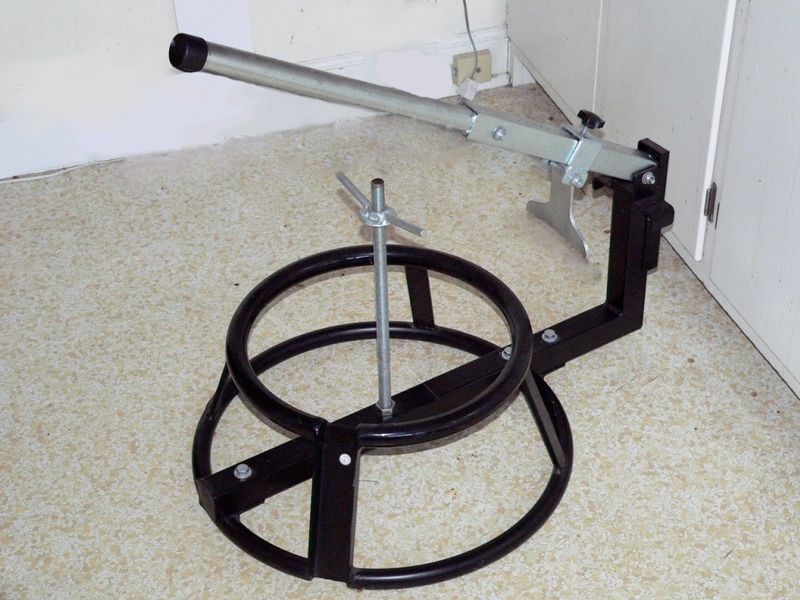
Tire Soap or Tire Lube. Use enough of it but don’t over do it. Too much may cause the tire to slip on the rim after the wheel is installed and in use. For tubeless tires, this won’t cause the bead to come unsealed or any other type of deflation hazard. Still, a slipping tire bead may affect wheel balance. It also can reduces power that is transmitted to the ground which may be a factor if you are racing. Too much soap may also result in moisture being trapped inside of the tire and that may encourage corrosion and affect wheel balance as well. I soaped the rim and the tire one or two times and then used plain water if the soap dried up. I used about 1 part dish soap to 4 parts water. Many people have sworn by the commercially prepared products known as tire lube. Those proprietary gel concoctions might have some ingredient that makes them superior but I have no experience with anything other than dish soap.
Rim Protectors. Use them at all times when placing a tire iron on the rim. They protect the outside from suffering cosmetic damage and the inside from suffering scrapes that will prevent the tire bead from sealing. I used 4 rim protectors at a time but having a couple extra on hand is advisable. Always use a heavy string to tie the rim protectors tightly to the center rod of the tire changer stand. This will prevent the rim protectors from falling to the inside of the tire leaving your tire iron to scrape on a bare rim.
These are the rim protectors I used. They are made by Motion Pro but there are other brands that look identical.
Tire Irons. There are a number of different kinds of tire irons that can be purchased. I chose the long 15 inch tire irons because the handles are easier to hold for the manipulations that are required when working alone. I did not choose them because of the significantly greater amount of leverage that can be applied with a long handle. I think the suggestion to not use a tire iron that is much longer than your hand is sound. The power that is at hand with 15 inch levers might bend some rims. When using the tire irons to lever the tires onto the rim, I tried to hold them closer to the middle of the iron rather than at the end. Use the curved end as the point and the straight end as the handle (as shown in the illustrations that follow).
It’s next to impossible to hold one iron down and insert the next one. Using three tire irons as I suggest in this tutorial is out of the question unless you have a second person to assist you. After prying the bead out of the rim, I used a heavy gauge steel wire to fasten the tire iron in place while I positioned the next tire iron. This makes a one man job possible but obviously it entails some risk. If you use this technique (see the photo in step 10) be very careful that the wire is secure and the iron will not move while your hands are off of it. If a wire slips or breaks, that will send the tire iron flying through the air, possibly hitting you while you work. 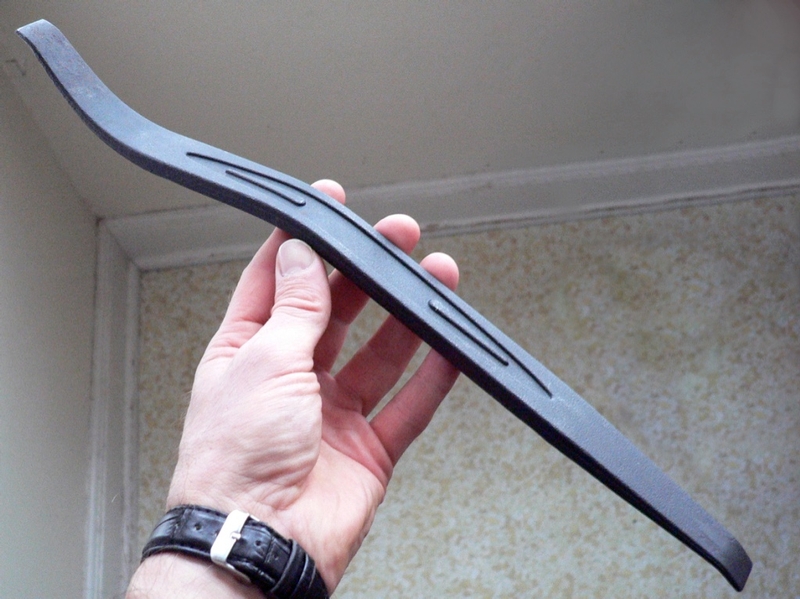
Air Compressor. I had luck using a sixty dollar, 3 gallon pancake compressor from Harbor Freight to seat my tire beads (the line and quick connect fittings were sold separately). It will do the job if both of the tire beads are contacting all around the rim. If the tire bead is not touching all the way around the rim on both the left and right sides, air will rush out as quickly as you can deliver it from a small compressor. In this case, it may be necessary to use a more powerful compressor or one with a with a large capacity tank such as an 80 gallon. 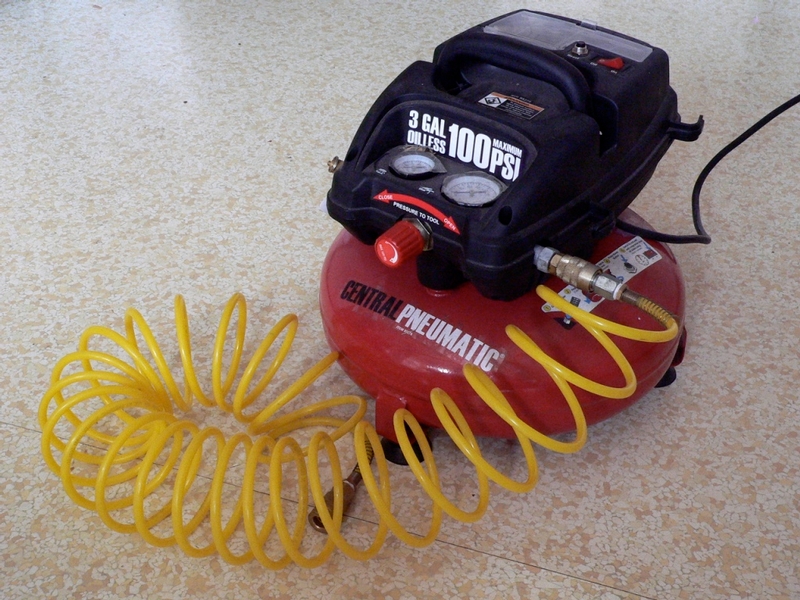
Ball Foot Chuck. Any chuck will work to inflate the tire but to seat the beads you need a chuck that will allow 100% unrestricted airflow into the tire so that it will inflate rapidly enough to push the bead(s) against the inside of the rim in less than one second. If it takes a lot longer than a second with a small capacity compressor tank, all the air will escape from the tire and there will not be enough air left in the tank to seat the beads. A ball foot chuck with the valve removed works great to deliver maximum volume from your compressor tank. The ball foot chuck valve removal process is described in detail in step 36 of this tutorial.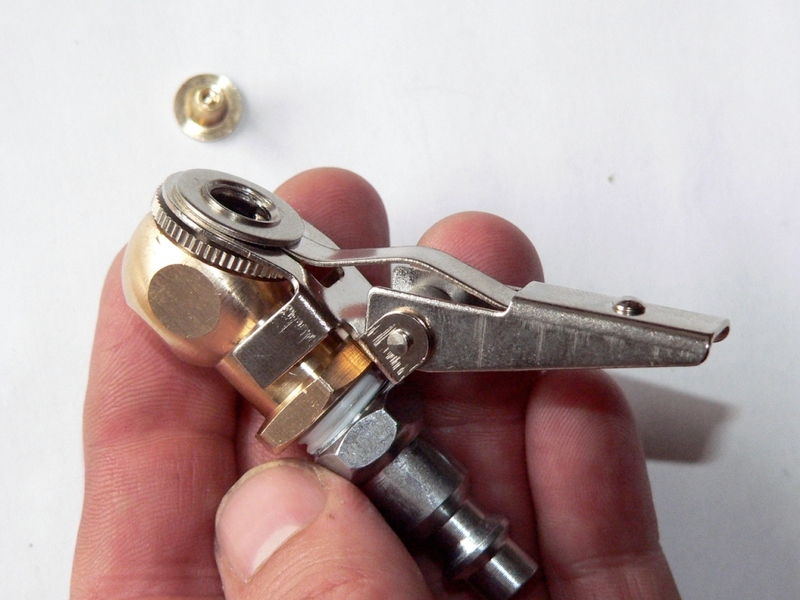
Pointers
Rule #1: DON'T Touch the bead surface of the rim! There are two bead surfaces inside each rim. One is vertical and it is pretty well protected from tire iron contact by the rim protectors you will use. The other bead surface is the adjacent horizontal surface inside the wheel. This has NO protection while you remove tires. Do not insert an iron so that it levers on, scrapes, rubs or touches this surface. If it is scratched, the tire may not seal. The bead surface of the rim will need to be polished to repair the damage.
The method of tire iron use is to pry the tire bead over or under the rim edge (according to whether you are removing or installing) with a tire iron. This iron is kept in position to “stake” the tire bead in place while a second iron is used to to pry the next section of bead. Both of these tire irons are held in position as a third iron is used to pry up the next few inches of tire bead adjacent to the second. The second tire iron is removed, placed ahead of the third and the next section of bead is pried. The first tire iron does not get removed. Tire iron two and three alternate or “leapfrog” around the rim until the tire bead is pried over (removing) or under (installing) the rim. This will be shown more clearly in the tutorial later on. Also, note that the iron should be inserted so that the curve is always facing up after the tire bead has been levered over the rim. This is the case for both installing and removing.
The tire irons require greater force as more of the tire is levered into place. A large length of bead will require more force to lever into place than a small length of bead. Be careful not to attempt to lever too long of a length of tire bead in one step. Smaller steps require less force and and are less likely to bend the rim. Be especially careful with lightweight rims.
Rear rims are larger and easier to lever tires onto than fronts. You might want to start with a rear wheel to get the hang of it. The front is about 25-30% more difficult.
Use the wire technique at your own risk. One person alone simply does not have enough arms to use three tire irons at the same time. For this reason, I have used wire to hold the tire irons after the tire has been levered into position. The tension is reduced at that point but there is still a danger that the tire iron could slip out or the wire could come unfastened somehow. A second person acting as a third and fourth hand is a better alternative if you have that at your disposal.
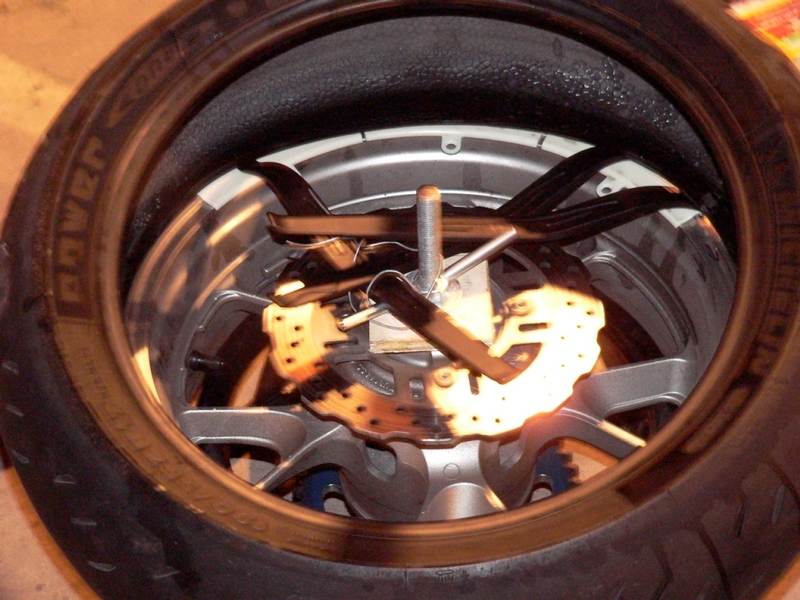
It may be advisable to remove rotors and sprocket from the wheels before starting the process of using tire irons. The reason is that these parts need to be especially flat to function properly. With the great amount of force being applied to stretch a tire over a rim, It is very possible that a tire iron may accidentally pry against a rotor. Before you know it, the rotor is warped. At any rate, if you do discover your rotor is warped one day, you don’t want to be wondering if it was caused by putting on your own tires. So I recommend removing discs and sprocket before using tire irons--at least for your first several tire changing experiences.
Never lift the rear wheel by the sprocket. If you decide you don’t need to remove the sprocket, be careful not to use it as a lifting handle for the rear wheel. The sprocket is bolted to a carrier but the carrier is only pressed into place over the cush drive with hand pressure. It fits tight but the carrier can pull right out under the weight of the wheel and the wheel drop on the floor.
Always wear eye/face protection. There is a lot of tension in a tire as it is mounted to a rim. Using tire irons, especially when wiring them in place, there is a lot of potential for something to fly up at your face. You might loose a tooth but at least you can keep your eyes protected if you have on safety goggles or a face shield.
Drop center of rim Looking at the inside of the rim, the center portion where the air valve is situated is lower than the bead surfaces of the rim. The center is often made extra low to make tire mounting a little easier. As the tire is levered over the bead, it may be pushed up into this low spot opposite of the tire iron. This will add a bit of slack that will come in handy when the tire requires more force to lever as work progresses. However, like tire lube, don’t become overly reliant on it. Using the drop center too much can cause the tire to become cocked on the rim and bed seating to be difficult.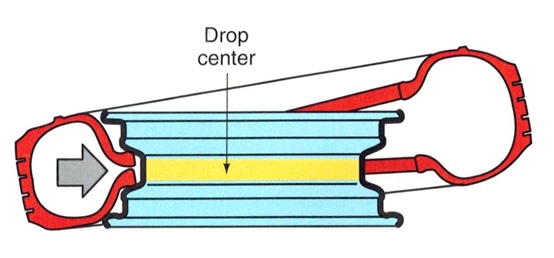
It is not a bad idea to mark the direction of rotation on the wheels with a Sharpie to eliminate confusion during tire installation. The OEM front ZX-14 wheel has a rotation direction indicator arrow molded into the surface of one spoke. You may still want to mark an arrow on both sides of the front and rear rim so you can easily match that to the rotation mark on the tire. Don’t accidentally install a tire with backward tread. 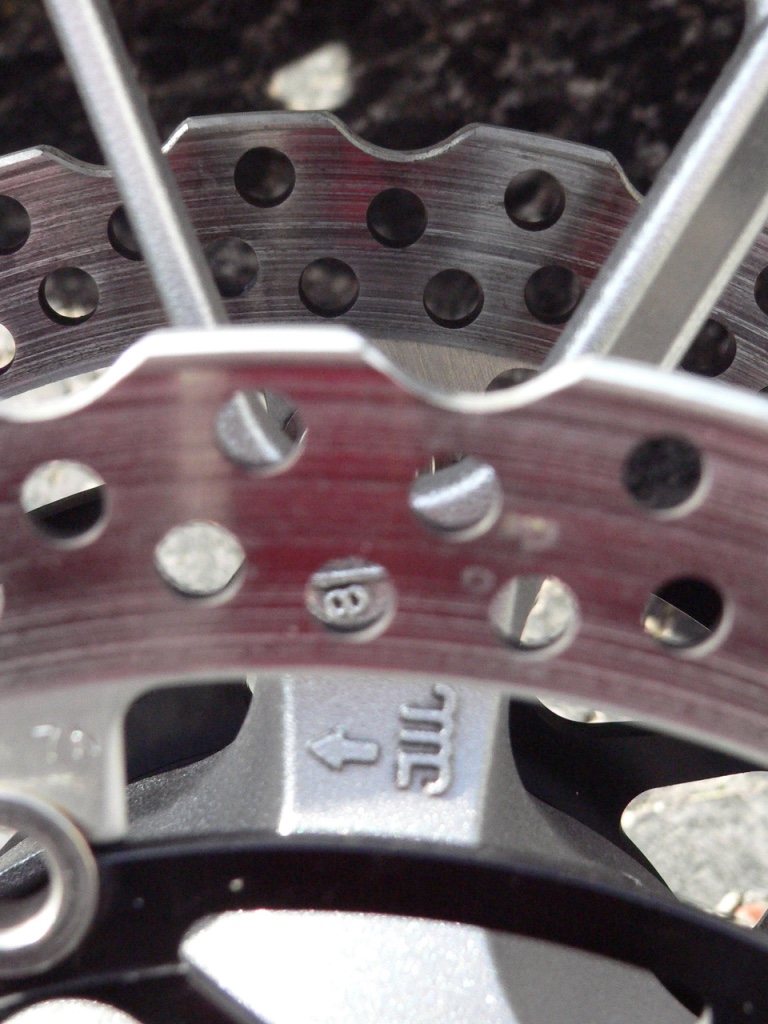
Finally, practice. Use old rims to mount your first set of tires. If you need tires on your expensive rims and you have no experience mounting them, you might want to find a shop with a very good reputation for NOT scratching rims and bring the wheels there. Then again, pretty much no shops I talked to guaranteed that my rims would come back without a single scratch. Owners I’ve talked to about this tell me they get their tire changes done complete with fresh scrapes on the rims every time. Most shops don’t take the time to avoid this and they can’t afford the liability to guarantee it won’t happen. Tire changing requires an awful lot of force. I consider myself extremely careful about working on my bike and I take a great deal of time to learn to do procedures without causing damage. I still put one small mar on my aftermarket rim and I dropped my OEM rim on the tire changer stand (carrying it by the sprocket) which scraped the finish. Of all the wrenching I have done, tire changing is by far the most brutal. It is not possible to be gentle every bit of the way.
Tire Removal
RECOMMENED: Break loose the rear sprocket nuts (See Sprocket / Drive Chain Replacement, step 9). Break loose the front and rear rotor bolts (see Front and Rear Brake Disk Removal, steps 1and 2). I also suggest that you mark the rotors, sprocket, nuts and bolts with a sharpie so that they can be reinstalled exactly as they came off for precise wheel balance (see step 14 of this tutorial).
Remove the wheels from the motorcycle (see Front And Rear Wheel Removal, steps 1through 9 and steps 20 through 32).
The following directions for tire removal apply the same to front and rear wheels. However, rear wheels are a lot easier than fronts.
1. Check the tire air valve stem and valve core with soapy water to determine if it is leaking and needs to be replaced (see Tire Air Valve Replacement). 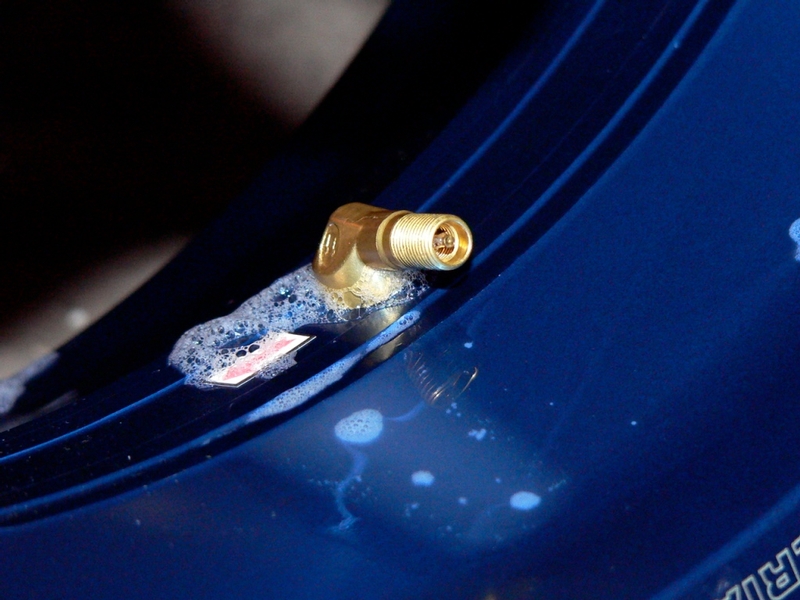
Remove the valve core from the valve stem using a valve core tool. All the air will come out of the tire. Save the valve core in a safe place. It is best to remove and install tires with the valve core removed.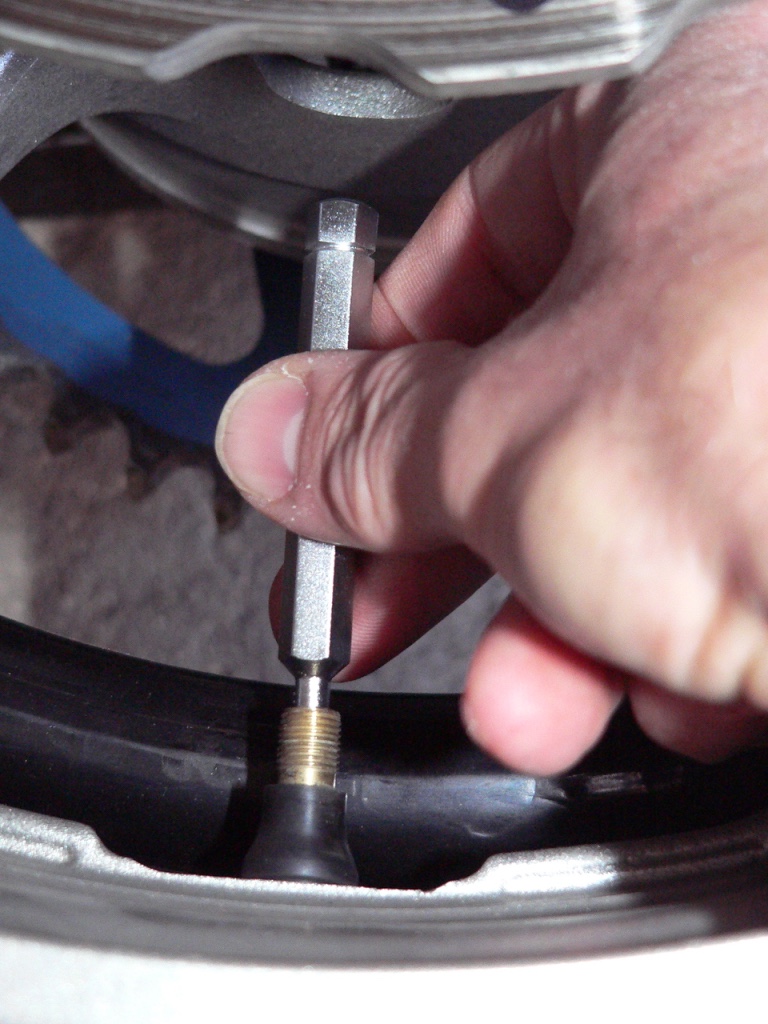
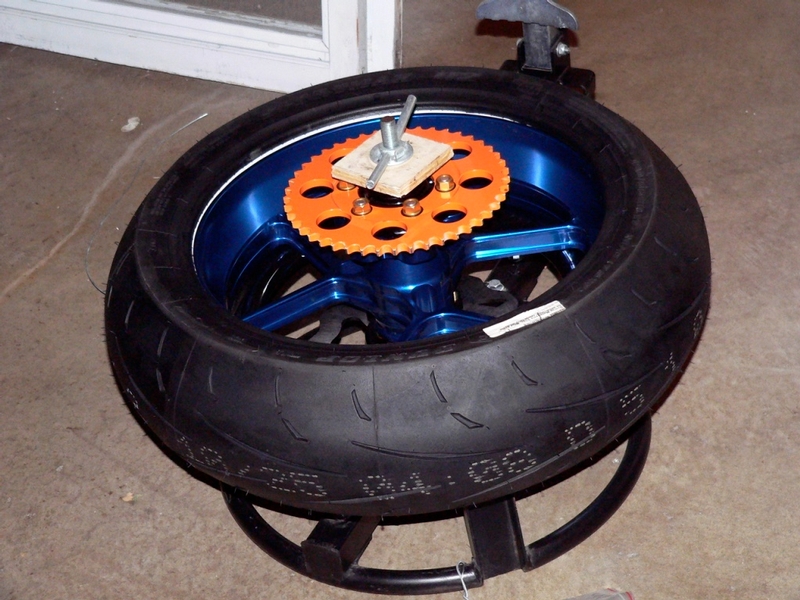
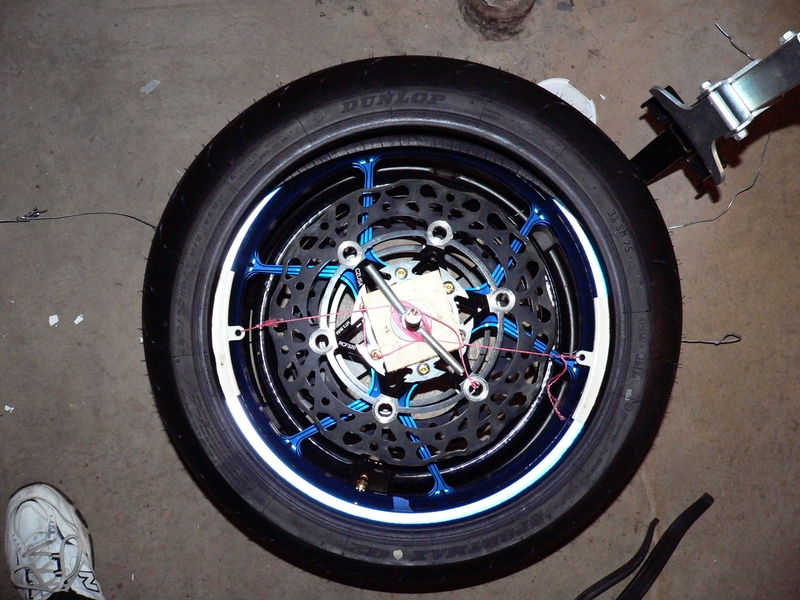
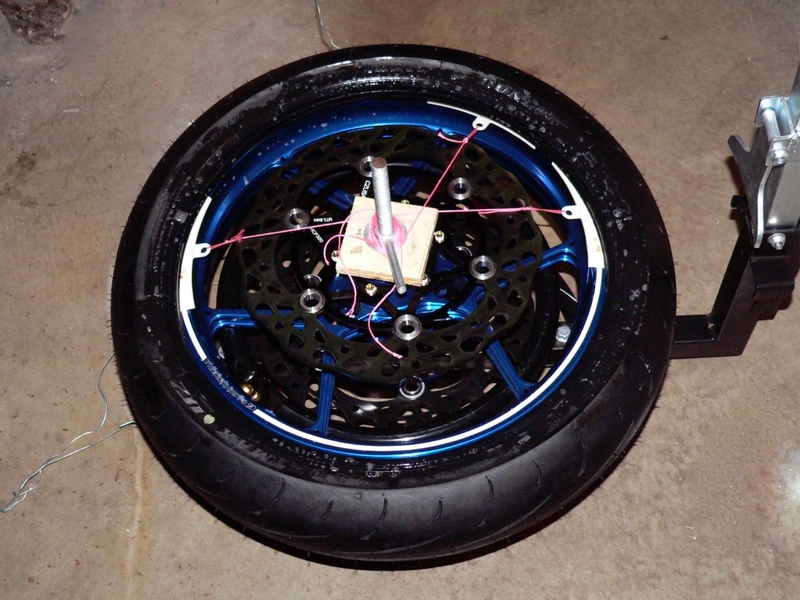
2. Carefully place the wheel on the threaded rod of the tire changing stand. The wheel may fit differently according to which side is facing down, sprocket side or rotor side. When the stem points down, ninety degree valve stems will only fit in the open spot on the top ring of the tire changer. The main point is that the wheel needs to rest with its spokes against the top ring of the tire changing stand. No other part of the wheel should touch the stand.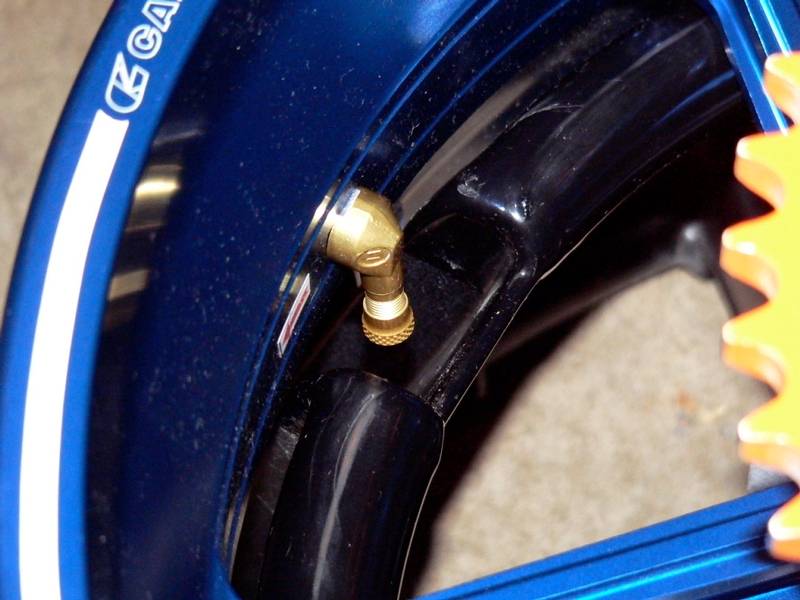
3. Cut a piece of 1/2 inch plywood, three and a half inches square with a 3/4” hole drilled into the center. Place it on the threaded rod between the wheel hub and the wing nut. Gently snug the wing nut finger tight against the wood. Do not over-tighten the wing nut or the bearings could become pressed to an improper depth in the hub. If you have not already done so, mark the direction of wheel rotation on the rim with a Sharpie.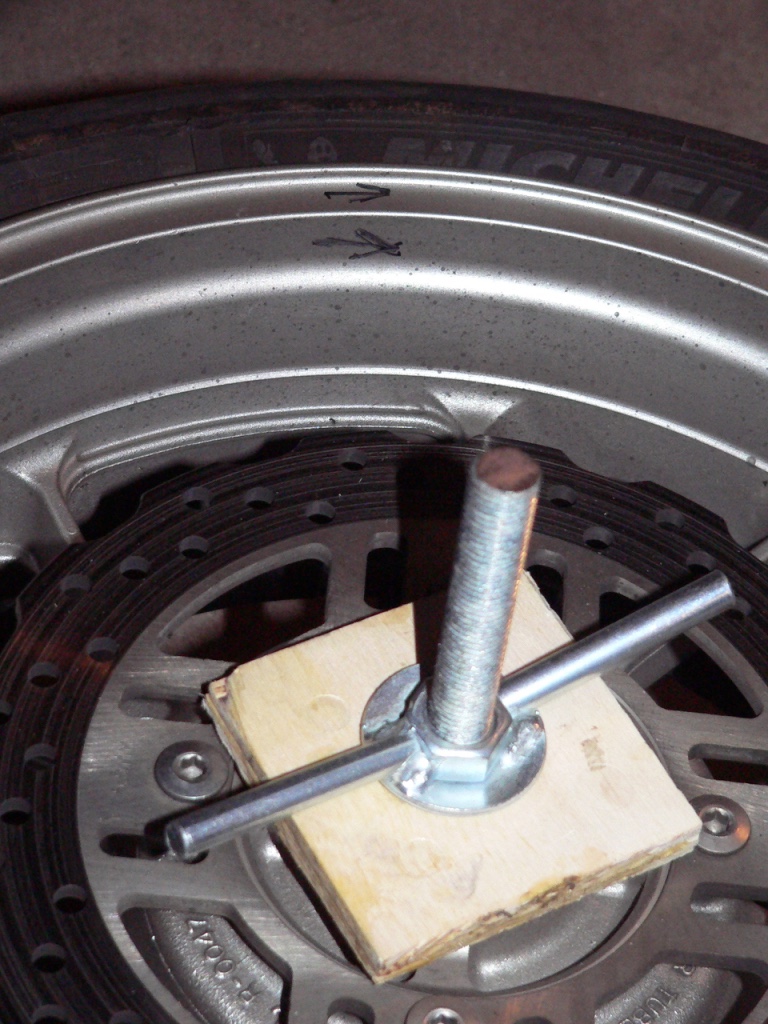
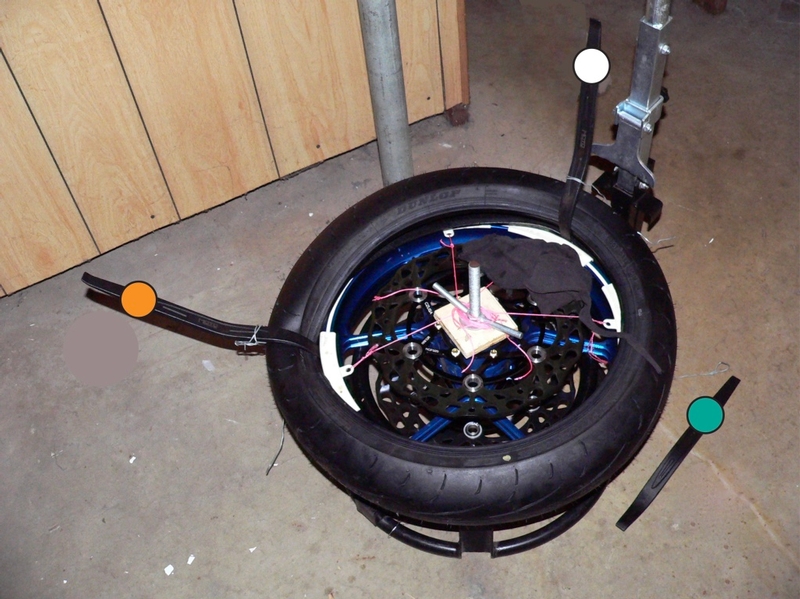
4. Adjust the bead breaker to the proper position so that it will not gouge inward at the rim. Use the bead breaker lever to press the bead down away from the inner edge of the rim. Loosen the wing nut, rotate the wheel a few inches, tighten the wing nut and repeat the bead breaking process. The bead will usually be sepperable by hand after approximately 6 inches of the bead has been broken with the bead breaker. 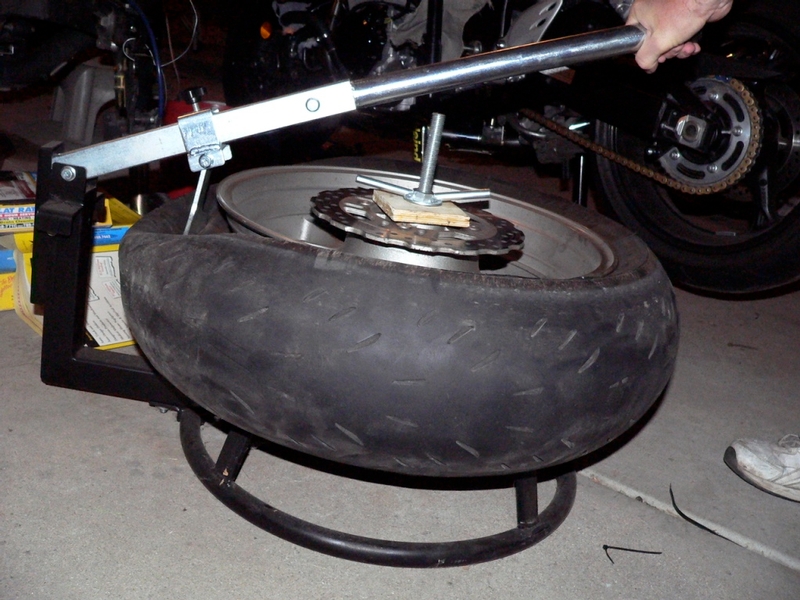
If the center threaded rod interferes with the lever of the bead breaker, lower the center rod as shown in the picture below. Push the bottom portion of the rod into the ground so that the tire changing stand will sit level while the bead is broken.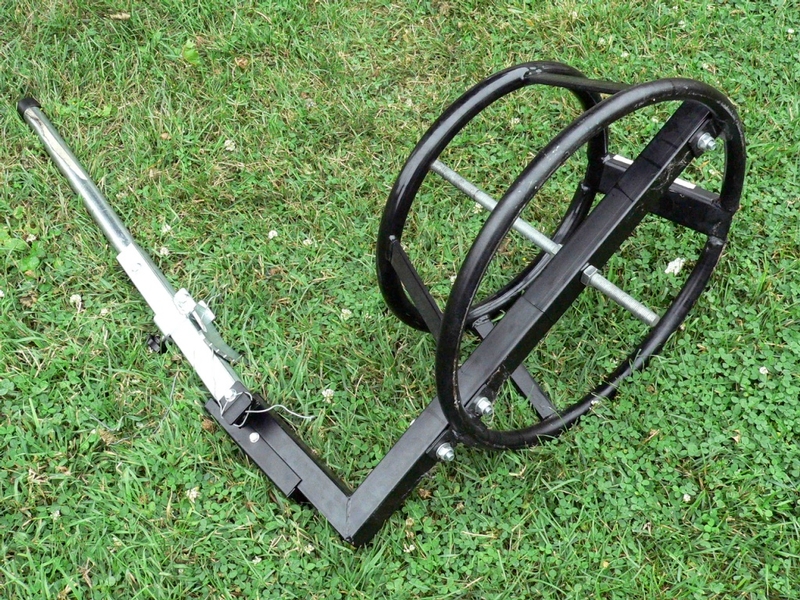
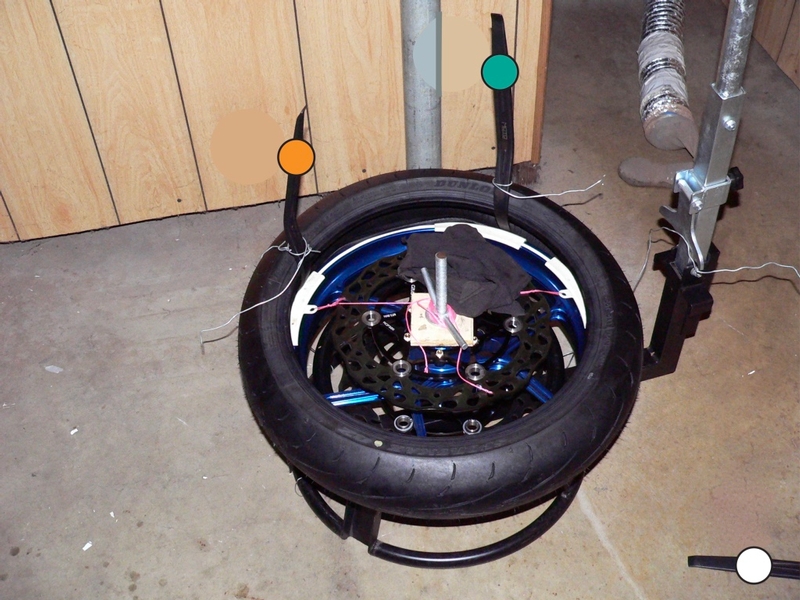
5. Remove the wheel from the tire changer and put it back on the tire changer with the opposite side facing up. Repeat steps 2-4. The bead will usually break around the entire circumference of the rim after one press of the bead breaker.
6. After both beads have been broken, determine which side of the wheel you want to have facing up for the remainder of the job. Put the wheel on the tire changer and use a soap and water solution or tire mounting lube all around the edge of the top edge of the rim and the top tire bead.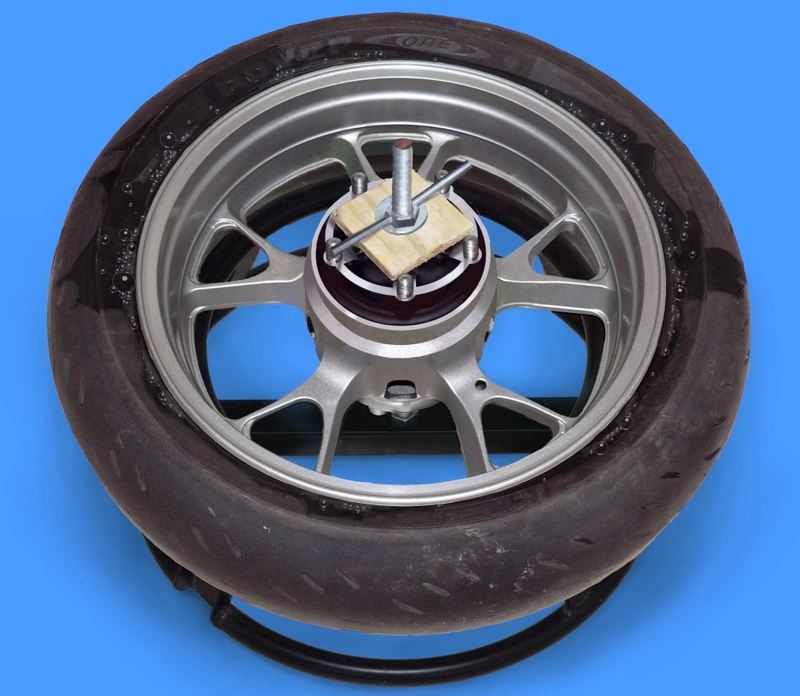
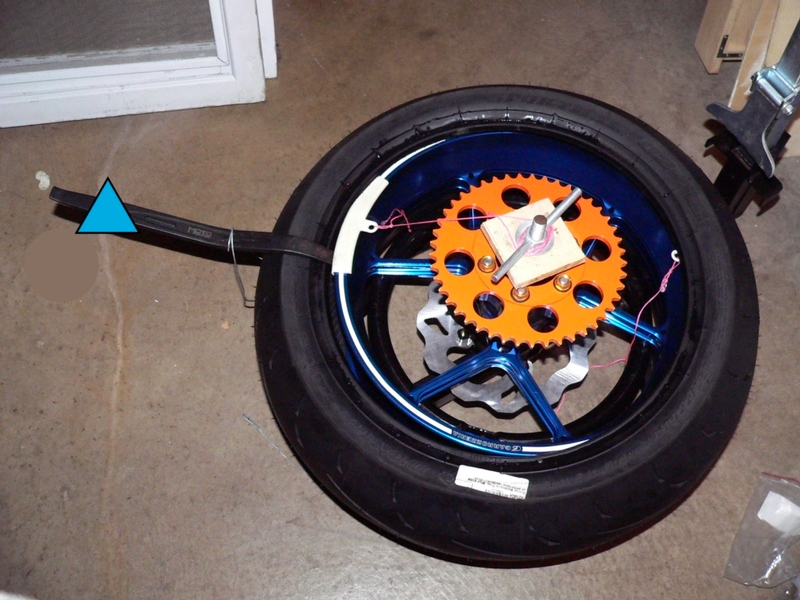
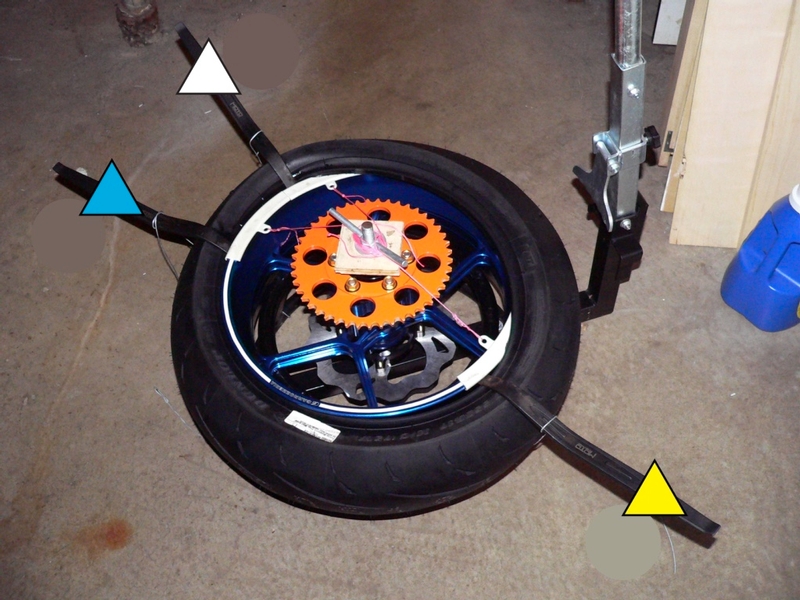
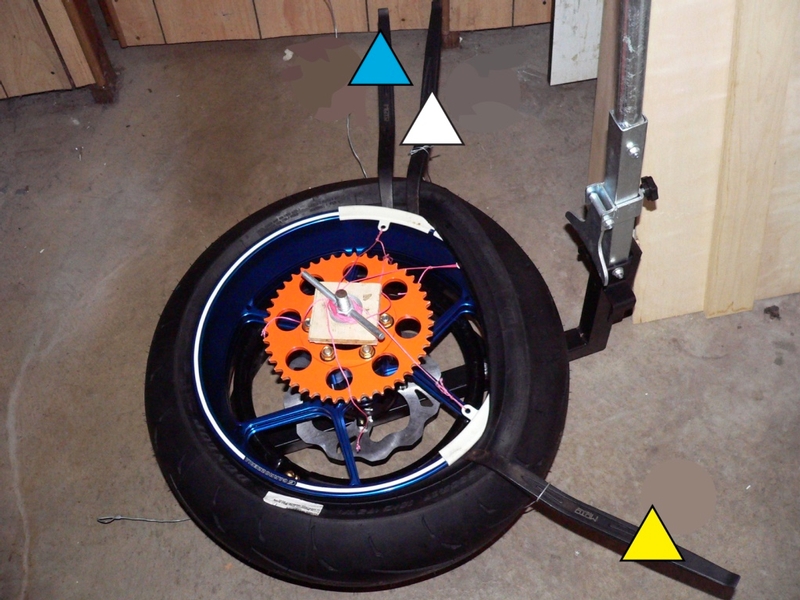
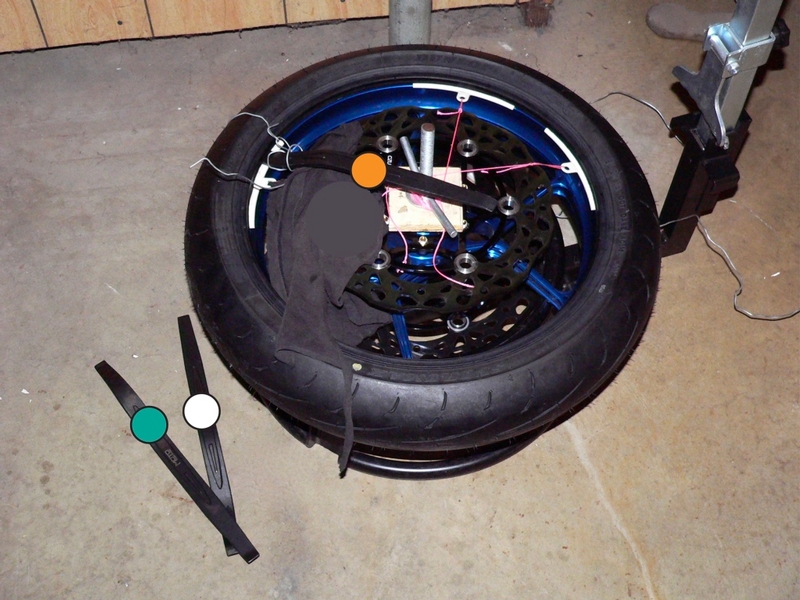
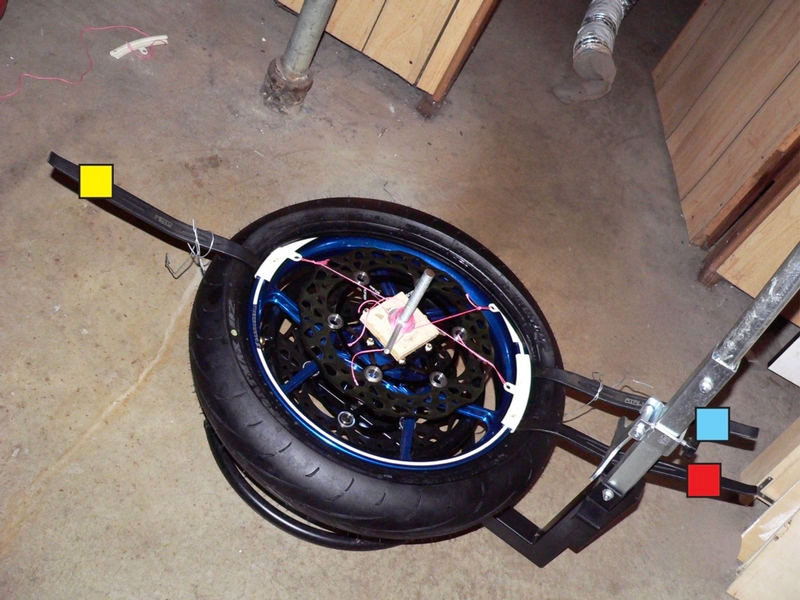
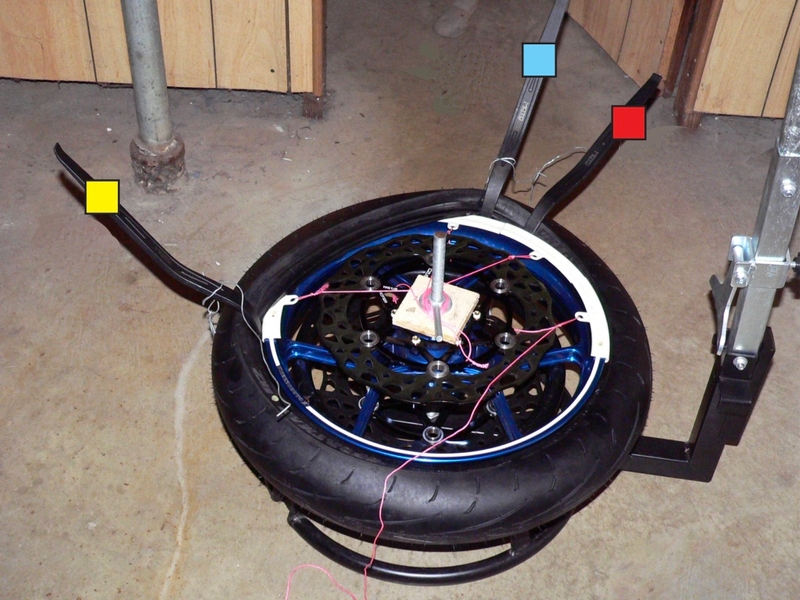
7. Arrange at least 4 rim protectors on the edge of the rim like so. Make sure you tie them with string to some part of the wheel so that they cannot fall in the tire while you work. 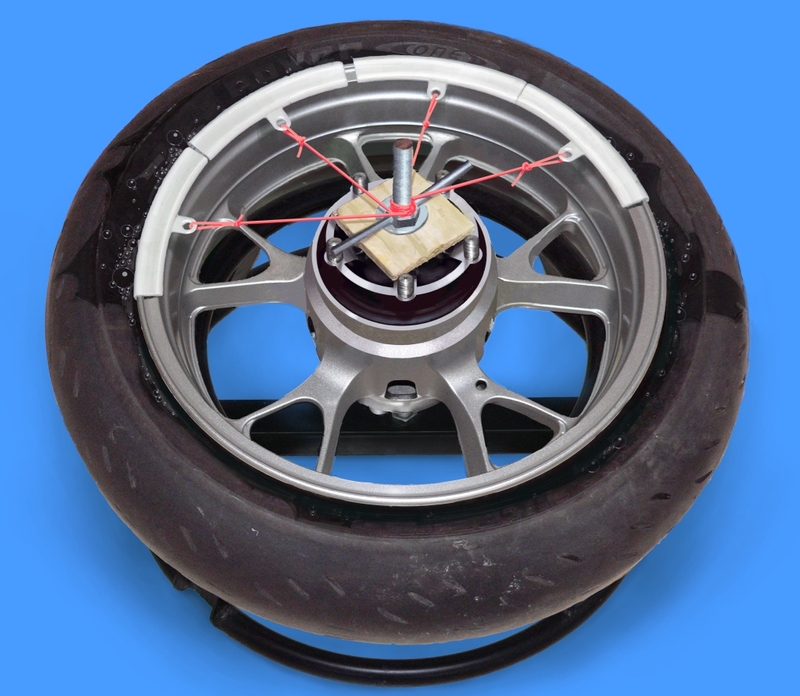
8. Apply some lube to a tire iron and place it on top of the first rim protector. Hook the tip of the tire iron under the edge of the tire bead. Lever the tire iron down against the rim protector. Hold the tire iron down in this position.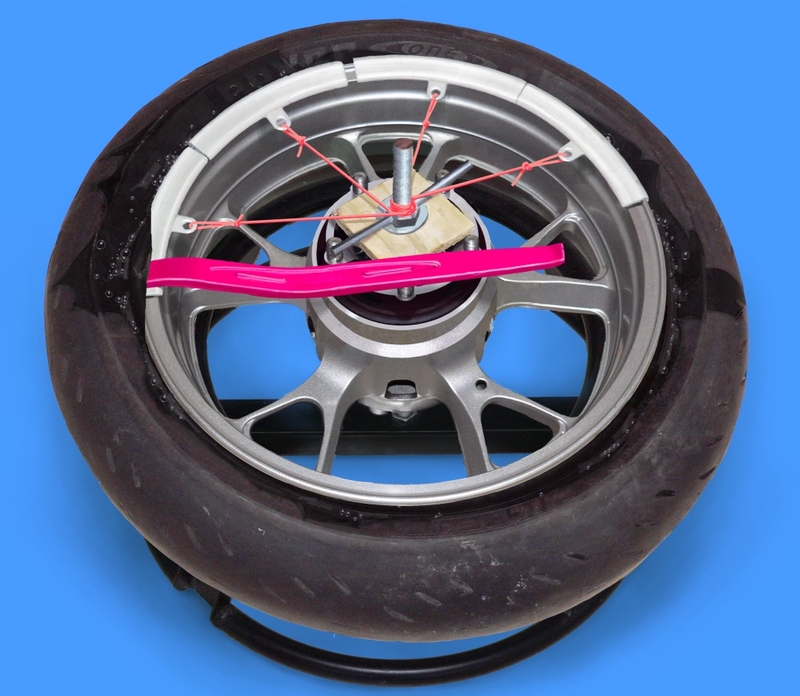
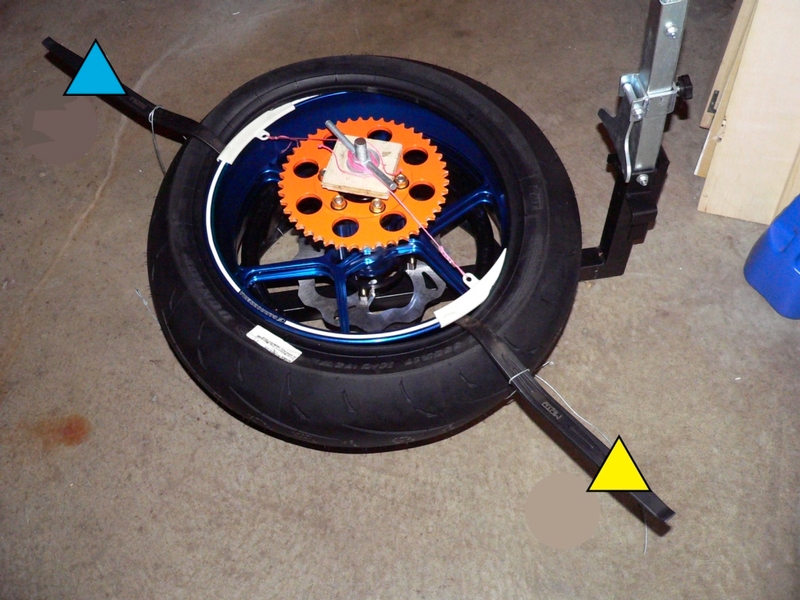
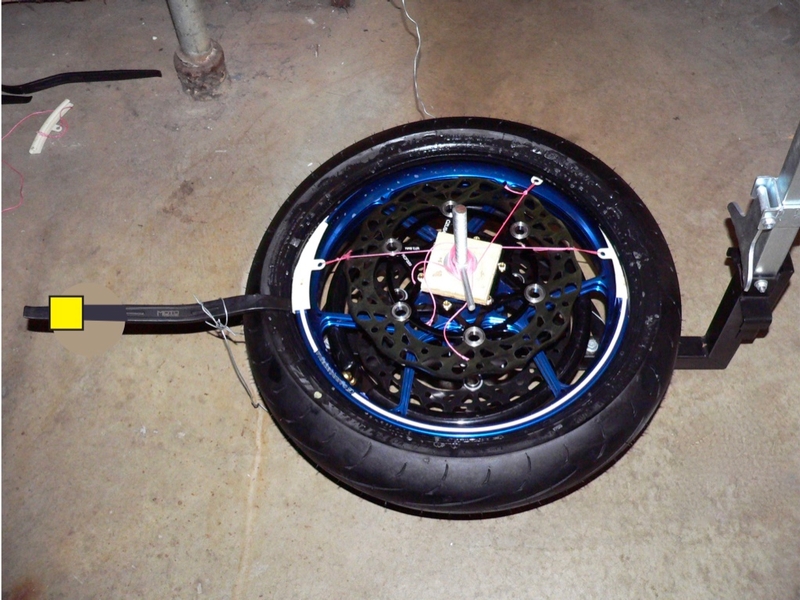
9. Place the next tire iron (yellow) on a rim protector next to the red tire iron. Insert and lever the yellow tire iron down as described in step 8, above. Hold the yellow tire iron in place. Do not remove the red tire iron. 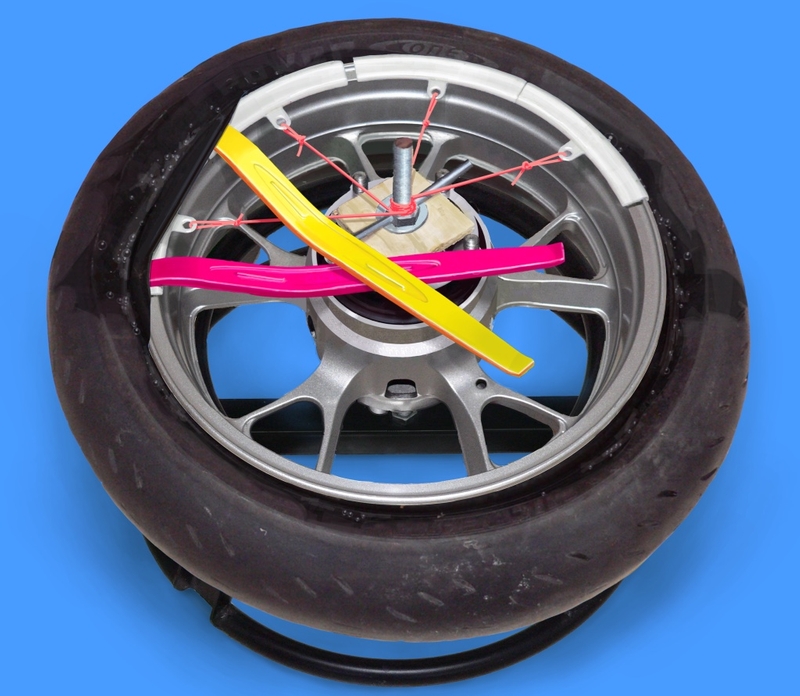
10. If you are not securing the irons with wire, you will need a second set of hands at this point. Place a third tire iron (blue) next to the yellow tire iron. Insert the blue tire iron between the rim protector and the tire edge as described in step 8. Lever the blue tire iron down and hold it in place. 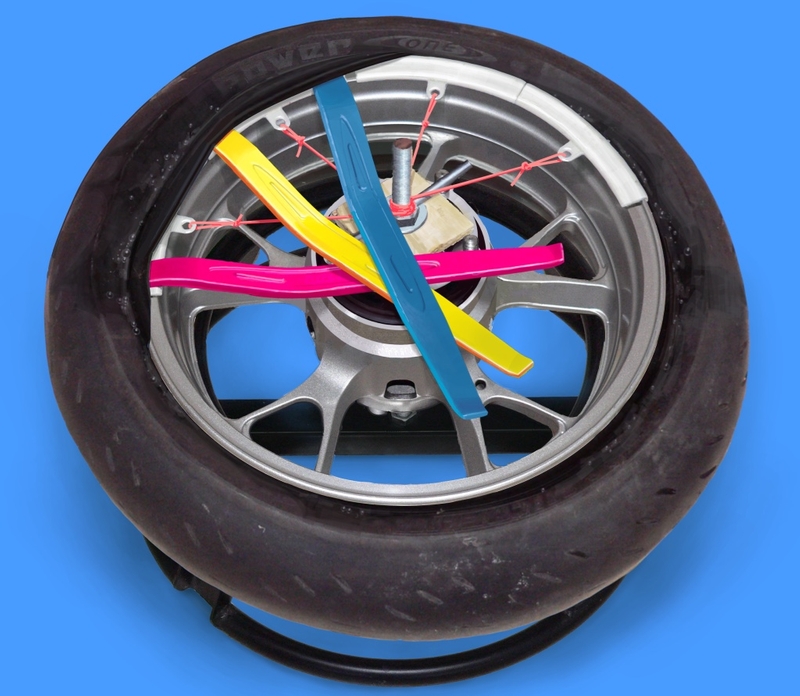
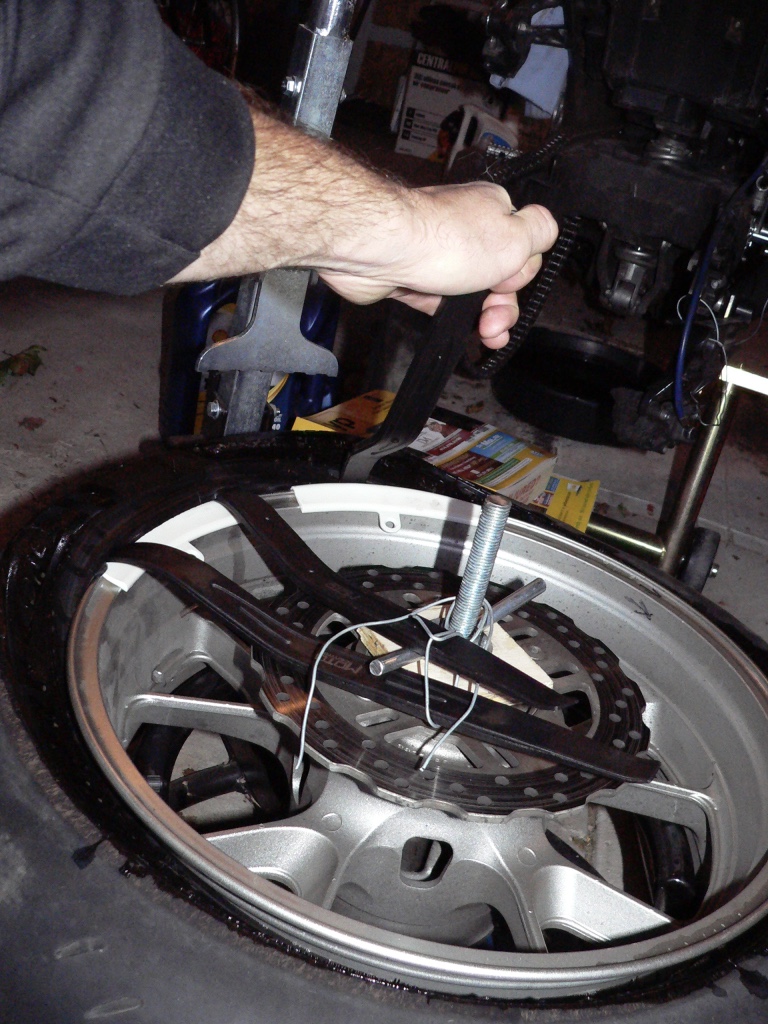
If you do not have a partner to help hold tire irons, it is possible to hold the tire irons down with some wire that has been precut. Wrap the wire around the wing nut to secure the levers. The tension is not great but take care! Wear safety goggles or a face shield! The rim protectors should also be tied off to the center rod to prevent them from falling into the tire.
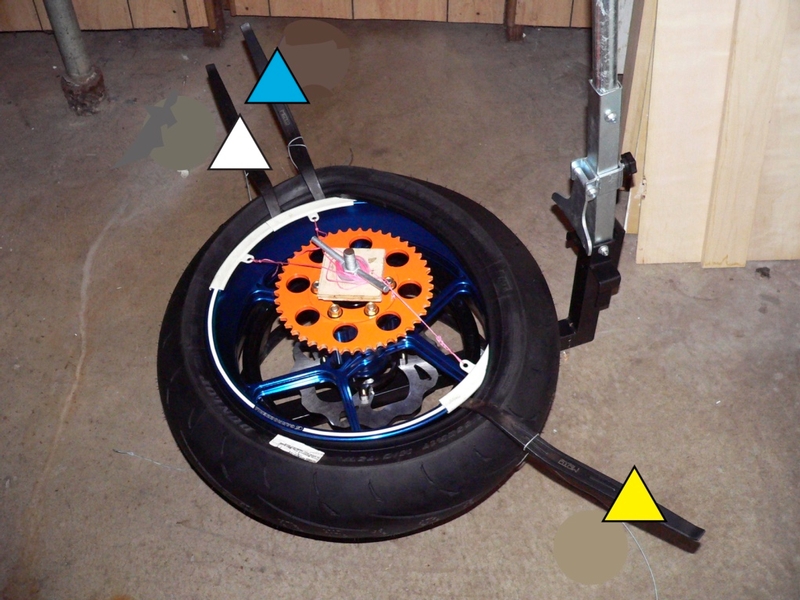
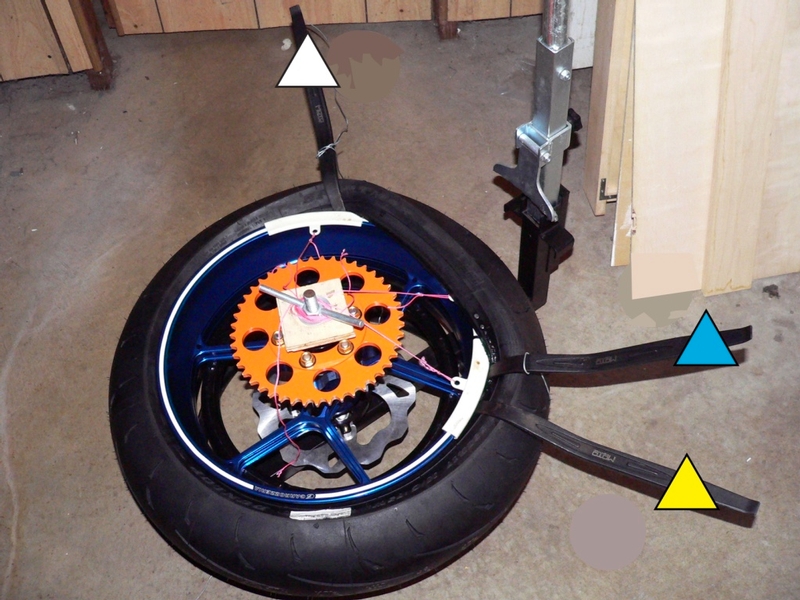
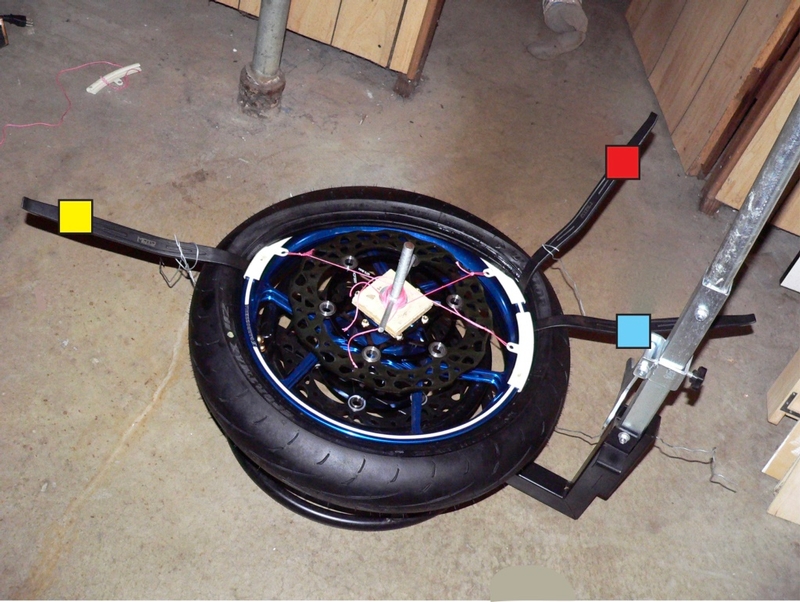
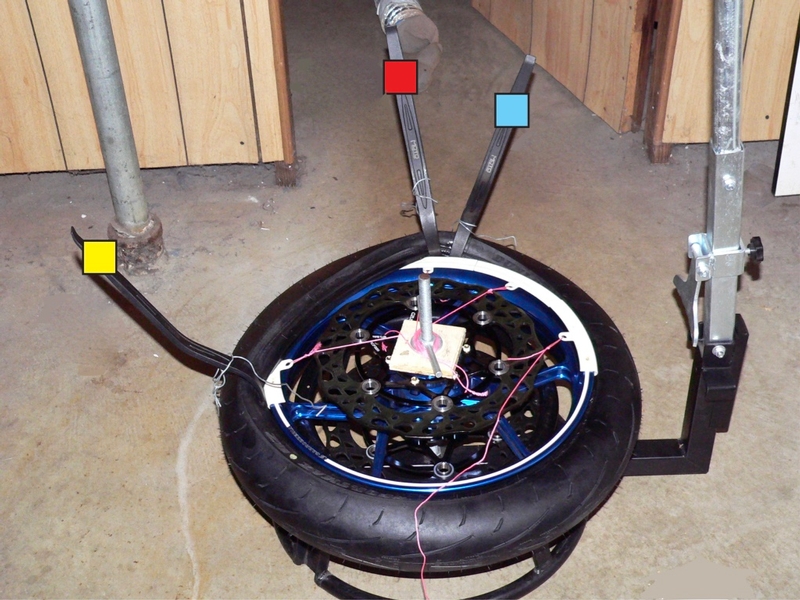
11. It may be possible to remove the red tire iron without having the bead snap back under the rim edge. I suggest leaving the red tire iron as positioned for now to be sure the tire bead remains staked in place. Remove the yellow tire iron and reposition it farther down the wheel radius on the other side of the blue tire iron. Insert the yellow iron and lever the bead up. 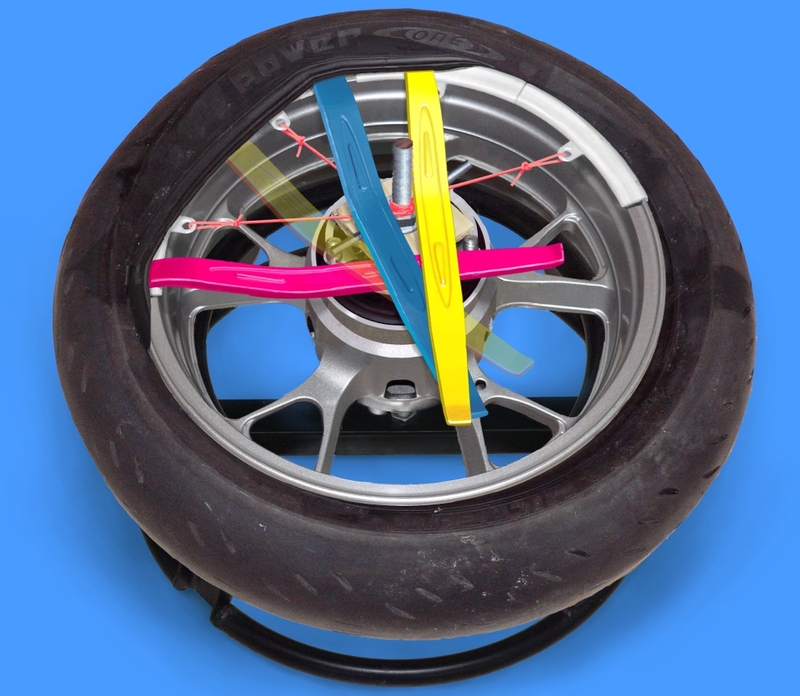
Re-lube the tire bead and reposition the rim protectors forward on the rim as needed. The tire will get tighter as it is stretched so take smaller bites as you progress. 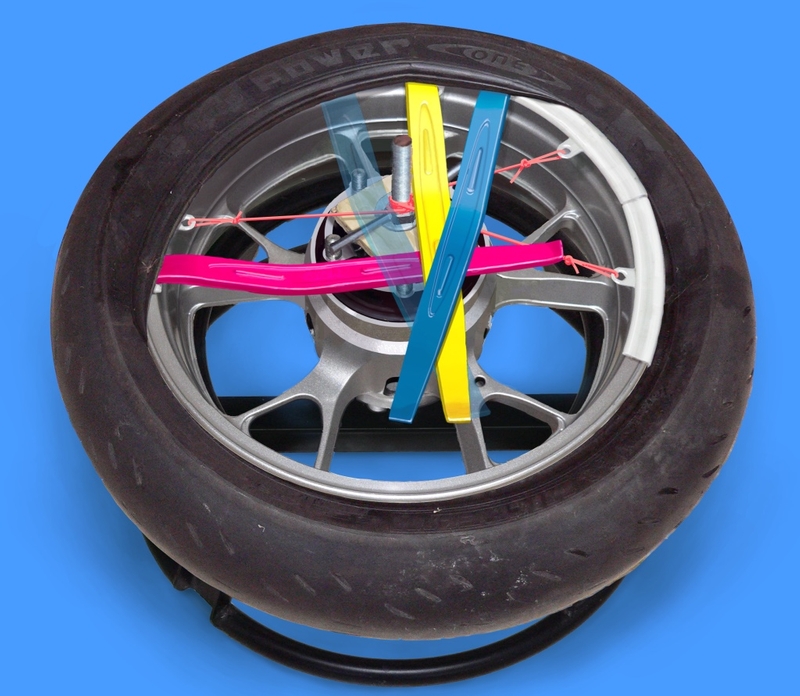
You should be able to remove the red tire iron by the time you get past one quarter of the way around the rim. 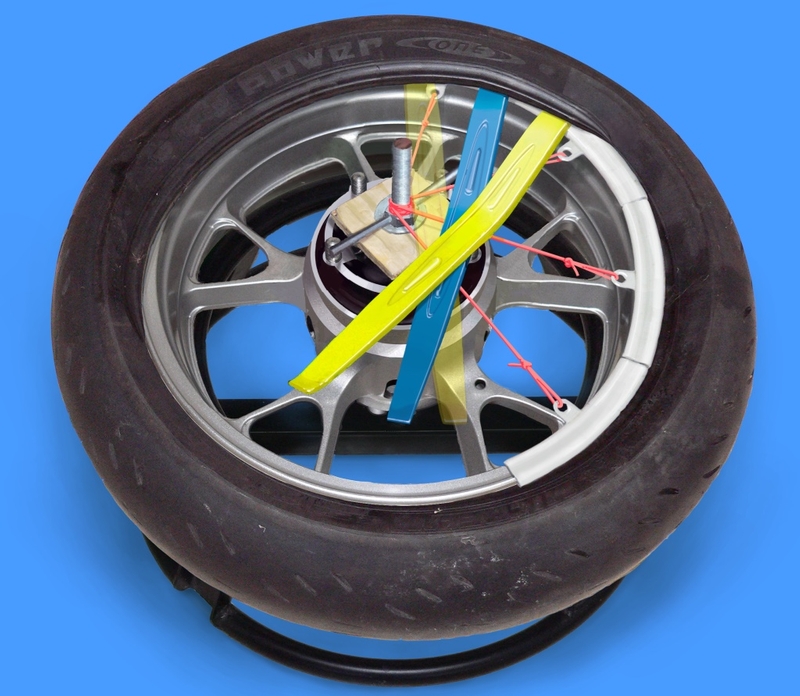
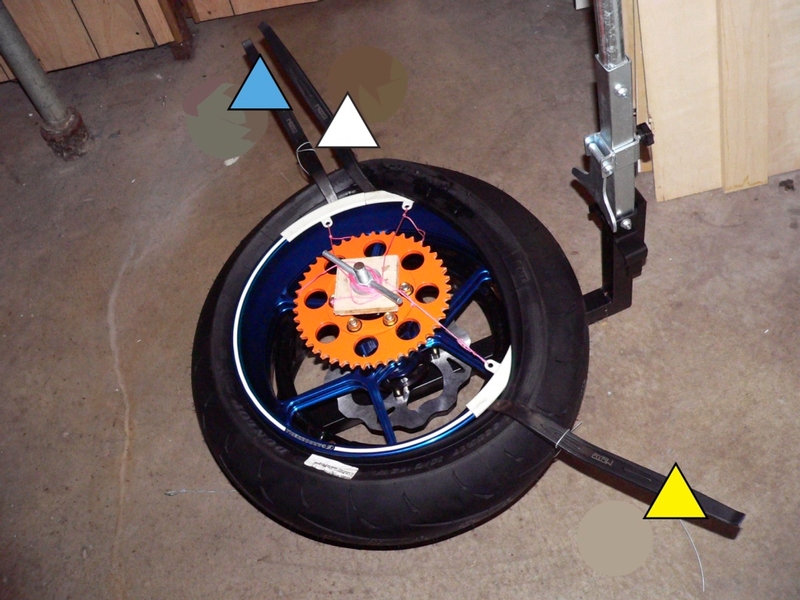
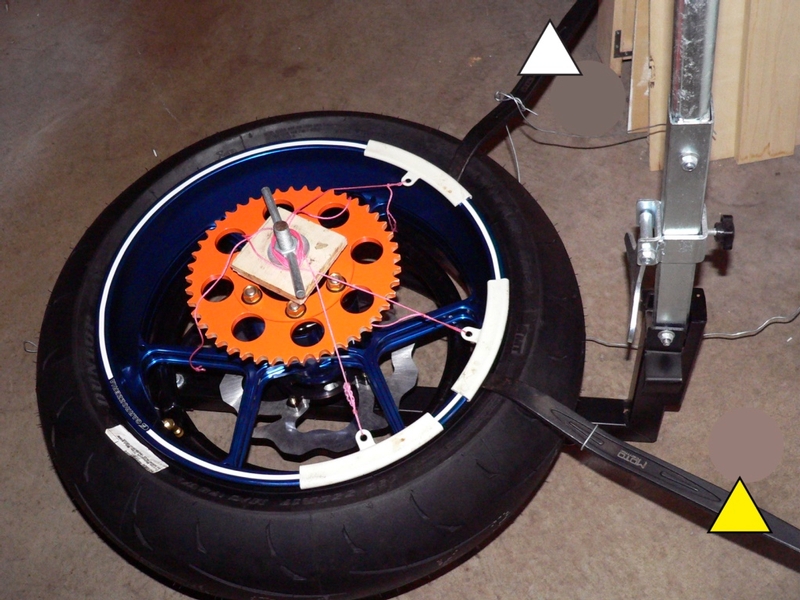
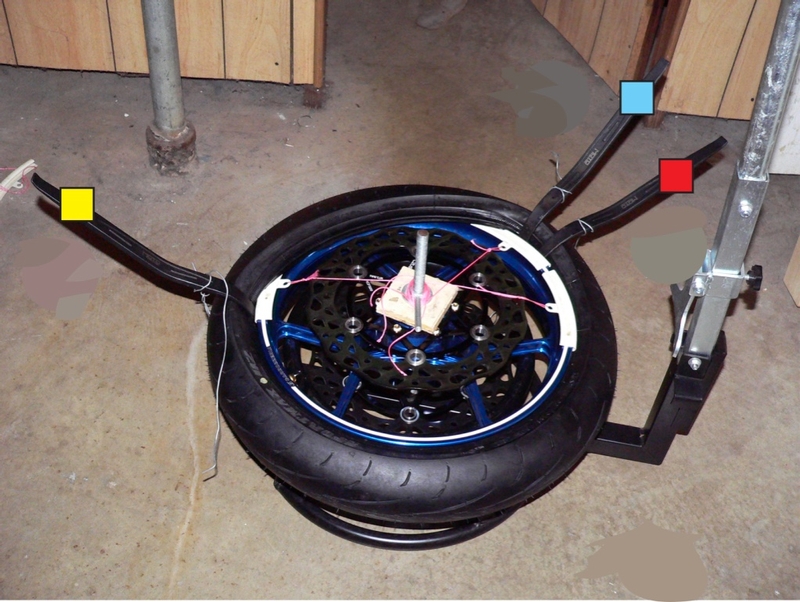
Continue leap frogging the tire irons all the way around the circumference of the wheel until the tire is entirely pulled over the edge of the rim. 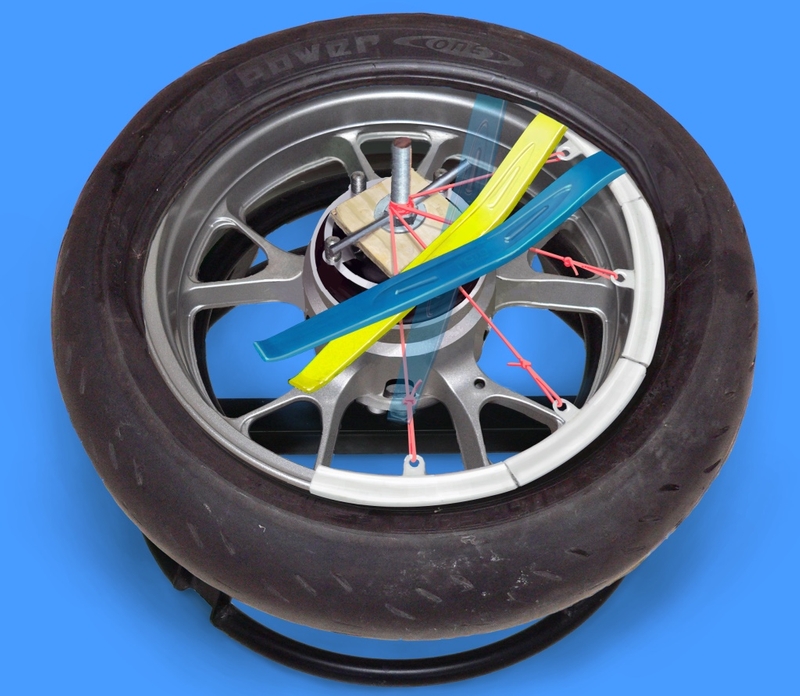
Pull the entire circumference of the upper bead over the top of the rim.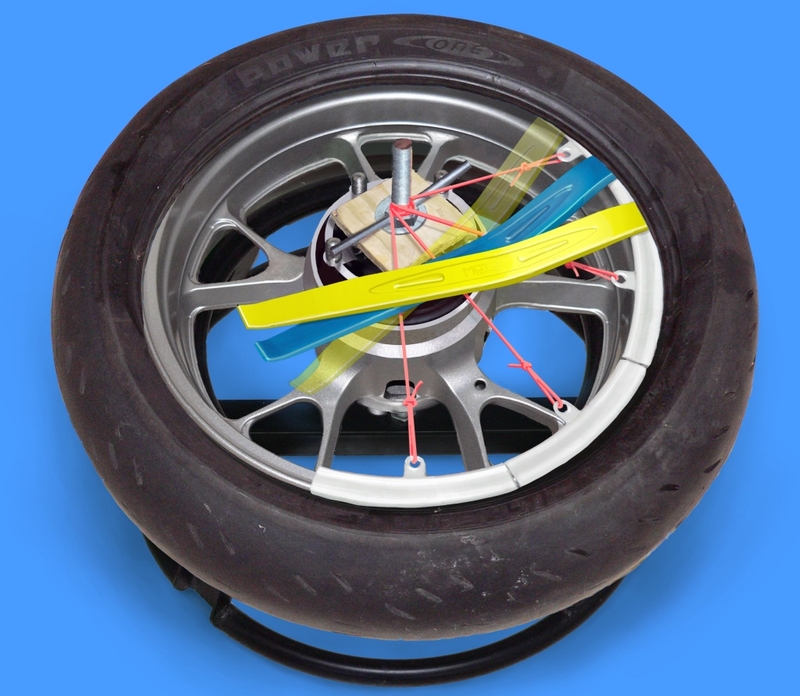
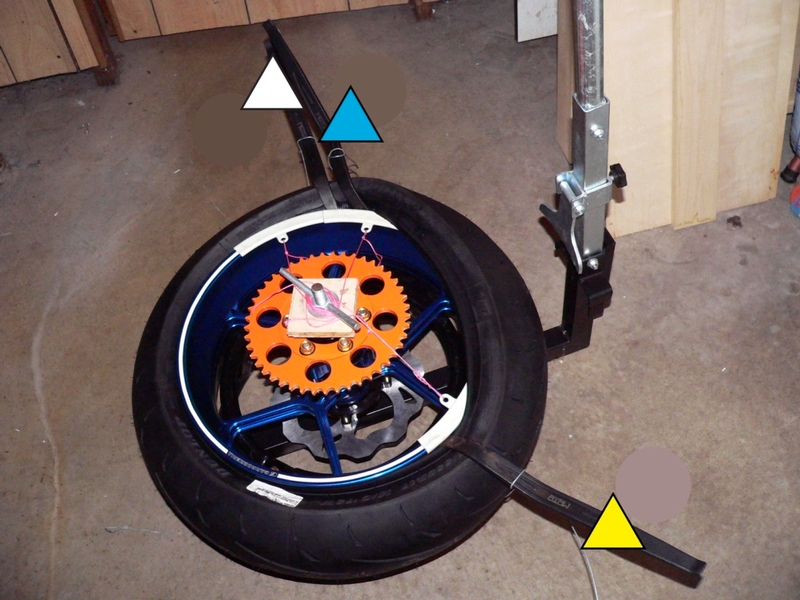
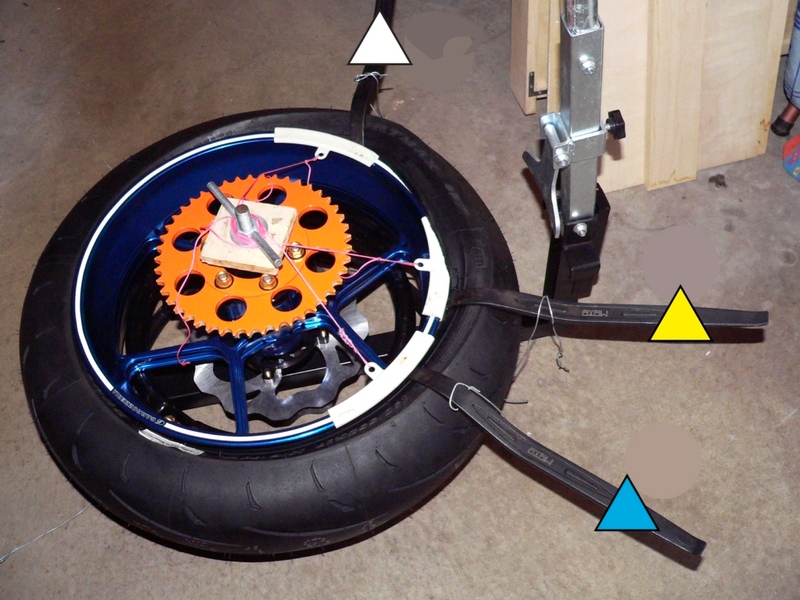
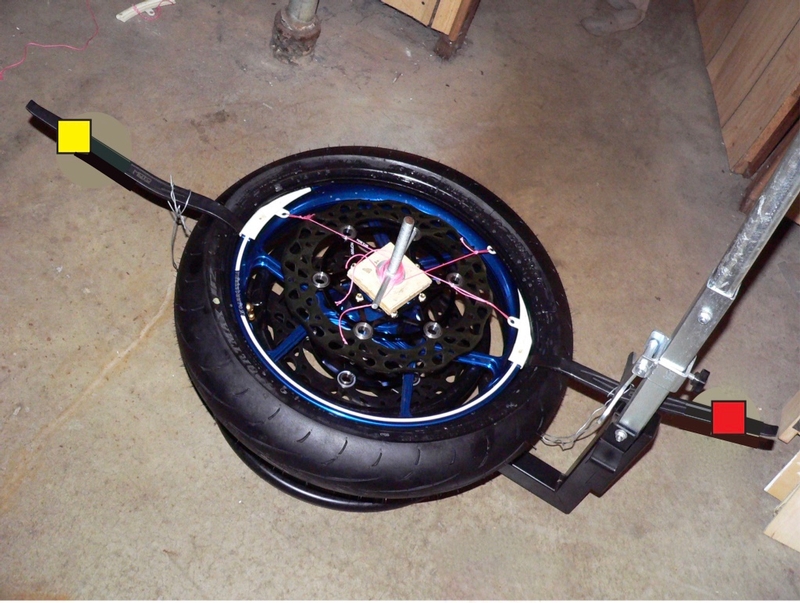
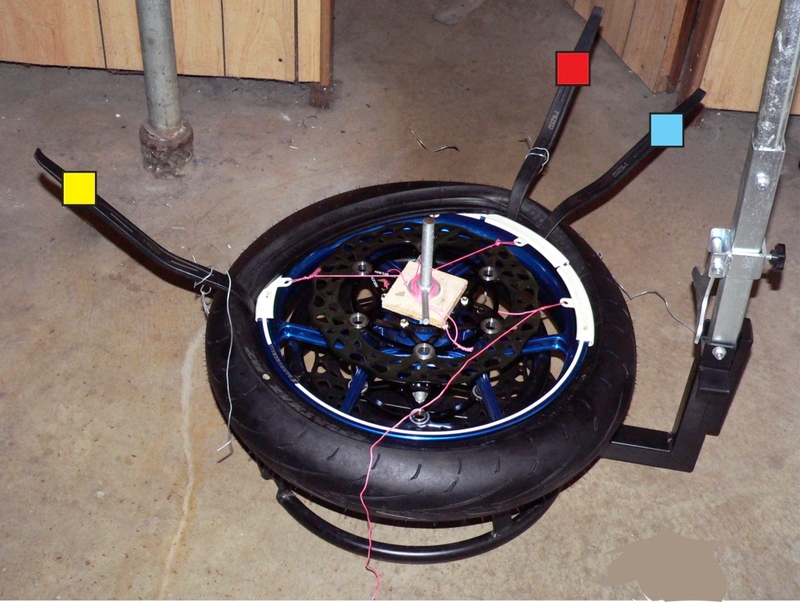
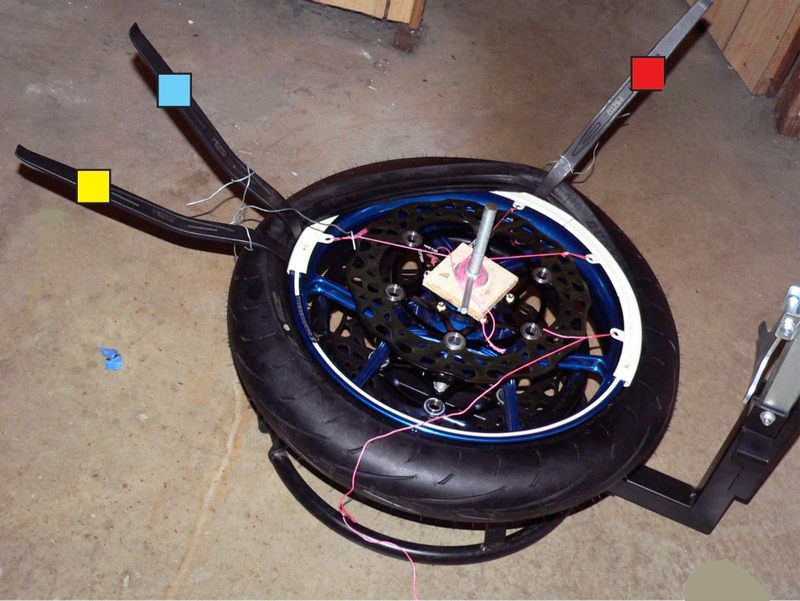
12. Lift the tire up so that the lower tire bead contacts the top inside edge of the rim. Repeat steps 6-11 on the lower bead of the tire. The bottom bead is pulled to the outside of the rim in the same manner as the top but the bottom bead will come off easier than the top bead. 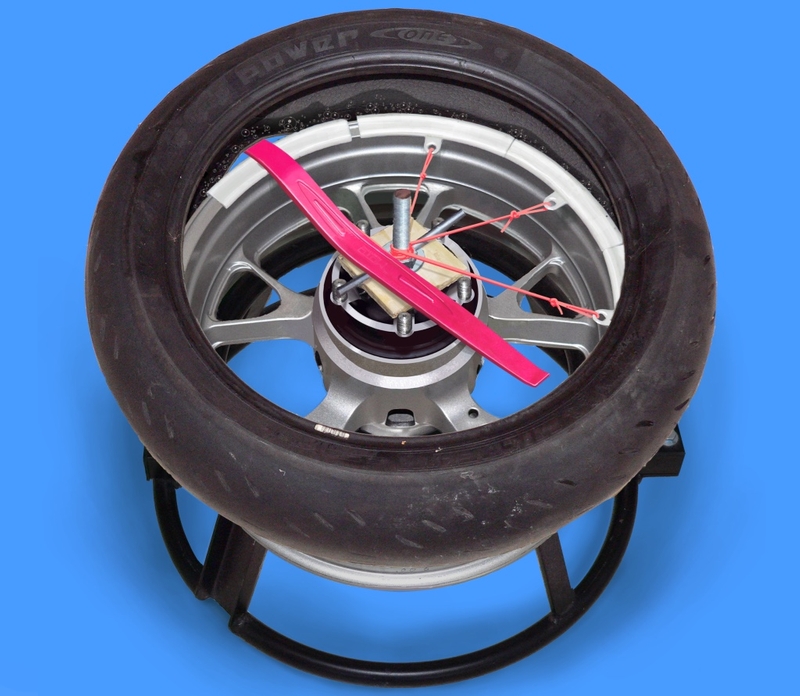
Bottom bead removal with irons wired to the center rod wing nut.
13. Remove the tire from the rim and remove the rim from the tire changing stand. Replace the valve stem if it is rubber. (rubber valve stems are supposed to be changed every time the tire is changed. (See Tire Air Valve Replacement, steps 1 through 3 or steps 5 through 7).
14. Loosely install the rotors and sprocket along with the bolts and nuts exactly as everything was removed. Place the rim with tire removed on a wheel balancing stand to determine where the heavy spot is on the rim is (see Wheel Balance, Steps 1-3).
Tire Installation
Before installing the new tire to the rim there are four marks to take note of. The direction of rotation mark on the rim, the direction of rotation mark on the tire, the heavy spot mark on the rim and the the light spot mark on the tire.
The direction of rotation mark on the rim was applied to the rim with Sharpie in step 3, above or in some cases there is a mark placed on the wheel by the manufacturer. This simply identifies which direction the wheel is meant to be installed on the bike. Also, the wheel must be installed in the proper direction of rotation so that the brake rotors mate to the proper caliper or the sprocket to the drive chain.
The direction of rotation mark on the tire is molded into the exterior sidewall of the tire. This mark needs to match the direction of rotation mark on the rim in order for the tire sipes to function properly.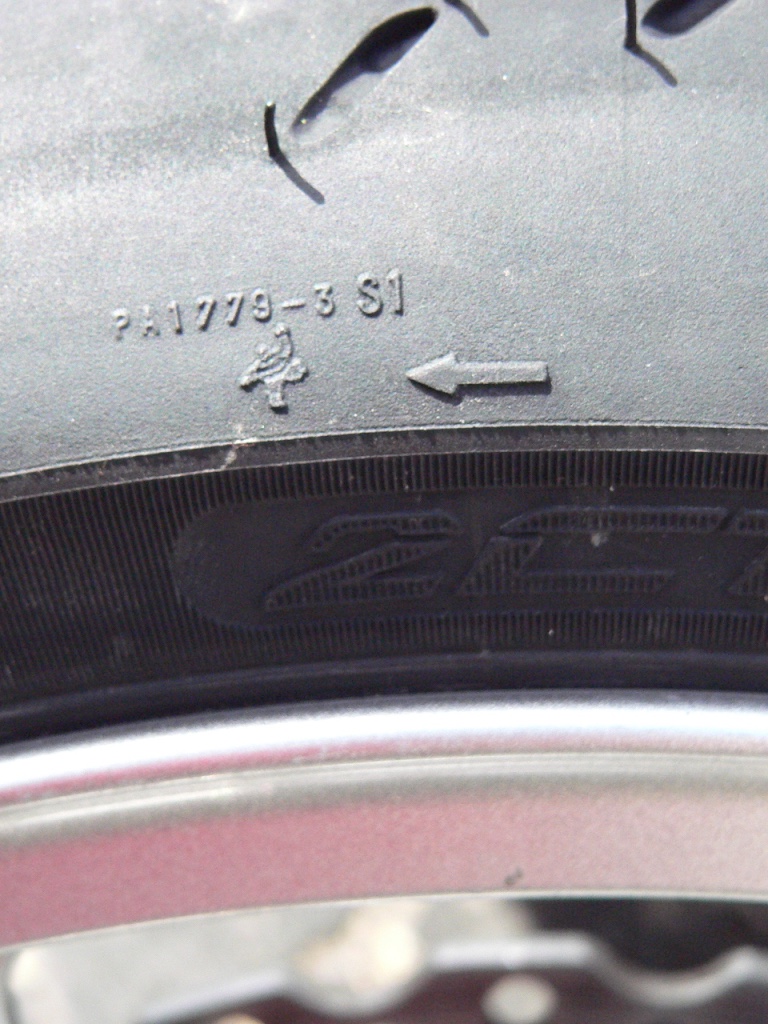
The heavy spot of the rim mark is a piece of tape that you apply to the rim after the rim is tested on the wheel balancing stand (see Wheel Balance, step 3).
The light spot of the tire mark is a red or orange dot that the tire manufacturer puts on the tire. If the the heaviest spot on the rim is aligned to the lightest spot on the tire, the two help balance one another out, reducing or eliminating the amount of balancing weights required. 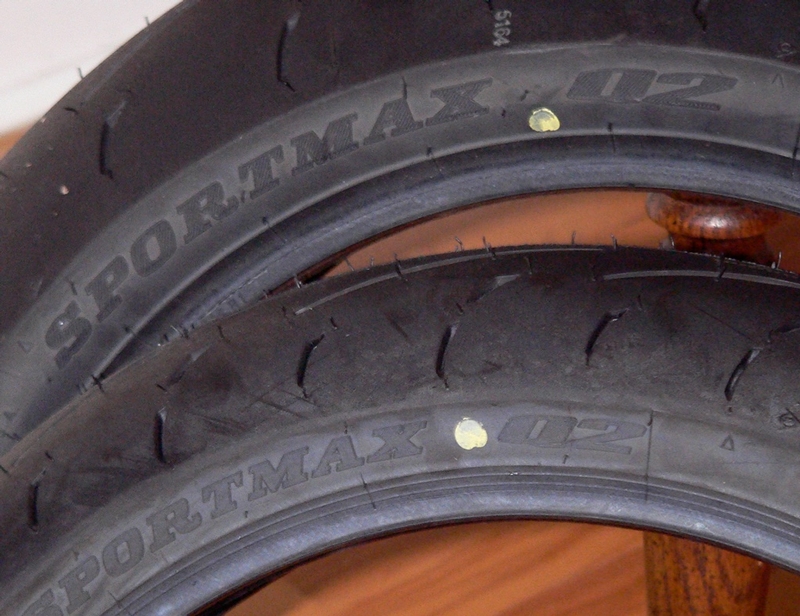
The preceding information about marks that need to be considered when installing tires applies to both front and rear wheels. The actual procedure of installing front and rear tires differs somewhat so I am detailing both.
Rear Tire Installation
15. If necessary, change the tire air valve before proceeding (See Tire Air Valve Replacement). Carefully determine how the rim and tire will best be placed on the tire changing stand to allow for easy alignment and visibility of the weight marks and direction of rotation marks on the rim and the new tire. Either side of the rim may face up according to what works best for your needs. Place the valve stem so that it fits in the joint of the top ring on the tire changing stand if necessary (as with the angled valve stem, see step 2 above).
Place the plywood square on the threaded rod of the tire changer. Thread the wing nut onto the rod finger tight so that it contacts the wheel without compressing the wheel bearings.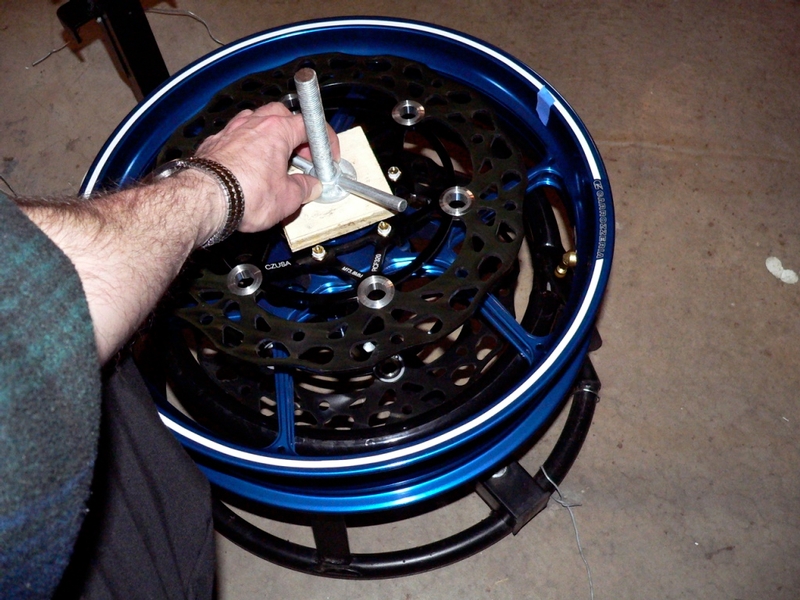
16. Use a blowgun connected to an air compressor to blow out any debris that may have settled into the new tire .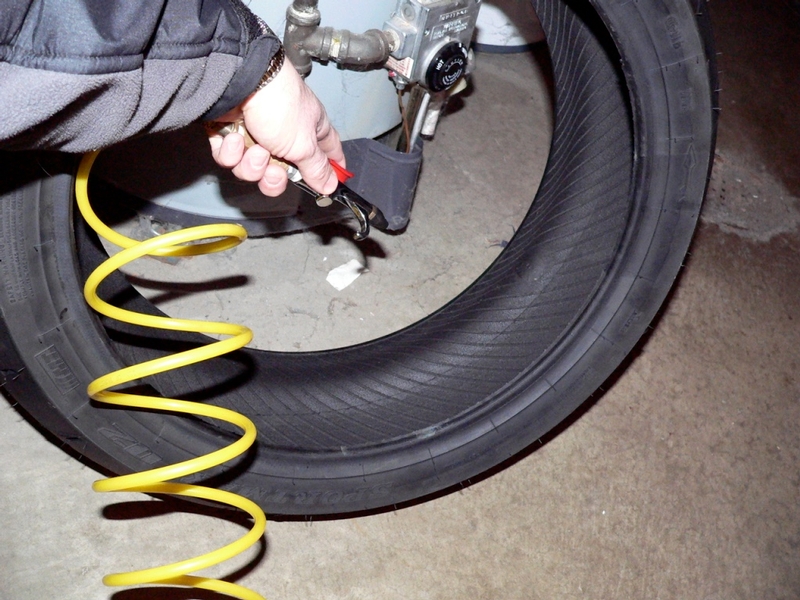
* Last updated by: Rook on 3/18/2018 @ 5:42 PM *


 )... but I sprint race on Pirelli.