


Tech Spec Installation
TechSpec comes in precut shapes to fit various motorcycle’s tank design. It also comes in larger pieces that you can custom cut and bevel the edges of with a bench grinder. I have only used the precut pieces so far but they work very well for gripping the sides of the bike and they do not come loose or slide on the surface. They will stick to surfaces that are rounded but if an edge of the TechSpec material comes close to one of the more abrupt curves on the bike, it may not want to stay down. If the material will stick to the contour of the surface as soon as it is installed, it will not come up on its own later on. It may be best to reposition TechSpec just a little before continuing to install it if an edge pops up immediately upon installation. If you need to to cover a small radius on the bike, the best thing to do is to custom cut smaller pieces rather than round the bulge with a single piece.
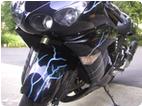
There are three varieties of TechSpec to choose from, each with its own texture. The kind I have is called “Snake Skin.” It is slightly thicker than the other two varieties.
Tools:
soap and water
masking tape
precut sections of TechSpec
painters tape
Windex, contact cleaner or denatured alcohol
It’s best to have the surfaces where Tech spec will be applied heated to at least 80 F. Place the bike in the sun or in a hot garage or use a hair drier or heat gun to warm up the surfaces. It will help a great deal to empty the fuel tank before applying TechSpec. If the fuel tank if it is empty, it will heat up much easier.
Wash you hands thoroughly to remove oil or dirt that my be transferred to the adhesive side of the TechSpec.
1. Use soap and water to clean off the surfaces where TechSpec will be applied. 
2. Apply masking tape to the back of each precut section of TechSpec so that it will stick to the bike for positioning. Check to make sure the TechSpec is positioned symmetrically on both sides of the bike and all pieces are positioned exactly where you want. Reposition as needed.
3. Use painters tape to mark the borders of the TechSpec as precisely as possible. 
4. Remove the pieces of TechSpec. Pull any tape residue that clings to the surface by pressing a piece of fresh tape against it and pulling it off.
5. Use Windex, contact cleaner or denatured alcohol (the installation instructions favor Windex and indicate that denatured alcohol is a less desirable cleaner for this application) to clean the surface where the TechSpec will be applied.
6. Peel up about one fifth of the paper backing. Lay it back down and fold over a corner so a small amount of the adhesive is exposed. It will be best to do this at an edge where the piece will need to conform to a small radius bend such as the area between the side and the top of the fuel tank. These areas are where the TechSpec might have a harder time adhering and it is better to get that stuck down as soon as possible. 
7. Position the piece according to the tape guidelines you made in step 3. Press the corner where the adhesive is exposed to adhere it to the bike. Hold it in place for a minute and press it down from the edge toward the paper backing to squeeze out any air. 
8. Lift the piece where the backing is still in place and pull back more of the backing. The backing should pull away from the piece pretty easily since it was loosened in step 6. Check that the edges of the piece will match up with the tape guidelines. Press the new section of exposed adhesive down working inward toward the paper backing the same way it was done in step 7. 
9. Repeat the process of pealing back the paper a little at a time and then pressing it into place. When you have adhered the entire piece, remove the tape guideline. Allow the adhesive to set up for 12 hours for maximum adhesion. 
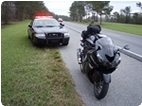
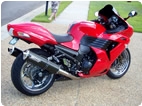
A problem I encountered using this method was that the top rear corner was lifting up just a little bit because the small radius bends at the side, top and back of the tank form a more or less rounded off point. It propbably would have been perfect if it were positioned just a couple millimeters lower. I stretched a piece of tape from the left side grip pad to the right to hold them flat but that did not successfully adhere the top rear corner on the right side. It is tiny gap and has has not lifted any worse in two years. As you see below, its not even visible in photos.
The only gripe I have with the precut product is that the center piece has a thin margin of adhesive that extends beyond the edge of the rubber. After a couple moths, this turns brownish yellow. It is very thin and the contrast with the black color of the TechSpec is not all that great. It would not be noticeable on a white bike but may be considered more objectionable on a black bike. I do not know if it would be advisable to trim the margin of adhesive off before installing but it could easily be colored with a fine point permanent magic marker.


* Last updated by: Rook on 6/18/2014 @ 8:40 PM *