Move Close
Welcome to zx14ninjaform.com!

You are not logged in.
New Topic Reply
Next Page

Page: 1 2

Previous Page

Thread: Dzus Fastener Install

Created on: 04/08/12 10:47 PM

Replies: 29

Rook


Rook's Gravatar

Joined: 03/28/09

Posts: 20579

Dzus Fastener Install
04/08/12 10:47 PM

Dzus Fasteners Install

Dzus fasteners are quarter turn bolts for body panels. They are designed to be easily removed for frequent maintenance or for fast trackside repairs.

Dzus fasteners come in a variety of styles including D ring, hex key and slotted heads. They also come in differnt finishes and in different lengths to accommodate various thicknesses of body panels.

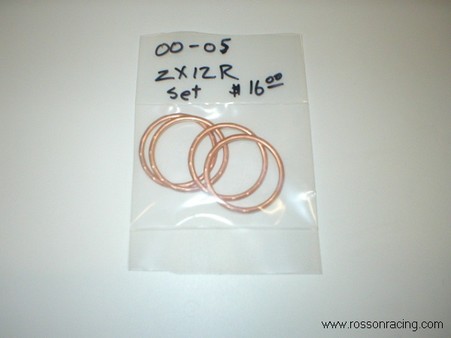
For the ZX-14, there are many fasteners and body panels so removal is time consuming even with Dzus fasteners. The fasteners that thread into the frame would have no simple means of installing the necessary anchor for the fastener. Dzus Fasteners are also much heavier than the OEM fairing fasteners. Still, they work well for replacing the small fasteners between the top fairing and the side and also for the fasteners that connect the side to the lower.

Dzuss fasteners can be very expensive. The cheapest that I was able to find online were at KuveyGirl. Order 14mm working length for OEM body panels on the ZX-14. The fasteners come in sets of four, six or ten.


Tools:
silicone spray lube
dremel
Sharpie marker
dremel grinding disk.
safety goggles
grinding stone
scribing tool
grinding bit
120 grit sand paper
pliers
colored marker or paint


1. Remove ram air covers, Formans, Side Fairings and Lowers (SEE FAIRINGS REMOVAL).


2. Lube well nuts with a drop of silicone spray lube. If the well nuts do not pull out easily through the front, push the rubber flanged end of the well nut through the hole to the back of the the fairing. Remove all 12 well nuts from the side fairings and the lowers.


3. Slide anchor clips onto the top edge of the side fairing so that each matches up
with one of the three fastener holes. You will notice that the back two holes on the left and right side fairings line up well with the clips. No modification is necessary, but for a perfect fit, use a dremel to grind away a small amount of metal from the bottom edge of the clip so that it will slide downward a tiny bit more allowing the clip and the fairing holes to lock together.

Anchor clips, rear view

Anchor clips, front view


If the bottom edge of the clip (the edge below the stamped writing) is ground away a small amount, this will allow the arched flange above the clip hole to catch in the fairing hole. The clip is meant to lock in place as such and also by the bottom edge resting against the ledge of the fairing as shown in the top photo.


You will also notice that the front side fairing hole does not match up with the clip hole because the clip cannot be slid down far enough. One corner of the clip needs to be ground off.

4. Trace a line with a Sharpie marker to mark the angle of the fairing ledge to the anchor clip.

Trim this off with a dremmel tool grinding disk. Be sure to wear safety goggles.

Smooth the edge with a grinding stone.

5. Position the anchor clip so that the hole in the clip matches up with the hole in the fairing. You will see that the holes will only line up if the clip is placed over the raised portion of the front tab on the fairing. Trace a guideline along the edge of the clip with a scribing tool to mark the portion of the raised area that will need to be ground away.

Tip: Position the two locking teeth on the clip so that they are parallel to the seam in the adjoining fairings. The D-ring is oriented so that it folds perpendicular to the locking teeth.


6. Use a dremel grinding bit to remove the necessary raised portion of the tab. Use 120 grit sand paper to smooth out the ground area.

7. The front clip must be further modified so that it will accept the 14mm Dzus fastener through the 15mm of fairing the fastener must pass through at the front hole. Squeeze the center portion of the clip with a pliers. The clip must be bent so that the hole with the locking teeth is brought closer to the front of the clip


The left clip shows the minimum amount the clip must be bent to permit a 14mm fastener to engage with it while passing through the thick material at the front of the side fairing. The right clip is unmodified.


8. Slide the anchor clip onto the fairing tab. Use a colored marker or paint to color the bottom of the clip. There is a bit of a gap between the top fairing and the side fairing that the clip may be visible through.

9. Install both side fairings as normal. Insert the Dzus fastener through the holes in the top fairing (the tip of the fastener fits very tight in the outer hole and needs to be twisted a bit while you push it through the top fairing). Turn the fastener clockwise until you feel it catch, then turn a quarter turn until the fastener stops. Turn a final few degrees until you feel the fastener lock. The front fastener will be very tight turning into the anchor clip. The D-ring is more than strong enough to turn the fastener but a straight slot screwdriver may also be used.


10. Fold the D-rings to the side. If any of the D-rings do not lay flat, it is because they are contacting the fairing before they are fully folded over. Use a vise grips and the shaft of a screwdriver to bend the sides of the D-ring so that they curve away from the fairings when folded over.

The d-rings on the right side of the top fairing seem to contact the fairing at an odd angle. The front one was extreme and the D-ring was not able to be folded over completely. It required bending. The Dzus fasteners on the left side top fairing all folded flush to the fairings.


11. The clips lock into the holes of the lowers perfectly. No modifications to fairings or clips are necessary. Install the lowers as usual and install Dzus fasteners as described in step 9.


OEM fasteners with washers and well nuts.


Installing 12 Dzus fasteners amounts to a net weight gain of 3.8 oz.


* Last updated by: Rook on 12/25/2016 @ 8:35 PM *


'08 MIDNIGHT SAPPHIRE BLUE Now Deceased

Link | Top | Bottom

Grn14


Grn14's Gravatar

Location: Montana

Joined: 02/25/09

Posts: 15511

RE: Dzus Fastener Install
04/09/12 12:44 AM

EXCELLENT ROOK!Gotta hand it to ya...you sure get er dun!I would NEVER have the patience to sit down and grind and fab all that stuff...no way.You Da Man!They look good on there.Nice slider BTW....looks much more usable with that flowing top slider piece on there .


* Last updated by: Grn14 on 4/9/2012 @ 12:46 AM *

Link | Top | Bottom

Rook


Rook's Gravatar

Joined: 03/28/09

Posts: 20579

RE: Dzus Fastener Install
04/09/12 10:16 AM

Thanks, Grn. It is really not to big of a deal but just for Dzus fasteners, yeah< I guess its a Bit of a PITA. The lowers fit perfectly without any extra work. I think the lowers look better too. I may just go with some kind of annodized bolt that fits the wellnuts for the top. This is mainly an appearance mod. The 14 is going to take a lot of time to remove the fairings no matter what kind of fastener you have.


&#x27;08 MIDNIGHT SAPPHIRE BLUE Now Deceased

Link | Top | Bottom

Grn14


Grn14's Gravatar

Location: Montana

Joined: 02/25/09

Posts: 15511

RE: Dzus Fastener Install
04/09/12 1:01 PM

Ya....I'm gonna find out just how much more it's a pain this week when I install my Brock's single 4 into 1 Titanium and PowercommanderV.Geez....looks like A LOT of work...ah well...it'll be worth it.Maybe I should film the whole deal?Whattaya think?The 'package' that's coming is weighed at 15 lbs UPS...That's with the box and petron and PCV and spring hook dealy.So the exhaust system must be somewhat less...gonna be a good weight reduction for sure.I think their site said something like 8+ lbs for the system.NICE.


* Last updated by: Grn14 on 4/9/2012 @ 1:33 PM *

Link | Top | Bottom

Jeff01ss


Jeff01ss's Gravatar

Location: Missouri

Joined: 04/29/09

Posts: 724

RE: Dzus Fastener Install
04/10/12 12:46 AM

the 14 is SIMPLE compared to an 07-08 CBR600RR believe me! FML


The problem with the world today is that there is no one to eat the stupid people!

You taught me hate, I'll teach you fear!

Link | Top | Bottom

Rook


Rook's Gravatar

Joined: 03/28/09

Posts: 20579

RE: Dzus Fastener Install
04/10/12 10:40 AM

Ya....I'm gonna find out just how much more it's a pain this week when I install my Brock's single 4 into 1 Titanium and PowercommanderV.

Sweet. There are too many 14rs out there with stock exhaust. I tell ya, as much as I would love to own a 14r, I think I would have to have an aftermarket system on it before I would be ready to give up the old 14. Modding has become as important as the bike. If I had a track bike, I think the mods would actually be more important than the particular bike I had. Gets expensive, but can't have a sportbike without mods anymore.

the 14 is SIMPLE compared to an 07-08 CBR600RR believe me! FML

Yeah, Grn, I don't think you will have a single problem with the 4-2-1. I would go the extra step of draining the coolant and totally removing the radiator. I'd hate tobend any rad fins while torquing the header nuts. ...or they say to tip the rad bottom forward pivoting on the top mounts and put a piece of cardboard over the back....I'd just take it off.


&#x27;08 MIDNIGHT SAPPHIRE BLUE Now Deceased

Link | Top | Bottom

Grn14


Grn14's Gravatar

Location: Montana

Joined: 02/25/09

Posts: 15511

RE: Dzus Fastener Install
04/10/12 12:22 PM

Well...we'll see.There is 'quite' a bit of room in there once that fairing is off...so...IDK yet exactly how I'm gonna pull this off.Apparently,the header comes in two parts....but not sure yet.The stock one is all one piece(4 into one into two)??I'm not looking forward to taking the fairings off


* Last updated by: Grn14 on 4/10/2012 @ 12:23 PM *

Link | Top | Bottom

Rook


Rook's Gravatar

Joined: 03/28/09

Posts: 20579

RE: Dzus Fastener Install
04/10/12 3:01 PM

With my Cannon, I had to get the head pipes on. They were one pipe/port. Put new gaskets in and Just let them hang loosish. Then Because the the rest of the system was so freakin tight, I had to assemble it and then join it up to the headpipes hangine down. Have something under there to rest it on. Don't rim rack on the loose head pipes/gaskets/exhaust ports (maybe you might as well try just going snug on the header nuts so it won't gouge the seats or gaskets tilting the pipes up and down while bolted). I just found it hard to twist each sectoin so it all matched up.....but then again the tsukigis are known for being really tight + I have a new ceramic coat on there.

Installing the PC will prolly be a lot more work than the pipe.


* Last updated by: Rook on 4/10/2012 @ 3:05 PM *


&#x27;08 MIDNIGHT SAPPHIRE BLUE Now Deceased

Link | Top | Bottom

Grn14


Grn14's Gravatar

Location: Montana

Joined: 02/25/09

Posts: 15511

RE: Dzus Fastener Install
04/10/12 10:57 PM

"Installing the PC will prolly be a lot more work than the pipe"..... Talked with Steve today at Brock's...apparently...they're sending the map and all loaded already(nice).I won't have to adjust the TP or anything.Just install and go.Unhooking my Computer and taking it up and down stairs was a real drag with my PC III.I know...shoulda had a laptop...well...I didn't.

Link | Top | Bottom

Grn14


Grn14's Gravatar

Location: Montana

Joined: 02/25/09

Posts: 15511

RE: Dzus Fastener Install
04/12/12 12:43 AM

Okay...VICTORY!!!!Started at 11:00 PM...just now finished removing the header pipe.Took all necessary bodywork off...no problem(s).Removed radiator fasteners,let radiator hang down so I could get to the head pipe bolts...no prob.Removed mufflers...(2nd)...all ready now for my new system...should go in very nicely.Wasn't near as bad as I thought it was gonna be.Thank God!!!!Sides came off fairly easily..no real drama.Nothing scratched or broken.No radiator contact.Happy so far....now Friday....'the install'....... .(watch it be perfect riding weather today )


* Last updated by: Grn14 on 4/12/2012 @ 12:46 AM *

Link | Top | Bottom

Rook


Rook's Gravatar

Joined: 03/28/09

Posts: 20579

RE: Dzus Fastener Install
04/12/12 2:16 AM

..all ready now for my new system...should go in very nicely.Wasn't near as bad as I thought it was gonna be.

see, no big woop. You going with the same gaskets? You could. Lots of people do BUT>>>> if they leak you will wish you used new ones you coulda bought from the dealer for about $16. You won't know until you have it all put back together and start it up. The old ones will prolly seal again but worth it to go with new gaskets IMHO.


&#x27;08 MIDNIGHT SAPPHIRE BLUE Now Deceased

Link | Top | Bottom

Grn14


Grn14's Gravatar

Location: Montana

Joined: 02/25/09

Posts: 15511

RE: Dzus Fastener Install
04/13/12 8:48 AM

"You going with the same gaskets?"....this is gonna sound...weird...but...there were no gaskets on these stock headers.Flanges holding the pipe(s) secure...but no gaskets.I didn't see any anyway.The header pipe just slipped out of the port...that was it . IDK yet...but I don't think there's any gaskets with the new system either...spacers...yes...I think so...and flanges...yes...but no gaskets.UNLESS..you're talking about the midpipe/collector connection.Yes...there were gaskets on that.They're still on there...good as new.I don't know if the Brock's pipe(s) require any...but I've got em if they do.


BTW...it's ABSOLUTELY GORGEOUS out today....most excellent carving weather .
I LIKE this part......
"With Brocks street map and PCV i had i little problem keeping the front end down in first gear so i backed off the stagging RPMs from 5500 to 4500 and that helped with the wheelies ..The bike was running great.. Below are the tickets , I think i have them in order .. My last run before the track went away i had a 1.31 60 footer"


"nice runs...does bike feel any different on track with few changes recently? i bet it would have been in 8.4's if it was cooler".

"Yes the PC and map helped for sure .. My MPH of 161+ is repeating over and over even on a poor run... It's making more power now but i need to find out how it use it .. When i got home tonight my drag shock was setting by my door .. Maybe the drag shock will help me controll the power better .. I wish i had it on the bike for today .. But you know UPS , always late ..."
....this from a guy who drags his arse off...using Brock's single Titanium system(CT I think),and PCV with Brock's map and Guhl flash.No other mods...pump gas....bone stock except for these things.

Gonna be a GREAT time this year!!!!!


* Last updated by: Grn14 on 4/13/2012 @ 9:17 AM *

Link | Top | Bottom

Rook


Rook's Gravatar

Joined: 03/28/09

Posts: 20579

RE: Dzus Fastener Install
04/13/12 10:14 AM

I'd just give Brock a call and ask if gaskets are needed. Seems very strange that there were no gaskets on the OEM setup. I'd call and ask. Check online and see if they make OEM header gaskets for the 14r. Last thing you want is to have exhaust hissing out of the exhaust ports.

The gaskets are made of very thin sheet metal. The metal is formed to make a hollow ring that collapses when the header nuts are tightened. I also used some of this on both sides of the gaskets.

The gaskets look like this, at lest on the Gen1.


&#x27;08 MIDNIGHT SAPPHIRE BLUE Now Deceased

Link | Top | Bottom

Grn14


Grn14's Gravatar

Location: Montana

Joined: 02/25/09

Posts: 15511

RE: Dzus Fastener Install
04/13/12 10:27 AM

He's sending a tube of Copper Permatex with the pipes...standard procedure with them.If there are gaskets,I'll be making sure they're in there before I do all this.He talked about the install on his site...no mention of any separate gaskets...only about putting a 'small' amount of the permatex on the OD of the pipe(s) before installing in the ports.The flanges that come with the set...they're quite beefy.Lots of support for a header pipe.With em seated in there against the head....I can't really see any problem...unless a guy got em cocked somehow...which he mentioned as well.There is a specific tightening(fitment)procedure to getting this system in correctly.It's a very close fit and the tolerances are very tight...even though the pipes will easily slip into the ports and all.

I've used that Copper Sealant before...it works very well for close tolerance applications.The machining on the head there...very nice.


* Last updated by: Grn14 on 4/13/2012 @ 10:33 AM *

Link | Top | Bottom

Rook


Rook's Gravatar

Joined: 03/28/09

Posts: 20579

RE: Dzus Fastener Install
04/13/12 1:25 PM

.I can't really see any problem...unless a guy got em cocked somehow...which he mentioned as well.

That is exactly what the gaskets are for, I'm sure. Seems as though it would very difficult to be certain that the headers were absolutely square with the ports when this thing runs down all the way down the front and the whole length of the bike. Then again, full systems are in slip together sections and they are made to flex some. I wouldn't question the wisdom of Brock. He must know the best way and that's how I'd do it. I am always very careful with those machined surfaces that are meant to adjoin with other hard parts. Always there is a gasket between...it not supposed to get scraped up. I'm going to ask at BL for you on this one. Everyone has a Brocks over there.


&#x27;08 MIDNIGHT SAPPHIRE BLUE Now Deceased

Link | Top | Bottom

Rook


Rook's Gravatar

Joined: 03/28/09

Posts: 20579

RE: Dzus Fastener Install
04/13/12 1:45 PM


&#x27;08 MIDNIGHT SAPPHIRE BLUE Now Deceased

Link | Top | Bottom

Grn14


Grn14's Gravatar

Location: Montana

Joined: 02/25/09

Posts: 15511

RE: Dzus Fastener Install
04/13/12 2:19 PM

Okay...it's here now...just quickly looked inside...ya...there's four gaskets like you said Rook.Not like those zx12 ones...taller.But yeah...it's all here...the system,spring hook tool(they sent 2LOL)...PCV...full instructions.Gonna be fun...see ya in a bit...wish me luck Bros.

Link | Top | Bottom

Rook


Rook's Gravatar

Joined: 03/28/09

Posts: 20579

RE: Dzus Fastener Install
04/13/12 5:52 PM

Cool man. That just didn't sound right. I'll stay tuned. You may have a problem getting the gaskets to stick before you get the pipes bolted. The copper spray or RTV or whatever you use will help that.

Also, there is a way that the gaskets should go. One side is smooth and the other has a bevel with a seam (that is how the gen1 OEMs are). I noticed my original gaskets were installed with some seam out and others seam in to engine so IDK how much it matters. I would check though, if you have those kind of gaskets.

wierdest thing is that there were no OEM gaskets. Are you sure they did not stick to the motor? One of mine was stuck very hard and required some very careful prying ----as I mentioned you don't want to scrape that machined surface.


* Last updated by: Rook on 4/13/2012 @ 5:52 PM *


&#x27;08 MIDNIGHT SAPPHIRE BLUE Now Deceased

Link | Top | Bottom

Grn14


Grn14's Gravatar

Location: Montana

Joined: 02/25/09

Posts: 15511

RE: Dzus Fastener Install
04/13/12 10:31 PM

Ya...okay...I 'found' the gaskets...ya...they were in the ports...so I just left em in there...Fitted everything up...had to remove the rad...pretty tight fit.Everything came out and went back in just great.NO problems.Well...okay...one...I somehow 'lost' a pushpin.It's cool...I'll get one soon.No biggie.

PCV went in sweet...that gear position plug was a bit of a pain...but she popped right apart and went back together easy enough once I got it figured out.

Pipes fit perfect...no drama at all.Rad went back in nicely.All the bodywork fit back together just fine.Took her out for a spin...OMG...ROOK...this thing is dangerous bro...it is.Like night and day.Still in shock with the perfromance this baby is puttin out now.BTW...I weighed her at the scales....500 lbs on the nose...half tank of fuel.She feels like she's about 300 lbs though...amazing what these mods did.

Listen...I'll gab with ya soon...tomorrow or somethin.I got to get some rest.Bout all I can say is...OMG!


* Last updated by: Grn14 on 4/13/2012 @ 10:33 PM *

Link | Top | Bottom

Rook


Rook's Gravatar

Joined: 03/28/09

Posts: 20579

RE: Dzus Fastener Install
04/14/12 8:54 AM

.had to remove the rad...pretty tight fit.

I will maintain that it is always better by far to just take the damned thing out when installing headpipes. Lots of people say don't bother but I always say take it out. A 1/4" drive ratchet w/a looooong extension (maybe 11" or more) and a Ujoint adapter is the way to check all of those header nuts w/o taking the the radiator out.

NO problems.Well...okay...one...I somehow 'lost' a pushpin.It's cool...I'll get one soon.No biggie.

Maybe a Dzus fastener?


&#x27;08 MIDNIGHT SAPPHIRE BLUE Now Deceased

Link | Top | Bottom

Grn14


Grn14's Gravatar

Location: Montana

Joined: 02/25/09

Posts: 15511

RE: Dzus Fastener Install
04/14/12 11:40 AM

Silly boy!!!!I didn't realize how simple really it was to remove the rad...yes..basically the two top mount bolts...and the lines.Made a world of difference being able to get easily to the header bolts.Puttin those springs on there..two on each outlet...I couldn't have done it I don't think with the rad in there.Those gaskets..ya..they look just like those you posted..yup.One came out...It looked fine...so...I put it back in there.All's cool.I think I'm gonna have to get the sound insert though...she's a growler now

Link | Top | Bottom

Rook


Rook's Gravatar

Joined: 03/28/09

Posts: 20579

RE: Dzus Fastener Install
04/14/12 8:07 PM

So you were able to move the rad forward out of the way w/o emptying the coolant? Good deal.. That would be the fast way. I ended up draining my system but it was 2 years old anyway. Never hurts to flush system and change coolant. ths is a nice threadf about Dzus fasteners.


&#x27;08 MIDNIGHT SAPPHIRE BLUE Now Deceased

Link | Top | Bottom

Grn14


Grn14's Gravatar

Location: Montana

Joined: 02/25/09

Posts: 15511

RE: Dzus Fastener Install
04/14/12 10:44 PM

" ths is a nice threadf about Dzus fasteners".....I know...sorry Rook...wasn't trying to derail your thread.

But speaking of fasteners..(here,maybe this'll make up for the sidetrack)...I found my lost lonely pushpin...yup.Still installed in the fairing hole...that dern rubber side cover piece was hidin it!Just popped er out and put er back in.So...all bolts,fasteners,pushpins...everything that came off....went back on!WHEEEEEEEE!!!!!!


* Last updated by: Grn14 on 4/14/2012 @ 10:45 PM *

Link | Top | Bottom

Rook


Rook's Gravatar

Joined: 03/28/09

Posts: 20579

RE: Dzus Fastener Install
04/14/12 11:37 PM

...I found my lost lonely pushpin..

I knew you would Grn. I was even going to say, "don't worry, you'll find it."

No prob going OT here. Pretty doubtful that many people will jump right on this mod but if interested, it's here.


&#x27;08 MIDNIGHT SAPPHIRE BLUE Now Deceased

Link | Top | Bottom

COOTER


COOTER's Gravatar

Location:

South West Florida

Joined: 04/27/11

Posts: 1342

RE: Dzus Fastener Install
04/17/12 1:24 AM

Hay rook do they rattle when you ride or when the bike idles and will you be able to return the bike to stock fasteners without any damage to the paint?


Team panda (ride safe ride sober)

Link | Top | Bottom


Welcome to zx14ninjaform.com!
 
New Topic Reply
Next Page

Page: 1 2

Previous Page

New Post

Please login to post a response.