Hey all! A new zx-14 owner here, upgraded a couple of days ago and love the new ride with one little annoyance (I am a bit picky about things). The bike's been down (knew that when I was getting it, but I got a pretty good deal on it and it's in a very good shape) and it looks like the fairing stay is bent a little. There are small gaps in between fairings where they shouldn't be and the mirrors are just slightly off alignment, so pretty sure the fairing stay bracket is bent. Found the replacements for $50 on ebay and was wondering if I'd be able to replace that myself. I always did the simple work on the old bike myself, so not a complete newbie, but I try to stay away from working on engines and whatnot. This one seems like it shouldn't be too hard, just have to be careful removing the fairings.
Any thoughts? Is there something I could possibly screw up? Should I take it to the mechanic?
 |
 |
 |
 |
 |
 |
 |


Page: 1
Created on: 06/26/14 12:00 PM
Replies: 5
Fuzz
Joined: 06/26/14
Posts: 5
Fairing stay replacement
06/26/14 12:00 PM
Rook

Joined: 03/28/09
Posts: 20579
RE: Fairing stay replacement
06/26/14 1:33 PM
IDK how similar the 14r is to the gen1 but I have all fairings off my 08 right now. Looks easy to remove the fairing stay that the top fairing hangs upon.
Let me know if you want pics.
2 bolts to the steering neck
4 bolts to the ram air intake
3 bolts to the instrument cluster which you will need to swap over to the new stay.
Definitely check the SM for torque specs and any other info.
you might check the side fairing hangers on both sides. Also radiator brackets.
I'd be wary of buying used fairing stays off of ebay. It could be a bent one off another bike that was dropped.
My busa was dropped two x by me and I think the dealership dropped it too. My top fairing stay is bent. I can tell by the small gap and misalignment of the fairing. Odd thing is the fit on the side it was dropped on looks perfect.
* Last updated by: Rook on 6/26/2014 @ 1:34 PM *
Fuzz
Joined: 06/26/14
Posts: 5
RE: Fairing stay replacement
06/26/14 1:55 PM
Rook, thanks for response. Mine is '08 as well, so if you could take a pic that would be awesome, but only if it's not too much trouble.
Seller has great ratings and says the stay is off a zero-mile bike and is in perfect condition (I've had a couple of disputes over ebay stuff before, so I figured I'll take a risk, ebay is usually reasonable with their purchase protection). If it arrives and isn't straight, he'll have to take it back. I am not in a huge hurry since its just a cosmetic nuance and doesn't interfere with anything, but would like to get it fixed nonetheless especially if it doesn't cost me too much.
P.S. The bike is amazing though, going from a 2006 750 can-o-tuna to zx-14 is quite an experience :)
Rook
Joined: 03/28/09
Posts: 20579
RE: Fairing stay replacement
06/26/14 9:00 PM
Top 2 bolts on ram air inlet. Also 2 bolts facing out to sides on the ram air tubes. You also see the 3 nuts that need to be removed to take off the instrument cluster. Hope they are fixed on the inside so you don't need to take apart the instrument cluster to remove it.
Here are the two bolts that hold the stay to the steering neck.
The SM suggests this:
Upper Fairing Bracket Removal
• Remove: Upper Fairing (see Upper Fairing Removal)
Front and Middle Inlet Ducts (see Front and Middle Inlet Duct Removal in the Fuel System (DFI) chapter)
Meter Unit (see Meter Unit Removal in the Electrical Sys- tem chapter)
Bolts [A] Upper Fairing Bracket [B] <<they show the bolts I have indicated in the pics above.
Upper Fairing Bracket Installation
•Installation is the reverse of removal.
They're saying you need to remove the ram air tubes. I'd try skipping that and maybe tie the ram air off to an overhead beam to support it while you replace the stay. Hope that works. I wouldn't let that whole ram air hang out in front with no support or it may bend the fastener plates which are pretty light metal. Might cause a leak. I'd be careful with that. Take them off if you need to. Not too hard. Always seems easy but ends up being twice as more time than you thought.
Be careful when you install the new one. It's all plastic. Go easy on the screws in all that stuff. There are no torque specs given in the SM but I would go just snug and no more on plastic. Can crack on you or strip threads.
Hope you get it done. I'd ask around on the site for a link to download a Service Manual. I know they're out there. Also you may get some help from someone who has actually removed the fairing stay. I have not. Also, will be away from computer till July 7.
Heres my fairing removal tutorial to get you started. Looks like you will be taking all of them off.
NEWBIES GUIDE TO FAIRING REMOVAL, GEN1
* Last updated by: Rook on 6/26/2014 @ 9:08 PM *
Fuzz
Joined: 06/26/14
Posts: 5
RE: Fairing stay replacement
07/06/14 3:04 PM
Just wanted to say thanks for all the help. The guide on fairings was quite helpful as well. But in the end, everything worked out really well, replaced the fairing stay/bracket and everything looks good again. I did tie the ram tubes to an overhead beam as you suggested, so was able to save some time on that. On the other hand had to take two days as there were a couple of tabs that interlock missing from fairings. The side fairing actually started coming off as I took out the longer 5mm screw. The lip that holds the other corner was broken off (luckily the actual plastic piece was still there) and rubber grommets were missing as well. So I actually found some replacements for grommets and mixed some epoxy, made missing tabs from miscellaneous pieces of plastic and got those pieces on the fairings with epoxy. That took some time (since I also got to fixing a couple of toys for the kid that were waiting for that epoxy mixing moment for over a month now :) ) plus I let it all sit overnight for epoxy to fully set. I think the total work time over two days was 3.5-4 hrs including searching/cutting plastic, etc. But now I got all fairings in good condition now, the only one that I still want to fix is the upper right that's missing that little tab that goes into the metal bracket on the fairing bracket. Didn't have the right piece of plastic, will have to do it next week, but that one comes off without removing the rest, so not a big deal.
Glad I did replace the thing though, the bracket seemed to be ok (could be slightly bent, but it was hard to tell), but the piece that bolts to the fork had a huge crack on it, not sure if it was big enough to brake off, but definitely too big for my liking. It's interesting that looking at it normally it was pretty much impossible to see, but once I took the piece off and looked at it upside down - it was obvious. For the total cost of $38+ my time, I think it was still worth doing and thanks again for all the help.
One last question, on this picture
What is that hole for? Immobilizer? I don't think I forgot anything, but can't stop thinking about it. Service manual seems to have immobilizer piece sitting somewhere near that, but I never found a place where they show how it attaches.
* Last updated by: Fuzz on 7/6/2014 @ 3:07 PM *
wfozx14

Location:
Joined: 12/16/12
Posts: 891
RE: Fairing stay replacement
07/06/14 4:15 PM
That is an empty hole on mine as well. I screwed a bracket into it for my radar detector. 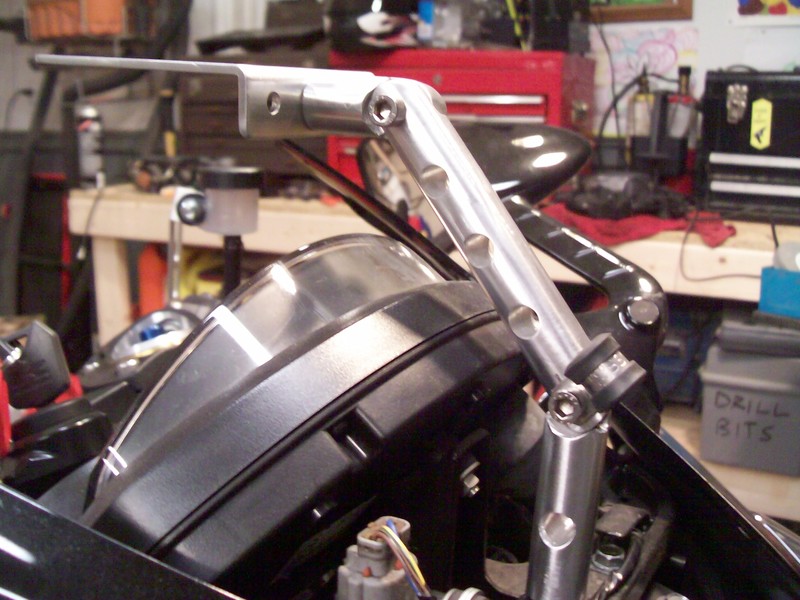
Page: 1
New Post
Please login to post a response.