Move Close
Welcome to zx14ninjaform.com!

You are not logged in.
New Topic Reply
Next Page

Page: 1

Previous Page

Thread: Drive Chain Slack Adjustment

Created on: 05/20/12 09:40 AM

Replies: 19

Rook


Rook's Gravatar

Joined: 03/28/09

Posts: 20577

Drive Chain Slack Adjustment
05/20/12 9:40 AM

ZX-14 Chain Slack Adjustment

The drive chain will need to be tightened periodically, especially when the chain is new. It also will need to be adjusted when replacing the drive chain or switching to different sized sprockets.

The movement of the rear suspension requires that the drive chain have a certain amount of looseness for both to operate properly. The looseness in the chain allows the suspension to operate without stretching or breaking the drive chain or stressing the bearings that the chain wheels turn on. The looseness of the drive chain is called chain slack. When weight is placed on the bike, the suspension compresses which pulls the chain tighter, reducing the chain slack. The reaction of the rear shock and the swing arm to road irregularities reduces chain slack during opperation even further.

The ideal chain slack is that which would allow complete compression of the rear suspension while not attaining 0 slack until that point. The manufacturer has determined the proper amount of chain slack to be a minimum of 1.3 inches as measured with the rear suspension compressed by weight of the bike only. In practice, this amount of slack should allow for a complete bottom-out of the rear suspension without stressing the chain or other parts of the final drive.

Adjust looser, not tighter. A chain that is too loose will be obvious upon inspection before it ever becomes loose enough to fall off the sprockets or cause severe damage. A chain that is too tight could snap. For this reason, I always give preference to adjusting the drive chain looser rather than tighter. If the chain comes off, it will either wrap around the engine sprocket and gouge the bottom of the motor out or wrap around the swing arm causing a rear wheel lockup. A chain that has come off does not usually fly out harmlessly. Proper chain slack is important but it is also simple enough to be one of the maintenance procedures that the manufacturer expects owners to be able to do themselves.

Do not run the engine when measuring or adjusting chain slack or performing any other drive chain procedures. Amputations. Need I say more?? It has happened more times than I can count on both hands!

Measure chain slack on the top and bottom chain runs, then add those two for a final figure. This procedure is described in detail below. It is not how the manufacturer recommends measuring chain slack. They recommend measuring the chain slack on one run but if you have not already discovered, that is impossible because of the swingarm is in the way. You can only measure part of the chain slack on both runs.

Make small adjustments. As amazing as it may seem, turning the adjuster screws one sixth of a turn is often enough to tighten the chain properly. There are adjustment reference marks on the swing arm. You will never need to adjust the blocks one entire mark tighter in a single adjustment or even half a mark tighter. That would be much too tight.


Tools:
rear spool stand
15” steel ruler
straight slot screw driver
pliers
32mm impact socket
24” breaker bar
Two 12mm open end wrenches
rubber mallet
torque wrench
new cotter pin

Measuring Drive Chain Slack

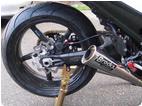
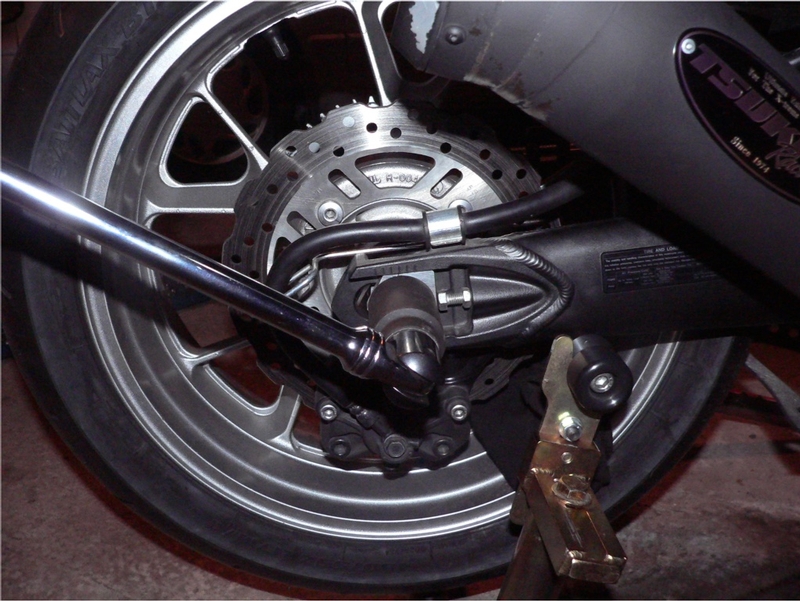
1. It is best to find the point of greatest tension in the drive chain before measuring the slack. Put the bike on a rear spool stand. Rotate the wheel slowly to find the point of greatest tension. Please be very careful not to roll fingers into the sprockets. Feel the chain from outside of the run and roll the wheel the direction that will not pull fingers into the sprocket.


When the point of greatest tension is found the drive chain slack may be properly measured midway between the front and rear sprockets (at the points marked by the blue pointers in the photo above).


2. Slide a 15” steel ruler inside of the swing arm on the left side. The ruler edge should touch the left front inside corner of the swing arm. To hold the ruler steady, the top of the ruler will rest perfectly inside of the slot in the mud flap behind the passenger foot peg bracket mounts. The back edge of the belly pan happens to also be at an ideal location to rest the bottom edge of the ruler if that is preferable.


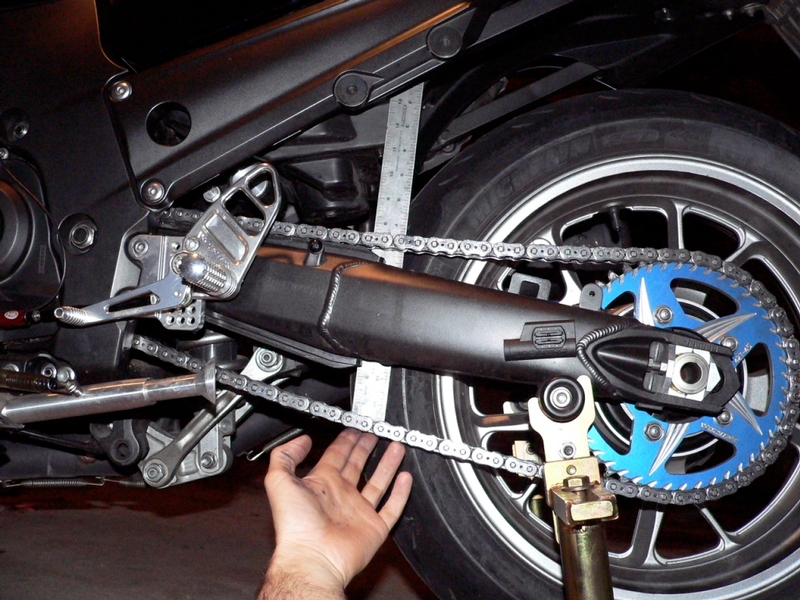
3. Pull the bottom run of the chain down using only approximately 2 lbs of force. Measure the distance of travel in the bottom run. Now measure the top run of the chain in the same way, pulling it upward with approximately 2 pounds of force. Add the measurements together for the total chain slack. Combined measurement should be be 1 and a third to 1 and one half inches. If it is out of spec, it needs to be adjusted.

Drive chain slack: 1.3 inch ~ 1.5 inches.

Pull the top chain run up and measure the travel. Pull the bottom chain run down and measure the travel. Add both measurements for total chain slack. Also, note that the ruler is resting on the belly pan bracket which is conveniently located in line with the proper points for measuring chain slack.


Adjust Drive Chain Slack

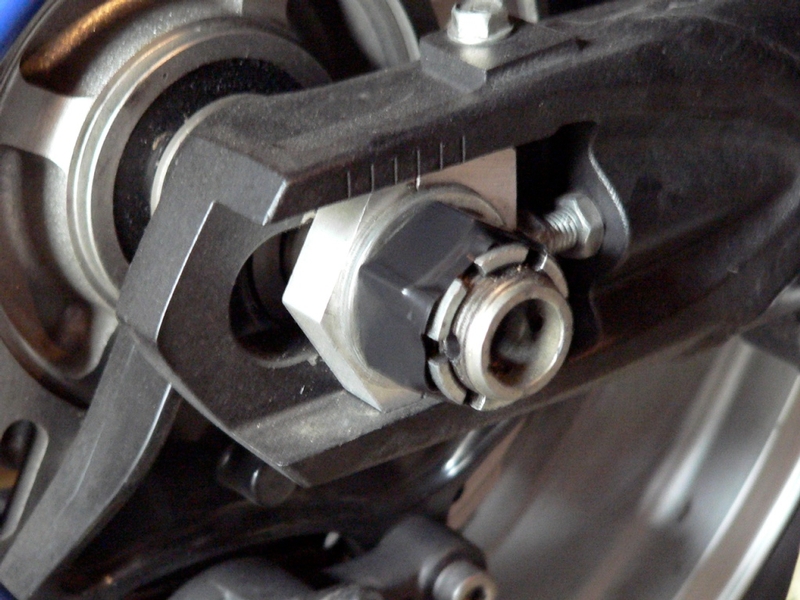
4. Note the position of the adjuster block in relationship to the marks at the top of the swing arm adjuster slot. Normal chain adjustments do not require much movement of the block at all. However, in some situations it is helpful to know where the block was before the adjustment. The marks should always be identical on both the left and the right adjuster to maintain proper axle alignment.

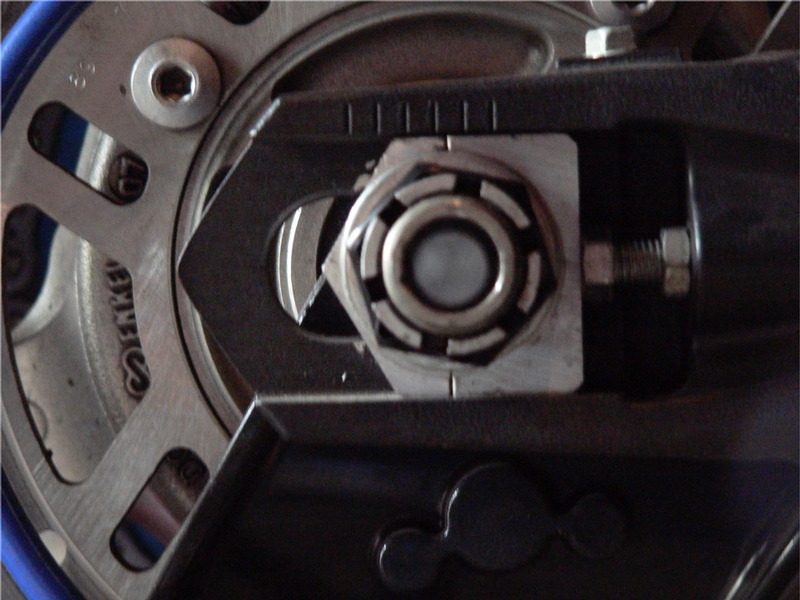
When visually checking adjuster block position, I square up my line of sight by looking straight down the hollow center of the axle.


5. Use a straight slot screw driver to straighten the cotter pin ends and pull the pin with a pair of pliers.


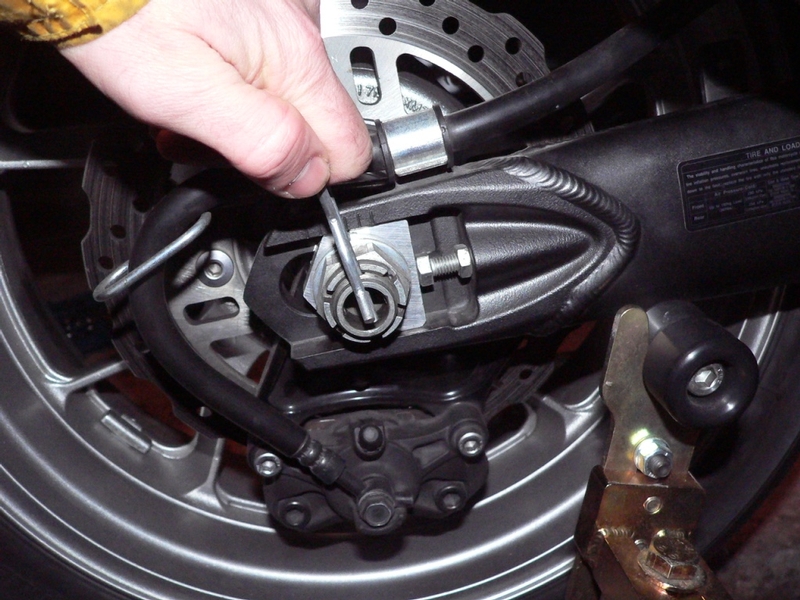
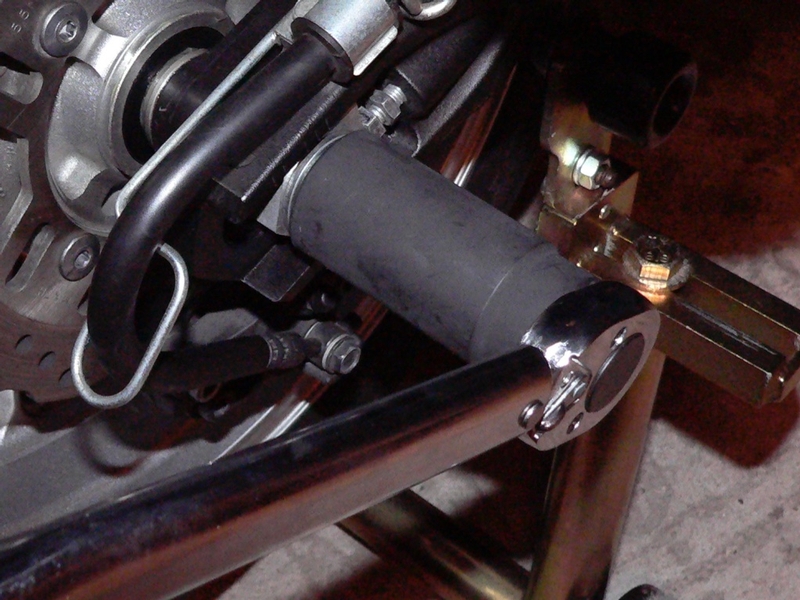
I have a reusable retainer pin that I secure the axle nut with. I have also seen a setup using a linchpin where the ring folds securely over the protruding threads of the axle.


6. Use a 32mm impact socket and a 24” breaker bar to loosen the axle nut. Make the nut loose enough that the washer behind it is free.


I tape my axle nut with electrical tape to help protect it from being marked by the socket when the nut is loosened or torqued.


7. Use a 12mm open end wrench to hold the left adjuster screw steady. Use another 12mm open end wrench to loosen the adjuster screw locknut. Do not move the adjuster screw yet. Repeat the locknut loosening procedure on the right hand adjuster.


8. Turn the left adjuster only a very small amount at a time, counterclockwise (out) to tighten the chain or clockwise (in) to loosen the chain. One sixth of a turn, (one hex flat) will make approximately a 1/8 inch adjustment in chain slack. Turn the right adjuster the same amount as the left. I sometimes mark the outside flat of the adjuster bolt on each side before I turn it. This provides a reference point to check that both sides have been turned the same amount. It is not normally necessary to mark more than one flat because the adjuster is usually not turned more than 1 flat to adjust the chain.


9. Kick the rear tire forward or use a rubber mallet to bump the rear tire in tight against the adjuster screws. Measure the chain slack as directed in steps 2 and 3 above. Adjust both sides equally if necessary.

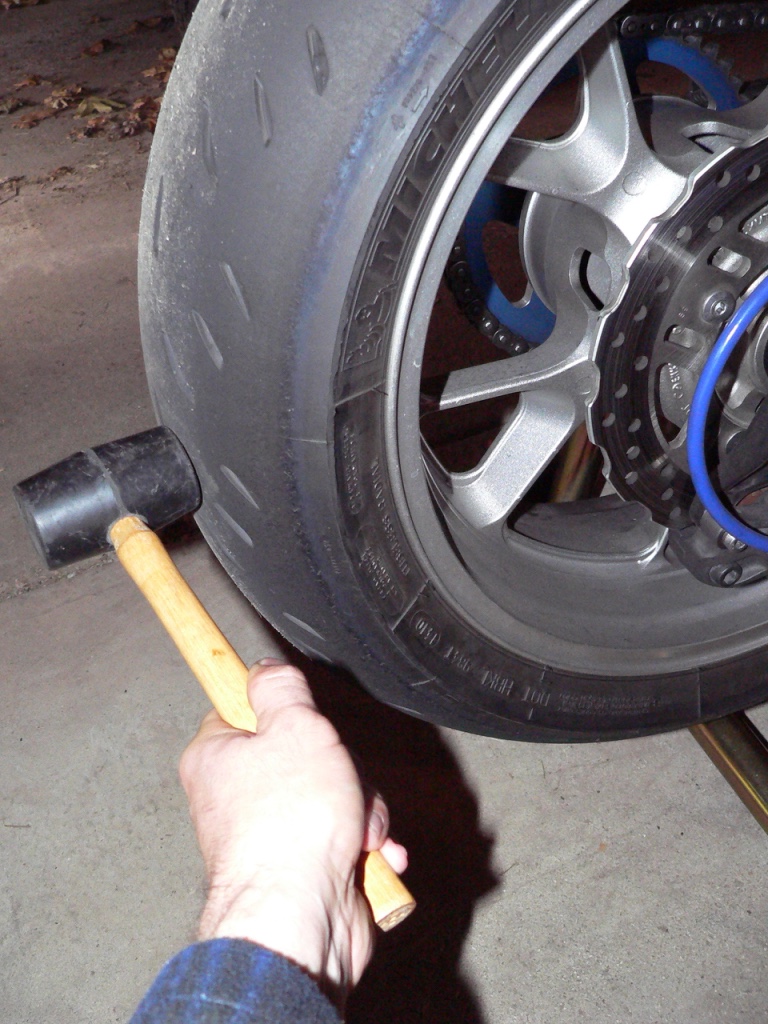
With the axle nut loose, the swing arm forks are not compressed. Expect the chain slack measurement to be approximately 1/8 inch less after the axle nut is tightened and the wheel is pulled back accordingly.


10. When the proper amount of slack is achieved, (remember that it will be 1/8” less after you tighten the axle nut) hold the adjuster screw with a 12mm open end wrench. Tighten the adjuster screw locknut against the front of the adjuster block slot with another 12mm open end wrench. Repeat this process for the adjuster on the other side.


11. Use a 32mm impact socket and torque wrench to tighten the axle nut. Inspect the the adjuster block marks on the swing arm. The adjuster block and marks should look the same on both sides when the rear wheel is properly aligned.


axle nut torque 93.7 ft lbs.


12. Take a final chain slack measurement. The chain slack will be approximately 1/8 inch less than it was before the axle nut was tightened and the swing arm forks compressed, pushing the wheel back slightly. Readjust the chain slack if it is not in spec range of 1.3 inch ~ 1.5 inch.


13. Secure the axle nut with a new cotter pin (or a reusable pin such as that in the photo below). If the axle nut torque did not result in the castle slots lining up with the holes in the axle, tighten the nut to the nearest alignment. Then loosen the nut until the castle slots go back past the hole they were aligned to. Torque once again to 93.7 foot lbs.

The procedure to line up the axle nut castle slots to the holes in the axle worked for me at least one time. I normally just mess around with the nut loosening and retightening, perhaps to a slightly lower torque value, until the nut and the holes in the axle line up.


* Last updated by: Rook on 2/17/2018 @ 9:28 AM *


'08 MIDNIGHT SAPPHIRE BLUE Now Deceased

Link | Top | Bottom

Grn14


Grn14's Gravatar

Location: Montana

Joined: 02/25/09

Posts: 15511

RE: Drive Chain Slack Adjustment
05/21/12 12:11 AM

Geez Rook...you've done er again my man...friggin EXCELLENT post and how-to.A guy cannot go wrong using number 4 and number 9.Nicely done !!!GREAT pics and instructions.


* Last updated by: Grn14 on 5/21/2012 @ 12:13 AM *

Link | Top | Bottom

Rook


Rook's Gravatar

Joined: 03/28/09

Posts: 20577

RE: Drive Chain Slack Adjustment
05/21/12 9:44 AM

Like oil changing, I'm sure most people know how to do this. I had done chain tightening before, years ago, but a little extra info would have been reassuring the first few times I adjusted the 14's. I think I may have adjusted it way too tight once? Those marks are not there to tell you where the next stop is-----you might go 10 thousand miles before you jump one whole mark. I forget how many marks I spanned with the OEM chain over its 25,500 mile life. It may have been just one mark or not a lot more than that. I can't remember. The point is, pulling the axle back a tiny amount reduces chain slack a huge amount. I think it may be because you are pulling all of the links around the back of the sprocket, not just one point.


'08 MIDNIGHT SAPPHIRE BLUE Now Deceased

Link | Top | Bottom

Grn14


Grn14's Gravatar

Location: Montana

Joined: 02/25/09

Posts: 15511

RE: Drive Chain Slack Adjustment
05/21/12 1:17 PM

I think you're right on the money.Gotta say...it should be YOUR how-tos in the service manual!You're too modest Rookster...you know your chit for sure!

Link | Top | Bottom

scottjkyl


scottjkyl's Gravatar

Location: east jordan,mi

Joined: 06/26/09

Posts: 1851

RE: Drive Chain Slack Adjustment
05/22/12 4:14 PM

I tape my axle nut with electrical tape to help protect it from being marked by the socket when the nut is loosened or torqued.

rook what you think? i think it looks better


08 zx14se Brocks CT Duals, Brocks street map, Driven 16/43 sprockets,EK ZZZ Chain,MRA Windscreen, Roaring Toyz Diamond Cut Grips Pingel Elec shifter, Hyper-Pro RSC Damper, BlackChrome Wheels, Sargent Seat,Factory Pro Velocity Stacks,PCIII USB,Bonneville Pro, TPX Radar/Laser Detector, TPX Laser Jammer, Goodridge Shadow series braided lines front and rear, Rifleman 1/5 turn throttle, Fusion LED Stage IV Kit, DDM HID's 10,000k

Link | Top | Bottom

retsam


retsam's Gravatar

Location: McKinney, Texas

Joined: 04/09/11

Posts: 84

RE: Drive Chain Slack Adjustment
05/22/12 4:32 PM

Awesome HOW TO Rook! This is exactly what I needed!


2010 ZX-14 SE, Ebay Fender Eliminator, Bolt License Plate LED, PCV, Brocks CT Single (4-2-1), 190/55 rear, Under seat USB port, Shogun frame sliders, Tech-Spec Tank Grip Pads, Knight Designs "1 Lower Pegs, on Engine Ice

Link | Top | Bottom

Rook


Rook's Gravatar

Joined: 03/28/09

Posts: 20577

RE: Drive Chain Slack Adjustment
05/22/12 8:00 PM

rook what you think? i think it looks better

Schnazy! I'm a little more for the bolty utilitarian look in the details rather than clean and finished look but that is a nice part. looks great with the wheel.

Awesome HOW TO Rook! This is exactly what I needed!

Good, then it's just for you, retsam ---and anyone else who is not quite sure about the ins and outs of chain adjusting. with all the cautions we here about overtightening, and the obvious risks of undertightening, it is good to have something like this to look at. I've never had a chain or sprocket problem so this should get anyone on the right track.


'08 MIDNIGHT SAPPHIRE BLUE Now Deceased

Link | Top | Bottom

Grn14


Grn14's Gravatar

Location: Montana

Joined: 02/25/09

Posts: 15511

RE: Drive Chain Slack Adjustment
05/23/12 11:42 PM

"Good, then it's just for you, retsam ---and anyone else who is not quite sure about the ins and outs of chain adjusting. with all the cautions we here about overtightening, and the obvious risks of undertightening, it is good to have something like this to look at. I've never had a chain or sprocket problem so this should get anyone on the right track"....bless you Rook... a real pro.

Link | Top | Bottom

Rook


Rook's Gravatar

Joined: 03/28/09

Posts: 20577

RE: Drive Chain Slack Adjustment
05/24/12 7:45 PM

thanks, Grn. "Pro" is a but too much but thanks.


'08 MIDNIGHT SAPPHIRE BLUE Now Deceased

Link | Top | Bottom

Grn14


Grn14's Gravatar

Location: Montana

Joined: 02/25/09

Posts: 15511

RE: Drive Chain Slack Adjustment
05/24/12 8:50 PM

IDK...those how -tos are some good chit!

Link | Top | Bottom

privateer


privateer's Gravatar

Location: [random forest]

Joined: 02/16/09

Posts: 3605

RE: Drive Chain Slack Adjustment
05/26/12 5:55 AM

This one reminds me how happy I am with shaft drive. Heh.


Living the Gypsy Life

Link | Top | Bottom

Danno


Danno's Gravatar

Location:

Southwestern Illinois

Joined: 12/18/11

Posts: 2142

RE: Drive Chain Slack Adjustment
05/28/12 7:19 AM

Bearings on a friend's C-14 shaft went out at around 27,000 miles, so shafts aren't perfect, just cleaner.


'07 CPB Blue; ZGST windscreen with MRA X-screen adjustable spoiler, tube bar adaptor, PC III, ATRE,BMC air filter, modified stock seat with 2nd Look cover,Scorpion Flame Ti slip-ons, Galfer rotors front and rear, braided-stainless lines, C-F 10R front fender, C-F hugger, C-F inner fairing panels, painted foreman's fins with faux C-F inlay, polished rim lips wired for heated gear and accessories, Givi V35 side bags and E41 topcase with SW-Motech qd mounts

Link | Top | Bottom

Rook


Rook's Gravatar

Joined: 03/28/09

Posts: 20577

RE: Drive Chain Slack Adjustment
07/31/13 9:10 PM

I made a discovery....definitely true...I'v been messing with this the last few times I adjusted the chain.

If I measure my chain slack with the bike on its side standthat will be about 1/4 inch looser than when I put the bike on a rear stand. I guess lifting the bike on the rear stand puts more weight on the back...never woulda thought it would have made that much dif. I like to use the stand for stability when adjustin the chain so I just adjust it with 1/4 inch less slack than I want. When I set the rear tire down, the rear suspension opens just a little and it make sthat extra 1/4 inch I need. ....Or just adjust on the side stand and be very careful you dont tip the bike or lever it forward so the stand folds up when torquing the rear axle nut.


...also, tightenning the rear axle nut compresses the sides of the swingarm inward. That makes the swingarm a bit longer and pulls the wheel back with it....figure about another 1/4 inch extra tightness in the chain that will be caused by tightening the axle nut. Really amazing how these little tweaks make a huge diff in chain tension.

Update 08/15/13 adjusted chain again tonight. Yes indeed, the chain IS about a quarter inch tighter when raised in the rear stand than when I put it back down on the side stand.


* Last updated by: Rook on 8/15/2013 @ 7:14 PM *


'08 MIDNIGHT SAPPHIRE BLUE Now Deceased

Link | Top | Bottom

NdgnusTxn


NdgnusTxn's Gravatar

Joined: 08/04/13

Posts: 11

RE: Drive Chain Slack Adjustment
10/08/13 10:08 PM

So, ideally, with the rear suspension fully compressed, the chain should have the minimum acceptable play?


The only thing more exhilarating than riding one of these beasts, is sex..

Link | Top | Bottom

Hub


Hub's Gravatar

Joined: 02/05/09

Posts: 13708

RE: Drive Chain Slack Adjustment
10/08/13 10:41 PM

Owner's manual says: 25~30mm (1.0~1.2 in.) you stand the bike up off the side stand. Keep rolling the bike till you find the tighter part of the chain. You then bring the lower rung up and down so you have a loose inch of play. If say the swing went up the fender well? That brings the lower chain up on the swing arm's slipper at the bottom of the sw/arm.

So if you want to unload the rear shock, bring wheel up the well, make sure you look at that area so there is some slack there. That means, you are spec at the tightest part of the chain, but loose as a goose at the other rung positions of the chain, so no need to worry about those chain sections.


Tormenting the motorcycling community one post at a time

Link | Top | Bottom

Rook


Rook's Gravatar

Joined: 03/28/09

Posts: 20577

RE: Drive Chain Slack Adjustment
10/22/14 4:53 PM

So, ideally, with the rear suspension fully compressed, the chain should have the minimum acceptable play?

Actually, I had Hub explain this to me one time years back. With the suspension fully compressed (bottomed out like you put a tie down strap over the seat and ratcheted the suspension to fully compresssed) the chain should be tight as a rubber band. The chain can't get any tighter than bottom out of the rear suspension so might as well make that the 0 mark of chain slack. This is beyond the range specced in the service manual. That specced range is for a bike resting on its side stand with no additional compressing of the suspension.

But if you want to ratchet your rear suspension to fully compressed and then adjust your chain, it should have perfect chain slack when you remove the tie downs.


* Last updated by: Rook on 10/22/2014 @ 5:01 PM *


'08 MIDNIGHT SAPPHIRE BLUE Now Deceased

Link | Top | Bottom

Rook


Rook's Gravatar

Joined: 03/28/09

Posts: 20577

RE: Drive Chain Slack Adjustment
03/31/17 6:40 PM

updated.


'08 MIDNIGHT SAPPHIRE BLUE Now Deceased

Link | Top | Bottom

Rook


Rook's Gravatar

Joined: 03/28/09

Posts: 20577

RE: Drive Chain Slack Adjustment
02/17/18 9:29 AM

done


'08 MIDNIGHT SAPPHIRE BLUE Now Deceased

Link | Top | Bottom

Soulrider


Soulrider's Gravatar

Location: Cape cod, MA

Joined: 08/11/18

Posts: 1

RE: Drive Chain Slack Adjustment
08/11/18 7:20 AM

Ok so this post helped me immensely! My only dealer is over 45 min from me and I have never been one to do maintenance because I was a weenie lmao. However I just adjusted the chain prior the dealer had and my bike rides better all around. I dont think they were putting much care and effort into getting the exact alignment. Thank you so much. I also used posts on here to replace my exhaust with yoshi slip ons and the wind screen. Now any suggestions on how to eliminate the plastic piece under the windscreen from rattling like crazy. Lol

Link | Top | Bottom

Rook


Rook's Gravatar

Joined: 03/28/09

Posts: 20577

RE: Drive Chain Slack Adjustment
08/11/18 9:45 AM

Glad the chain slack tutorial helped.

Now any suggestions on how to eliminate the plastic piece under the windscreen from rattling like crazy. Lol

Sorry, that must be a Gen2 piece. Maybe some of those rubber self adhesive bumpers they put on the inside of drawers to keep them from slamming shut? I used those on my tail fairings but they won't stick for long without some RTV to hold them in place. Self adhesive foam insulation, 1/4" thick works well too.


'08 MIDNIGHT SAPPHIRE BLUE Now Deceased

Link | Top | Bottom


Welcome to zx14ninjaform.com!
 
New Topic Reply
Next Page

Page: 1

Previous Page

New Post

Please login to post a response.