Move Close
Welcome to zx14ninjaform.com!

You are not logged in.
New Topic Reply
Next Page

Page: 1

Previous Page

Thread: Coolant System Pressure Test

Created on: 08/22/12 12:11 PM

Replies: 2

spyglass


spyglass's Gravatar

Location:

British Columbia, Canada

Joined: 03/10/10

Posts: 174

Coolant System Pressure Test
08/22/12 12:11 PM

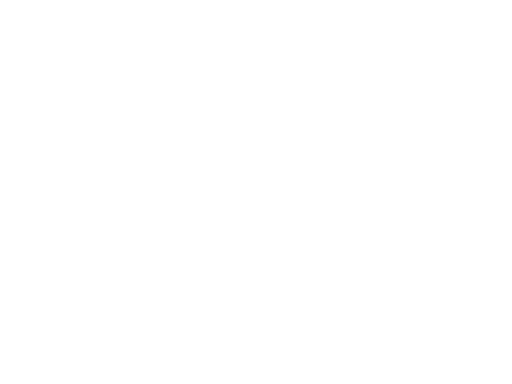
I thought I would post an easy, cost effective, way to perform a pressure test on our ZX-14. I looked around for a conventional coolant pressure tester and was surprised at the price they were asking for them. The next problem was that no one seemed to have stock. I decided to make one myself. Here is a photo of the assembled device and a list of the parts involved.


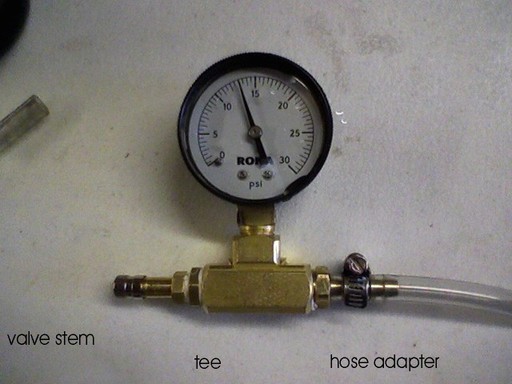
Pressure gauge (0-30 psi range)
Brass Tee
Brass reducer (pipe thread to fine thread of valve stem)
Valve stem
Brass hose connector
Small hose clamp
Length of 1/4 tubing

(you will need brass hose connector and a thread cap to seal the Air Bleed hose)


Remove the "Air Bleed" hose where it connects to the right hand side of the radiator. (The "Air Bleed" hose is a small hose that runs directly from the water pump to the rad and allows air to escape the pump body) Cap the Air Bleed hose off. Connect the tubing from your pressure tester to the radiator where the "Air Bleed" hose was connected. (The "Air Bleed" hose is located between the top reservoir hose and the main rad return hose).

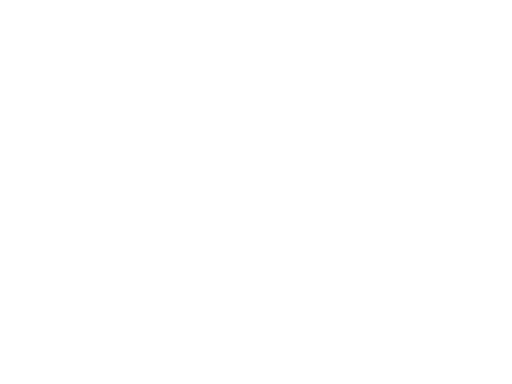
Use a small hand or foot pump (a bicycle pump is ideal). The goal is to slowly introduce pressure into your coolant system up to within 1 to 1 1/2 psi below the pressure rating of your rad cap. Once the desired test pressure has been achieved it should hold firm. The manual suggests a 6 sec test is sufficient. The stock Zx-14 rad cap is rated at 1.1 Bar (15.95 psi). A test pressure of 13 1/2 to 14 psi would be fine. I left my test on for 6 hours. (never exceed 18psi). When finished with the test, simply depress the valve stem and release the pressure, remove the tubing, and reconnect the "Air Bleed" hose back up to the radiator. I would strongly caution against using an air compressor unless you have a very good regulator and have tested and verified the regulated pressure before introducing the air supply to the test. One layman trick that is often used in the field with small compressors is drain down the compressor's tanks completely while the compressor is switched off. Then take advantage of the slow gradual pressure increase experienced as the compress slowly fills the tank and build pressure over a period of time. What ever air supply you decide to use, test it first. The manual bicycle pump is easy and safe. I tested my device by capping off the tubing and applying pressure to the valve stem. This let me leak check my device & verify the gauge accuracy with my digital tire pressure gauge.

It is just a case of pulling off one hose and capping it, and connecting the tubing of your device.


Thanks for looking, hope this helps.

Spyglass

Link | Top | Bottom

Rook


Rook's Gravatar

Joined: 03/28/09

Posts: 20579

RE: Coolant System Pressure Test
08/23/12 7:06 PM

Great tutorial, spyglass!!

Once the desired test pressure has been achieved it should hold firm. The manual suggests a 6 sec test is sufficient. The stock Zx-14 rad cap is rated at 1.1 Bar (15.95 psi). A test pressure of 13 1/2 to 14 psi would be fine. I left my test on for 6 hours.

What would one do if the pressure did run down?


'08 MIDNIGHT SAPPHIRE BLUE Now Deceased

Link | Top | Bottom

spyglass


spyglass's Gravatar

Location:

British Columbia, Canada

Joined: 03/10/10

Posts: 174

RE: Coolant System Pressure Test
08/23/12 11:15 PM

Thanks Rook,

A drop in pressure would signify a leak in the coolant system. The leak needs to be located and repaired or the coolant system will not be able to increase the boiling point / boiling temperature of the coolant.

Drain the coolant from the system as it is generally easier to find leaks with air than liquid. Pressure up the coolant system with air and do an external soap test and look for bubbles. A dish soap solution in a spray bottle can be handy for covering areas with a soap film. Spray the rad, around the rad neck and cap, all hoses & fittings, pump, thermostat housing, oil heat exchanger, etc. Check the pressure release hose that goes to the coolant reservoir and make sure the rad caps inner pressure seal is holding.

When you find the leak make repairs. Then perform another pressure test to prove your repair and that you have found all the leaks (unlike a chain that may only break at one link..... leaks can come in bunches). If you can not find the leak via the soap and bubble method you will have to resort to the isolation method (divide and conquer), where you isolate the individual components and test them. When trouble shooting always try and divide the problem in half. Test the one half. If you do not find it in that half you are 50% explored. Divide the remaining half into two and test one part. If you do not find it you are now 75% explored. This can save a lot of time. It can also help you from getting tunnel vision and over focused to early on.


Hope this helps. If anyone has anything to add on this topic please feel free to do so.

Spyglass

Link | Top | Bottom


Welcome to zx14ninjaform.com!
 
New Topic Reply
Next Page

Page: 1

Previous Page

New Post

Please login to post a response.