Move Close
Welcome to zx14ninjaform.com!

You are not logged in.
New Topic Reply
Next Page

Page: 1 2

Previous Page

Thread: Compression Test

Created on: 07/24/14 03:05 PM

Replies: 36

Rook


Rook's Gravatar

Joined: 03/28/09

Posts: 20589

Compression Test
07/24/14 3:05 PM

Compression Test, Gen1

Cylinder compression is the key indicator of engine service life. Compression is measured by the maximum pounds/square inch of air that can be compressed by the cylinder before the cylinder leaks compression. Low compression indicates wear of the cylinders, piston, rings but compression that is lower (or higher) than spec can be an indication of other engine problems. If the engine idles smoothly and has good power, chances are the compression is ok. It’s still not a bad idea to check compression each time spark plugs are changed to monitor engine service life.

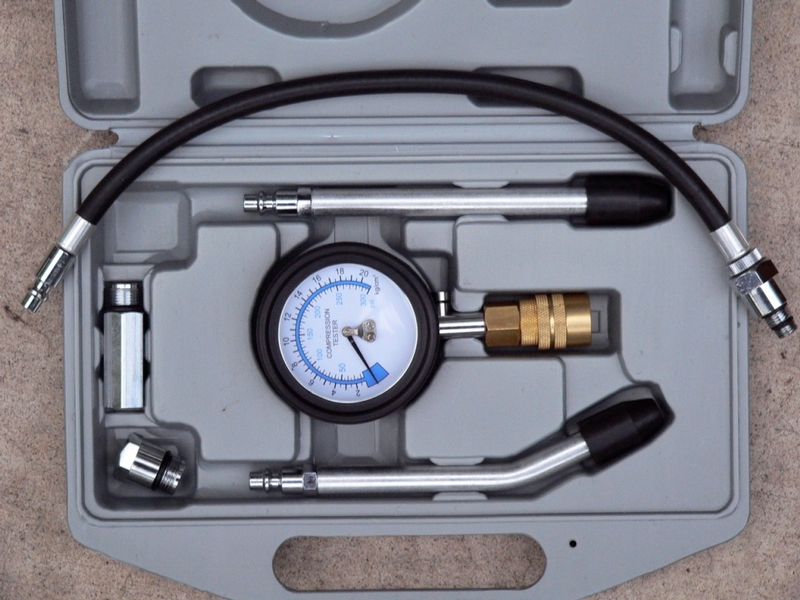
COMPRESSION TESTERS: A compression tester will have three basic parts: an adapter, a hose and a gauge. The adapter attaches to the spark plug hole. Some adapters are threaded with an o-ring to seal between the adapter and the spark plug hole. The other type of adapter is a press-in rubber tip at the end of a metal tube that may be dropped down deep spark plug wells. The hose is a length of rubber air line that connects the adapter to the gauge. The gauge is a dial or digital display that measures and indicates air pressure. These three parts are connected by quick couplers and/or threaded couplings.

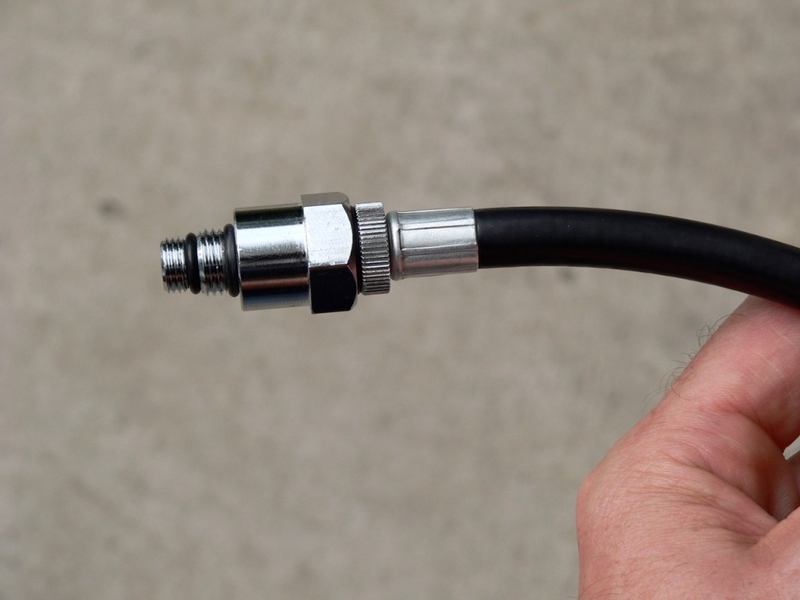
I used the Pit Posse compression tester which was claimed to be a good tester for the ZX-14. To me, it seems better suited for use on an external spark plug engine. If one of the rubber tipped tubes is used in the spark plug well of a ZX-14, the Pit Posse’s gauge will not fit onto it. If the hose is used, the adapter is apt to thread off of the hose and be left stuck in the spark plug hole. Use blue LokTite on the hose to adapter threads to prevent this. The Pit Posse tester will work for your Gen1 ZX-14 if used as shown in this tutorial. However, I would suggest finding some other compression tester with an adapter on a metal tube of the proper length to place into the well. The tube should have a quick coupler 90° elbow that attaches to the hose. This is the type of tester shown in the service manual for the ZX-14.

PIT POSSE COMPRESSION TESTER REVIEW

DO FIRST IN THIS ORDER THEN IMMEDIATELY PROCEED WITH THE COMPRESSION TEST:
*Remove fairings (see
Fairings Removal
, Lowers, Foremans, Ram Air Covers, Fuel Tank Cover, Inner Upper Fairing and Side Fairings.
*Tape off well nuts in air bow where the fuel tank fairing fastens.
*Clean the top of the engine of dirt and road debris.
*Take the bike for a 40 minute long ride to heat up the entire engine, oil, coolant and exhaust and fully charge the battery.
* Give the engine top one more blow with compressed air to remove any potentially hazardous particles that may have been deposited during the ride.
*Immediately remove each stick coil (see Stick Coil Removal, steps 1 through 3)
*Loosen the threads on each spark plug (see SPARK PLUGS REMOVAL: by spyglass)
*Clean each spark plug well (see Cleaning Spark Plug Wells)
* Remove each spark plug (see SPARK PLUGS REMOVAL: by spyglass) noting which cylinder it came from with a Sharpie.
* !!!Whatever you used to stop your spark plug wells during cleaning, remove ALL of them.
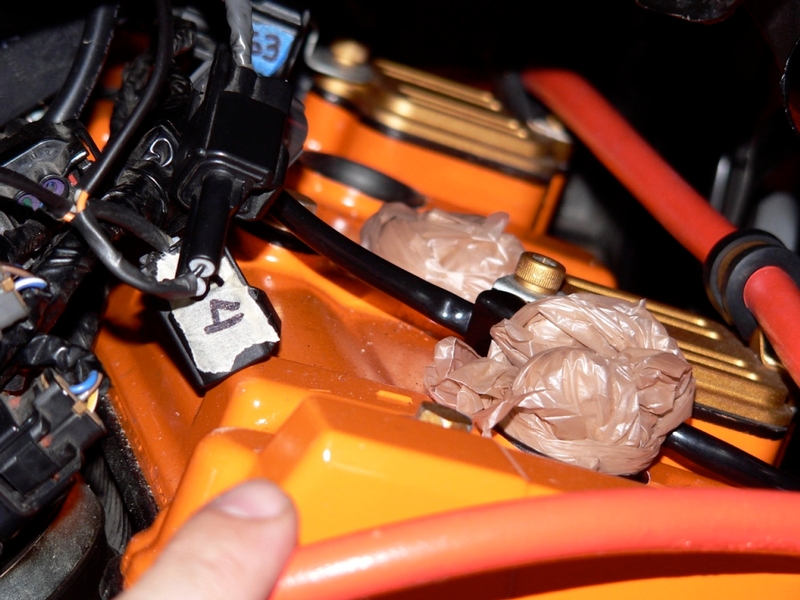
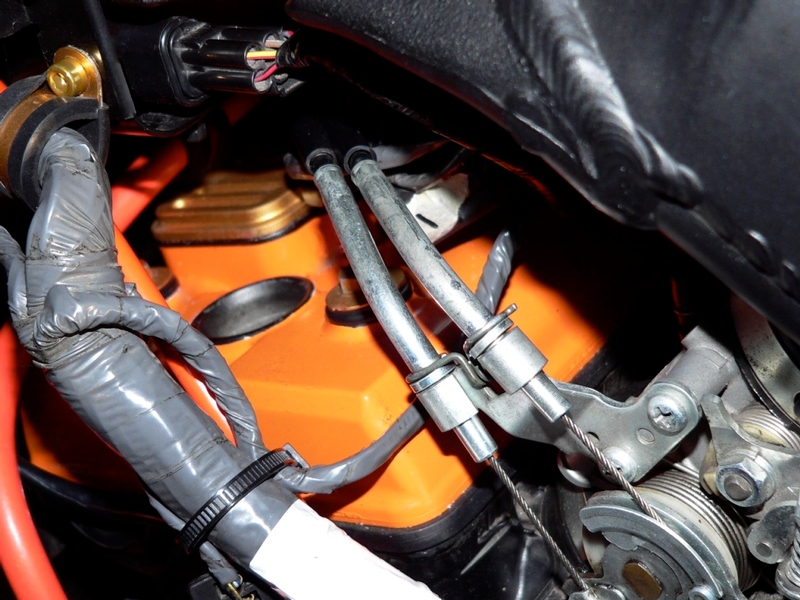
Tightly rolled plastic grocery bags work great for stopping spark plug wells while you clean an open well but DON’T forget to remove all before doing the compression test!....or you will probably have a big problem.

Tools:
compressed air and blowgun
Sharpie
compression tester
optional: new spark plugs

1. Spark plug wells are all unstopped, spark plugs are all out... Install the adapter to the spark plug hole in cylinder #1.
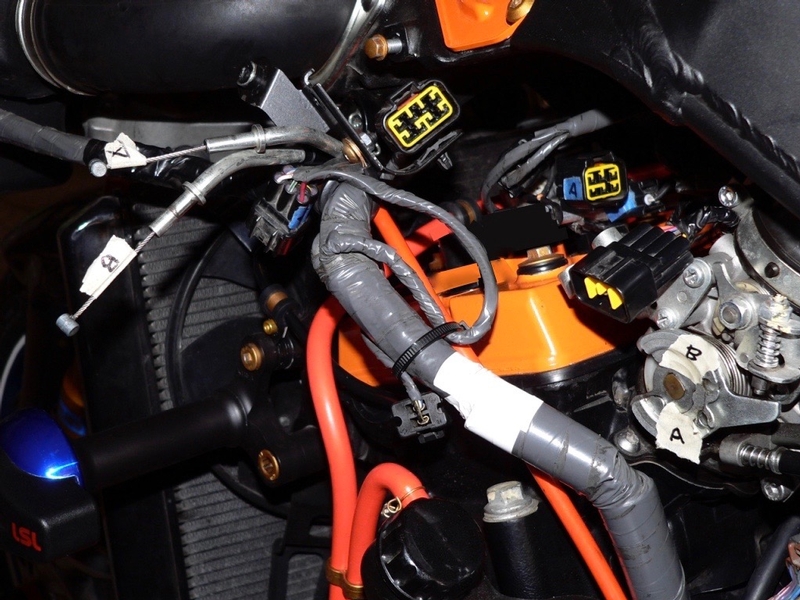
Cylinder #1 is difficult to reach because of the wires and cables on the LH side of the engine. You may remove the hanger bracket for the LH side fairing to help. The engine subharness lead which is the large black connectors farthest to the left side of the head cover (mine is modded for relocation in the photo above) must remain connected or the fan will come on when the ignition key is switched to ON. The throttle cables also need to be left connected so the throttle can be opened for the compression test.
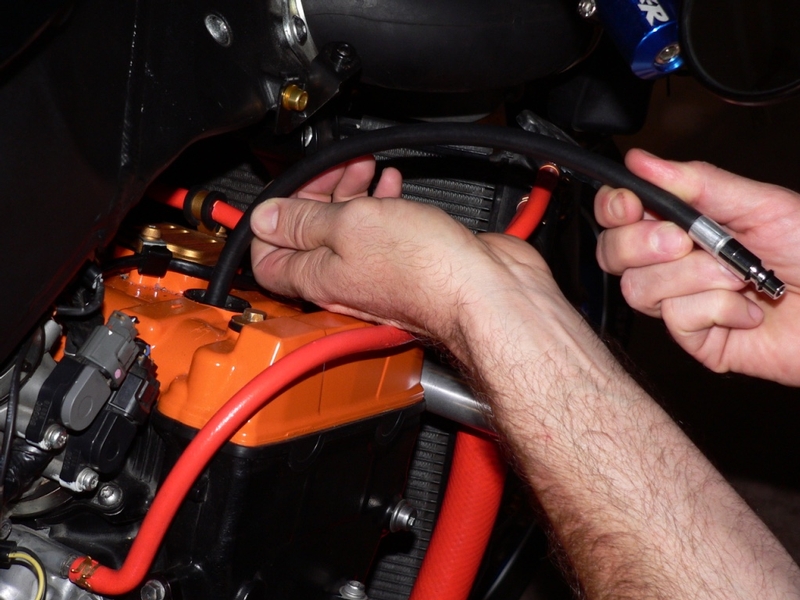

For illustrative purpose, I’m showing cylinder #4 in the above pic to show how a hose with a threaded adapter is twisted like a flexible shaft to install the threaded adapter to the spark plug hole.


2. Now connect the gauge to the hose. Double check, are all of the spark plug wells unstopped? Be sure engine kill is switched to RUN. Turn the ignition key ON. Press starter switch cranking engine over until the needle on the gauge stops rising. Turn ignition key OFF. Write down the pressure indicted on the gauge and which cylinder was tested.
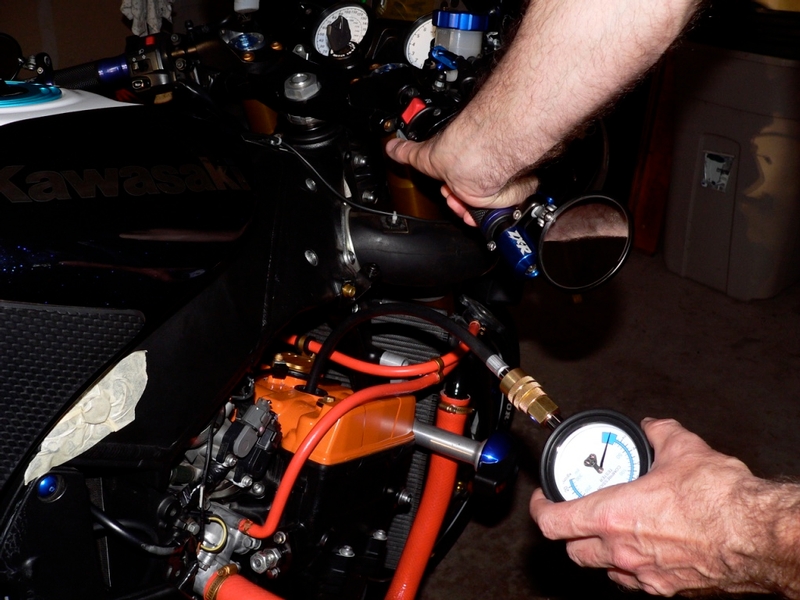


Cylinder Compression Usable Range: 1 030 ? 1 570 kPa (10.5 ~ 16.0 kgf/cm2,
149 ~ 228 psi) at 300 r/min (rpm)


3. Remove the gauge and the adapter and follow steps 1 and 2 of this tutorial for each of the remaining cylinders.


DO LAST IN THIS ORDER

*Inspect each spark plug. Install each spark plug with new ones if needed (see SPARK PLUGS REMOVAL: by spyglass
*Install each stick coil (see Stick Coil Removal, steps 4 and 5)
*Install fairings (see Fairings Removal, Lowers, Foremans, Ram Air Covers, Fuel Tank Cover, Inner Upper Fairing and Side Fairings).

Here are the readings I got. All in spec but not by a whole lot. I do not know what compression is typical for a bike with this mileage but the owners manual does spec engine replacement at around 60,000 miles.

* Last updated by: Rook on 2/2/2018 @ 1:59 AM *


'08 MIDNIGHT SAPPHIRE BLUE Now Deceased

Link | Top | Bottom

Rook


Rook's Gravatar

Joined: 03/28/09

Posts: 20589

RE: Compression Test
07/24/14 3:13 PM

For now, I'd like to start a discussion about compression testing. I know I have a few questions. Feel free to post any questions or commenst about compression testing and they will be included with this thread following the tutorial (when I get it done).

Here is the link to the online tutorial I found.
Dan's Motorcycle Compression Testing

Question #1
First question is always the stupidest so I might as well ask. Can I do the compression test without using the starter motor. Is it possible to turn the engine manually at the timing rotor and achieve acceptable compression in the motor?

Question #2
Rather than remove all the sparkplugs, would it be safer to only remove the plug from the cylinder that is being tested--so as to reduce the risk of sucking something into the cylinders that are not being tested?

More questions coming.


'08 MIDNIGHT SAPPHIRE BLUE Now Deceased

Link | Top | Bottom

sweetfa65


sweetfa65's Gravatar

Location: South Australia

Joined: 07/22/13

Posts: 371

RE: Compression Test
07/24/14 6:03 PM

Hey Rook. From my understanding of doing this in the past to different bikes and cars, the nominal compression figures are usually stated at cranking speed, so you'd need the motor live to do that. It normally takes several revolutions to build the gauge up to maximum compression. On the other point, you could leave the other plugs in, but you'd need to remove the ignition source to prevent accidental starting. Cranking also requires more power than with them removed. I'd just clean out your plug wells and cover/plug them with a suitable lint free rag etc.


Look ahead, relax & GO HARD!
2013 ZX14R SE ABS (aka:ANIML).Polished wheels,Supersprox sprocket,clear filmed paintwork,frame caps,rear seat cowl,ceramic coated Akrapovic headers,carbon Yoshimura R77s,H9 modded lighting,Zero Gravity screens,Ventura rack,tinted lenses,Genmar risers,Throttlemeisters,Pazzo levers,custom stainless radiator guard,Yoshimura fender eliminator,Woolich Log Box Pro,Zeitronix O2 controller,ECU flash.

Link | Top | Bottom

Rook


Rook's Gravatar

Joined: 03/28/09

Posts: 20589

RE: Compression Test
07/24/14 6:15 PM

I think I found my answer to question
#1 ABSOLUTELY NOT

#2 Best to remove all spark plugs so that the starter will have an easier time turning the motor.

Thanks, sweetfa65.

Also,

As far as covering the open spark plug holes, I may try to rig something up that is safe but I once had a scare with the plastic dust covers I had over my T-body holders. I turned the motor by hand and heard a crackling noise. Almost sucked a couple dust covers in! Cranking on the starter would almost surely suck a rag down the spark plug well.

Question #3 I have brand new spark plugs. When I install the new plugs after the compression test, won't they foul from any oil that I might have squirted in the spark plug holes (if I find I have a weak cylinder and want to test it for ring seal)?

Question #4 If I find compression is inadequate and I do the "oil in the cylinder to seal the rings" trick, is a leakdown test really that important? If oil improves the compression that would mean rings and not valves, right?

This guy says the numbers are not meaningful for a motorcycle engine leakdown test but the test will help identify where compression is leaking.

Dan's Motorcycle Leakdown Test


* Last updated by: Rook on 7/24/2014 @ 6:21 PM *


'08 MIDNIGHT SAPPHIRE BLUE Now Deceased

Link | Top | Bottom

Hub


Hub's Gravatar

Joined: 02/05/09

Posts: 13718

RE: Compression Test
07/24/14 7:01 PM

http://www.bigdogbiker.com/forums/technical/63931-bike-fouling-front-plug.html

#1 ~ No. You need the kinetic push to cause the rings to press out and seal. Right now, you create no sealing effect moving the crank that slow.

#2 ~ No. You now have 3 kinetic resistances to overcome. Push the bike in 1st gear as fast as you can, let the clutch out... Imagine it. Now with the plugs out, try that in 1st gear again, you can walk the bike, move the crank with just a push off.

A. Pull all plugs.
B. Install tester in plug hole.
C. Run with the bike in N and grab 2nd gear, then shift to 6th.
D. Run with the bike so the compression comes up and stops on the gauge.
E. That is your number when the bike keeps pumping initially and now hangs at that final number as it pumps up fast.
F. The 3 other cylinders will be purging air out the plug holes and if there is anything coming in, there is a good change it flies out again on the run up.
G. I want to write down the exact number the needle lands on, write it down, compare it to the other cylinders #'s.
H. Consistent [even numbers] pressures means a smooth idle. Lagging compression is a less powerful fire off and see how the momentum slows down? Poor idle is a clue when a sync is no joy; idle hangs then comes down is an example.
I. The gauge may bleed off: so the peak number is the accurate number. If it's 193 psi, it is not 190 and think close enough as if to round it off as it came down.

J. Run the engine with all plugs out. And if you think the battery is in question, then add a charger to it.
K. All this spinning is going to happen fast and if you rather run on foot, pull a calf muscle, the more power to ya.
L. We are at the throttle grip, bungee sets a WOT position and tie it off. We mess with the starter button only if you rather battery up or run out of breath.

Next is, do we have the tool?

I. Gut a used spark plug. Do not mar the threads. Cut the side electrode off.
II. The body is now the screw in adapter. What you braze, solder up, can drop down between engine and frame, etc.
III. Your mission, if you choose to take on this project... This tape will self add here to your ear.


Tormenting the motorcycling community one post at a time

Link | Top | Bottom

Hub


Hub's Gravatar

Joined: 02/05/09

Posts: 13718

RE: Compression Test
07/24/14 7:14 PM

Comp test warm or cold?

Morning: WOoo happen?
Nostart: I was running.

Morning: WOT camp are you, oh, camp warmeup.
Nostart: I see you are from coldcampwarme.

Morning: While you forgot WOT is the very first clue about a poor starting car/bike/boat/goat?
Nostart: Why I never walked out to a warm car and start tit up, wad a prick... Are you insinuating?

Morning: WOT I don't understand is my campee-pee on your tee-pee is your bike, your boat and how you float it.
Nostart: I can't seem to warm up my plane's engine and give you a buzz you gray beard old buzzard I need a jump.


Tormenting the motorcycling community one post at a time

Link | Top | Bottom

sweetfa65


sweetfa65's Gravatar

Location: South Australia

Joined: 07/22/13

Posts: 371

RE: Compression Test
07/24/14 8:07 PM

Rook, going back to point #2, I'd just get the whole area really clean then go for it. Another alternative would be to get a lump of foam and jam a piece in the plug wells. That'd not get sucked in very easily. I did that with my last valve adjustment. Good luck with it mate.


Look ahead, relax & GO HARD!
2013 ZX14R SE ABS (aka:ANIML).Polished wheels,Supersprox sprocket,clear filmed paintwork,frame caps,rear seat cowl,ceramic coated Akrapovic headers,carbon Yoshimura R77s,H9 modded lighting,Zero Gravity screens,Ventura rack,tinted lenses,Genmar risers,Throttlemeisters,Pazzo levers,custom stainless radiator guard,Yoshimura fender eliminator,Woolich Log Box Pro,Zeitronix O2 controller,ECU flash.

Link | Top | Bottom

Rook


Rook's Gravatar

Joined: 03/28/09

Posts: 20589

RE: Compression Test
07/24/14 8:13 PM

Thanks, Hub. Running with the bike is a nifty idea if you have no battery power. I'll be using battery power.

#5 Why is it important to open the throttle WOT? I know, to let as much air into the engine as possible?

#6 I have a tester with rubber tipped extensions. Will this work as well as a screw-in tester? Schnitz said they use the rubber tip probe on 14s all the time.


* Last updated by: Rook on 7/25/2014 @ 6:40 AM *


'08 MIDNIGHT SAPPHIRE BLUE Now Deceased

Link | Top | Bottom

hagrid


hagrid's Gravatar

Location: pittsburgh

Joined: 02/16/12

Posts: 2210

RE: Compression Test
07/27/14 12:20 PM

I prefer the threaded ones. The rubber tipped variety requires you to hold down on the nozzle during the test.


Yoshis!! GO NINJEE!!!

Fat chicks at Wal-Mart: NOT RECOMMENDED

Link | Top | Bottom

Rook


Rook's Gravatar

Joined: 03/28/09

Posts: 20589

RE: Compression Test
07/27/14 5:16 PM

I think I'd rather use a threaded one, also. The rubber tip should be quicker in and out with no chance of crossing threads but you have to wonder how well it seals. I think I'll be going with the rubber tip but just in case, I see I have a screw in with two adapters for dif sized threads. Think I'm set.


'08 MIDNIGHT SAPPHIRE BLUE Now Deceased

Link | Top | Bottom

Hub


Hub's Gravatar

Joined: 02/05/09

Posts: 13718

RE: Compression Test
07/27/14 6:28 PM

#5 - Correct.
#6 - Depends.
See, the adapter is going to rise so much out of the head and you have to figure out how to keep the rubber tip sealed over the adapter. Rather, you buy the whole compression test kit and you have it for the car, lawnmower, bike, snow blower, etc.


Tormenting the motorcycling community one post at a time

Link | Top | Bottom

Rook


Rook's Gravatar

Joined: 03/28/09

Posts: 20589

RE: Compression Test
08/04/14 5:14 PM

#5 - Correct.

You mean ALMOST correct! You can't let in more air, just faster! LOL

Rather, you buy the whole compression test kit and you have it for the car, lawnmower, bike, snow blower, etc.
Yup, think I got it but I didn't describe it accurately. The kit I have has a long probe with a rubbertip, a rubber hose with a screw in tip attached and two other screw in tips for smaller threads.


* Last updated by: Rook on 8/4/2014 @ 5:15 PM *


'08 MIDNIGHT SAPPHIRE BLUE Now Deceased

Link | Top | Bottom

Hub


Hub's Gravatar

Joined: 02/05/09

Posts: 13718

RE: Compression Test
08/04/14 7:43 PM

You mean ALMOST correct! You can't let in more air, just faster! LOL
<<<<


Tormenting the motorcycling community one post at a time

Link | Top | Bottom

Rook


Rook's Gravatar

Joined: 03/28/09

Posts: 20589

RE: Compression Test
09/09/15 9:12 PM

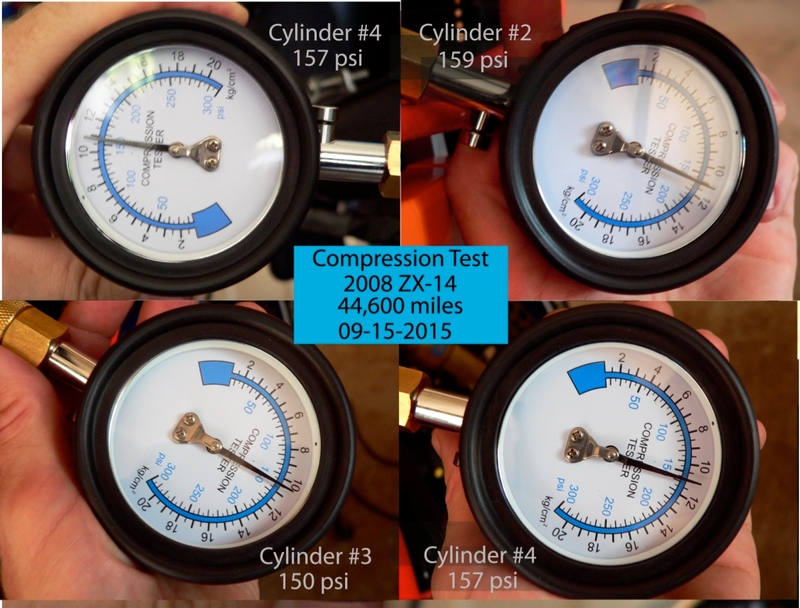
I'll post the tutorial soon. For now, here's my readings, tested on hot engine for #s 2 and 3, warm engine (couple hours later, long story) for 1 and 4. I sure was looking forward to see 200 some psi.

Thoughts?


* Last updated by: Rook on 9/9/2015 @ 9:14 PM *


&#x27;08 MIDNIGHT SAPPHIRE BLUE Now Deceased

Link | Top | Bottom

Hub


Hub's Gravatar

Joined: 02/05/09

Posts: 13718

RE: Compression Test
09/09/15 9:49 PM

149-228 psi

149 - Borderline breakout but shot none the less.
150 - 1 psi away.
141 - Breakout.
139 - Breakout.

Rings/cylinder finish/valves/new seats.

I cut seats, I may run out of shim size and that pounding is going to seat in too as if new.
I may get away with rings, but now I check my skirts and if they are worn, that's loud cylinder knock like a tick.
I should sell this to some first time rider. With that low a compression, a fresh 600 is going to leave you in the dust.


Tormenting the motorcycling community one post at a time

Link | Top | Bottom

Rook


Rook's Gravatar

Joined: 03/28/09

Posts: 20589

RE: Compression Test
09/09/15 10:03 PM

Hm........well I am looking at an R6 with 200 miles.

Could be the screw in adapter was not sealed tightly. I was unable tighten it with a wrench, I had to use the rubber hose to snug it in. It was just finger tight. I'm going to have to delay the tutorial until I try this again with proper equipment. Not this year. I don't think I can screw with this anymore. My father is already criticizing me for my anality. I'll post pics of the how the tool was set up tomorrow. Please stay tuned.

Thanks Hub. Something has to be up here. I've destroyed plenty of 600s. The busa never felt much different than the 14 and it only has 10k miles. Of course, the 14is geared down now but before that, the 14 and busa were same. This doesn't add up.


&#x27;08 MIDNIGHT SAPPHIRE BLUE Now Deceased

Link | Top | Bottom

Rook


Rook's Gravatar

Joined: 03/28/09

Posts: 20589

RE: Compression Test
09/10/15 8:19 AM

Here's the adapter. What would be required to snug the adapter in nice and snug would be a solid tube with flats at the top to put a wrench on it--like the spark plug removal tool. Then attach the hose to an elbow coupler on the top of the tube.

As you see, I have the hose dropped down the well. I had to tighten the adapter into the spark plug hole by twisting the hose like a flexible shaft.

If the adapter was threaded in by twisting the rubber hose, I doubt it was much more than finger tight but it was threaded in enough to compress the oring on the bottom of the adapter. The gauge needle locks at the last reading until you release the pressure from the gauge (my thumb points to the release button in the photo above). The needle would not slowly drop if pressure was leaking upstream of the gauge so I would not be able to detect a leak that way.

#7 The oring was compressed but not real tight. Would finger tight be enough to seal or might compression be leaking past the oring? I see the guy in the video is just twisting the hose in. Looks about the same as my test.

#8 If the oring was leaking compression fromnot being tightened in, does it seem possible that tightening it 1/2-3/4 turn with a socket would hold ~30 psi more compression?


I'm not in denial. This is a 7 year old bike. I know there's stronger bikes since the Gen1 ZX-14 and that doesn't bother me because this thing still has more power than I can handle. That's why I can't believe this engine is ready for overhaul.


* Last updated by: Rook on 9/15/2015 @ 4:24 PM *


&#x27;08 MIDNIGHT SAPPHIRE BLUE Now Deceased

Link | Top | Bottom

Rook


Rook's Gravatar

Joined: 03/28/09

Posts: 20589

RE: Compression Test
09/10/15 8:44 AM

SHIT.

...just realized, I forgot to hold the throttle at WOT when cranking.

#9 could that be the problem?


* Last updated by: Rook on 9/10/2015 @ 8:46 AM *


&#x27;08 MIDNIGHT SAPPHIRE BLUE Now Deceased

Link | Top | Bottom

Maddevill


Maddevill's Gravatar

Location: Hayward, CA

Joined: 04/23/11

Posts: 2656

RE: Compression Test
09/10/15 8:56 AM

Yes, the throttles need to be open to allow unrestricted air flow. Right now the butterflies are closed.

Mad


Owner of KNGKAW.

Link | Top | Bottom

Rook


Rook's Gravatar

Joined: 03/28/09

Posts: 20589

RE: Compression Test
09/10/15 10:32 AM


f*&kin A Do-da!


Well, stay tuned for round 2 of compression test (dammit).

Thanks Mad


&#x27;08 MIDNIGHT SAPPHIRE BLUE Now Deceased

Link | Top | Bottom

Rook


Rook's Gravatar

Joined: 03/28/09

Posts: 20589

RE: Compression Test
09/10/15 10:36 AM

I removed the throttle cable ends to get at cylinder #1 easier.

#10 I plan to run the bike with new plugs to warm it up for for the next test. If I remove the coils, plugs and throttle cable ends again, I suppose it would be WOT to simply hold the little lever on the spring wheel down while cranking, hey...?


* Last updated by: Rook on 9/10/2015 @ 10:45 AM *


&#x27;08 MIDNIGHT SAPPHIRE BLUE Now Deceased

Link | Top | Bottom

Hub


Hub's Gravatar

Joined: 02/05/09

Posts: 13718

RE: Compression Test
09/10/15 10:56 AM

No wrench needed, just squash the oring down with that 10mm having no shoulder like the 12mm does. So once you feel the oring hit the head, just twist the adapter tube a little more and stop. Distort and it leaks, just enough squish and it's sealed.

Bad boy... bungee cord the throttle open so you can watch the needle and use one finger for the starter, and eliminate one less move. Charge the battery after you run the comp tests.

Yeah, 3 dry plugs and the oily one has more compression? Retest since this has to keep pumping that needle with the door being closed, meaning, the needle will swing 'faster' to the number with less restriction.


Tormenting the motorcycling community one post at a time

Link | Top | Bottom

Rook


Rook's Gravatar

Joined: 03/28/09

Posts: 20589

RE: Compression Test
09/10/15 5:16 PM

Thanks Hub. Will-do. Good suggestion on the battery charge before Istart up again. I can't see the battery voltage on the multifunc because the LOW FUEL indicator is going. Didn't realize I might need the battery voltage and I usually try to have no gas when I lift the bike.

The tiny 12 Amp Shorai did the whole test and was still turning...a little slower but turning.

BTW, that #4 spark plug hole is pretty dirty. #4 is easy to reach but that was the hardest to get the adapter screwed in because of the crud. Any suggestions on how to clean that hole up? Maybe put a few drops of gas on the new plug threads, screw in to dissolve the schmutz?


* Last updated by: Rook on 9/11/2015 @ 10:44 AM *


&#x27;08 MIDNIGHT SAPPHIRE BLUE Now Deceased

Link | Top | Bottom

hagrid


hagrid's Gravatar

Location: pittsburgh

Joined: 02/16/12

Posts: 2210

RE: Compression Test
09/10/15 8:15 PM

Let it be.

Anything you do to loosen the schmutz increases the risk of said schmutz getting into the cylinder.

A proper cleaning job would require hade removal.


Yoshis!! GO NINJEE!!!

Fat chicks at Wal-Mart: NOT RECOMMENDED

Link | Top | Bottom

Hub


Hub's Gravatar

Joined: 02/05/09

Posts: 13718

RE: Compression Test
09/10/15 10:55 PM

The tiny 12 Amp Shorai did the whole test and was still turning...a little slower but turning.

Find 14v as fully charged, right? And cook it after the comp test. Where are the directions?

Any suggestions on how to clean that hole up?

No need. It's just oil and the area is [water cooled] so sealed it is... once the sparkstick is sent home.. Vaseline is the same as electroshit. Are the plug ends [sparkstick side] coated with white shit? Vaz a smear in the sparkstick and wipe around the ribs so it's easier one everybody and NOTE the home is send it home. Once you think it's on, it moves more so know that feel or the spark has to jump at the plug end, right?

Maybe put a few drops of gas on the new plug threads

No. Oil is now thru the threads, who cares, pull them next 15k and see who is wet at the tips? Note that chem cook on the threads... if any. The threads are fine, know your magnetic field for chem action. Do I see white shit on the threads? No. Do I see the threads torn up? No. Do I see the need for seize?

Those plugs are in inch pounds and now look at the squish of the gasket as opposed to the new one. This separates the journeyman holding that torque wrench and the mechanic with the bike's tool kit's plug wrench. You need that feel for the crush and stop. This seals the compression, stops you from pulling out the threads with a questionable torque tool. Time to feel the most serviceable hole on the bike. By hand one leaves the journey behind.


Tormenting the motorcycling community one post at a time

Link | Top | Bottom


Welcome to zx14ninjaform.com!
 
New Topic Reply
Next Page

Page: 1 2

Previous Page

New Post

Please login to post a response.